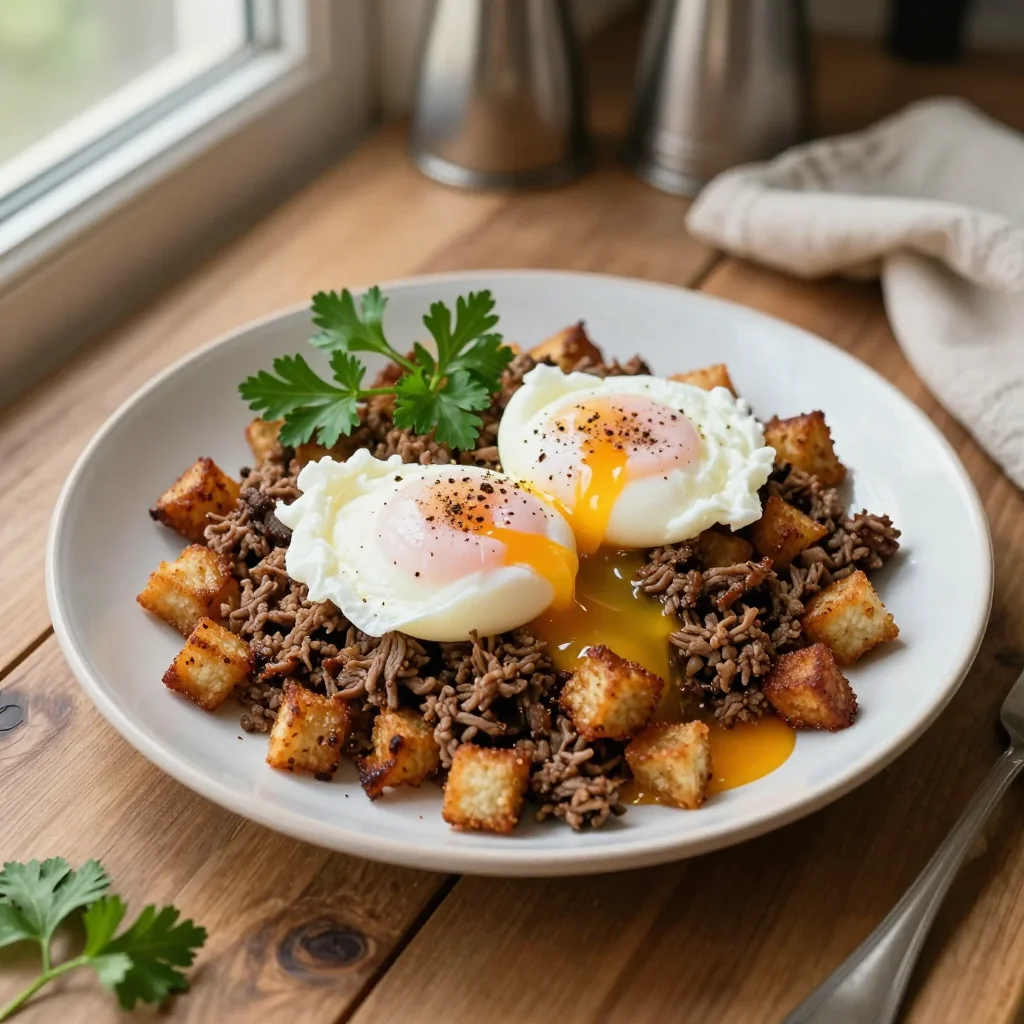
A hearty, comforting breakfast that blends salty corned beef, crisp potatoes, and perfectly poached eggs for a start you’ll never forget.
There’s a particular magic that happens when the aroma of sizzling potatoes mingles with the salty depth of corned beef, all crowned by a silky poached egg. I first discovered this dish on a chilly New England morning, sitting in a bustling diner where the chef tossed cubed potatoes into a hot skillet, letting them caramelize until they whispered golden secrets. The moment the poached egg slipped onto the heap, the yolk burst like sunrise, turning the whole plate into a comforting sunrise on a plate.
Rooted in Irish-American tradition, corned beef hash has long been a staple of hearty brunches, especially during St. Patrick’s Day celebrations. Its origins trace back to the practice of repurposing leftovers—corned beef, potatoes, and onions—into a quick, satisfying meal that could feed a crowd without fuss. Over the decades, home cooks have refined the technique, adding fresh herbs and a perfectly poached egg to elevate the dish from simple to spectacular.
In this guide, I’ll walk you through every nuance: from selecting the right cut of corned beef, to mastering the poach that yields a velvety yolk, to plating it in a way that looks as good as it tastes. You’ll learn the science behind crisping the potatoes without burning, how to balance seasoning, and tricks for making the poaching water stay perfectly gentle.
So tie on your apron, preheat that skillet, and let’s bring a little Irish comfort to your kitchen. Ready? Let’s dive in!
🌟 Why This Recipe Will Win Your Heart
Corned Beef Hash with Poached Eggs isn’t just a meal; it’s an experience that satisfies cravings, fuels the body, and brings people together around the table.
- ✨ Robust Flavor Balance: The salty, cured corned beef pairs with sweet, caramelized potatoes, while the poached egg adds a luxurious, buttery finish that ties everything together.
- ✨ Textural Harmony: Crispy edges, tender interiors, and a silky yolk create a symphony of textures that keep every bite interesting.
- ✨ Nutrient-Packed Breakfast: High-quality protein from beef and eggs, complex carbs from potatoes, and vitamins from herbs make this a balanced start to any day.
- ✨ Crowd‑Pleaser: Whether you’re feeding a family, brunching with friends, or preparing a weekend treat, the dish scales easily and looks impressive.
- ✨ Simple Yet Sophisticated: The technique is straightforward, but the result feels restaurant‑grade, perfect for home cooks who love a challenge.
- ✨ Versatile Foundation: Use it as a base for creative twists—add smoked paprika, swap in sweet potatoes, or top with avocado for a modern spin.
🥗 Ingredients
📝 Complete Ingredient List
For the Hash Base:
For the Poached Eggs:
For Garnish:
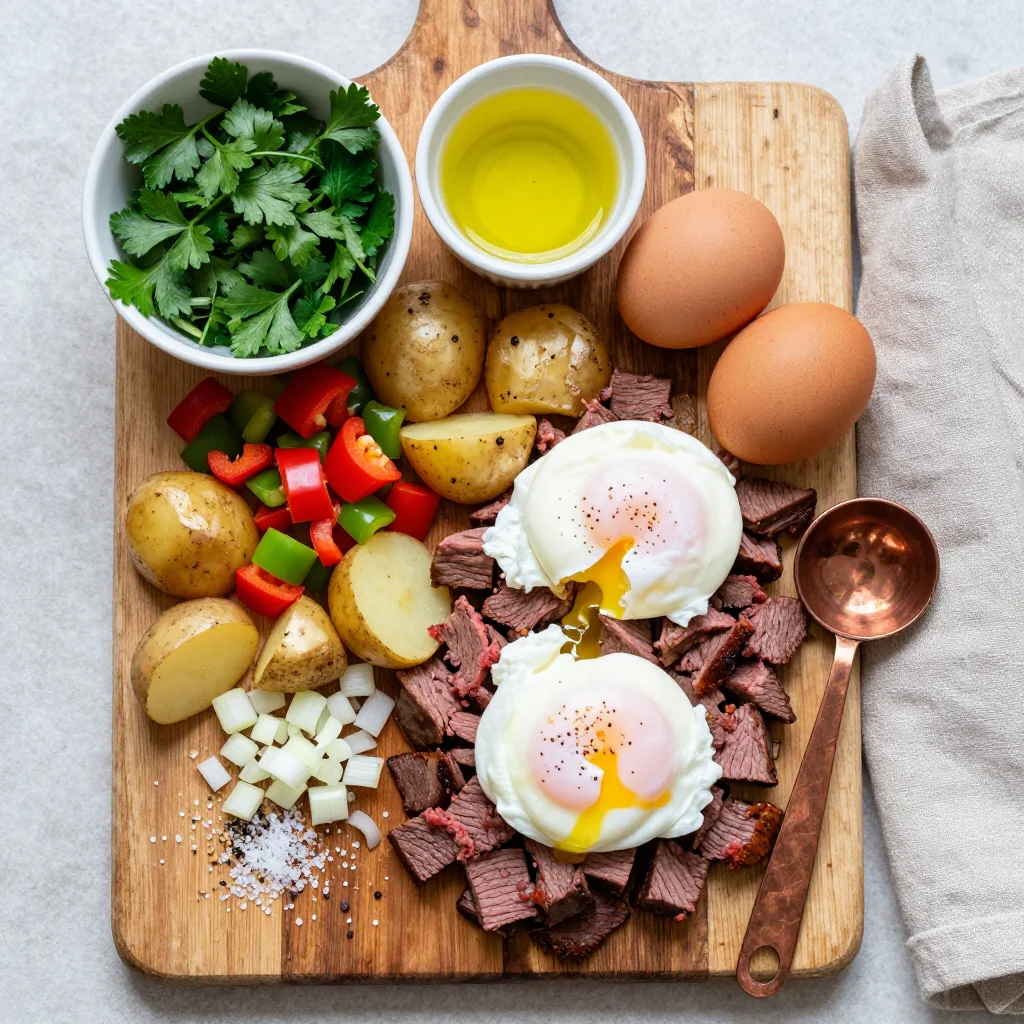
🔍 Focus on Key Ingredients
Corned Beef
Corned beef brings a distinctive salty, slightly peppery flavor that forms the backbone of this hash. When selecting, opt for a piece that still has a thin layer of fat—this renders during cooking, infusing the potatoes with richness. If you prefer a leaner version, you can trim excess fat, but keep a small amount for flavor.
Russet Potatoes
Russet potatoes are high in starch, which is essential for achieving that coveted crisp exterior while staying fluffy inside. Cutting them into uniform 1‑centimeter cubes ensures even cooking. Soaking the cubes in cold water for 10 minutes removes excess surface starch, preventing them from sticking together.
Fresh Herbs (Parsley & Chives)
Parsley and chives add a bright, herbaceous finish that cuts through the richness of the beef and butter. Add them at the very end of cooking to preserve their color and flavor. If you love a pop of freshness, a squeeze of lemon juice can also be drizzled just before serving.
🔄 Quick Substitutions
| If you don’t have… | Use instead… |
|---|---|
| Corned beef | Smoked ham, diced |
| Russet potatoes | Yukon Gold potatoes |
| White vinegar | Lemon juice |
👨🍳 Step‑by‑Step Instructions
Follow these detailed steps to create a hash that’s golden, fragrant, and perfectly balanced with poached eggs.
📋 Phase 1: Preparation & Mise en Place
Getting everything ready before the heat hits the pan ensures a smooth cooking process.
Dice the Corned Beef
Trim any large pieces of fat from the corned beef, then cut the meat into bite‑size cubes about 1 cm on each side. The uniform size allows the beef to brown evenly and release its savory juices into the pan. As you dice, notice the pink‑red hue that signals a good cure, and set the cubes aside on a plate.
Prep the Potatoes
Peel the russet potatoes and cut them into 1‑centimeter cubes, trying to keep each piece as uniform as possible. Place the cubes in a bowl of cold water and let them soak for 10 minutes; this removes surface starch and helps achieve a crisp texture later. After soaking, drain and pat dry thoroughly with a clean kitchen towel.
Chop the Onion & Herbs
Finely dice the yellow onion so it melts into the hash without overwhelming the other flavors. Roughly chop parsley and slice chives; keep them separate because they’ll be added at the very end to preserve their fresh color.
🔥 Phase 2: Cooking & Assembly
Now the magic happens—transforming raw ingredients into a cohesive, flavorful hash.
Sauté Onions and Beef
Heat a large cast‑iron skillet over medium‑high heat. Add 1 tbsp of butter and 1 tbsp of olive oil; the butter gives richness while the oil raises the smoke point. Once the butter foams, add the diced onion and sauté for 2‑3 minutes until translucent. Then add the corned beef cubes, spreading them in a single layer. Let them sear without stirring for 4‑5 minutes, allowing a deep caramelized crust to form.
Add Potatoes and Finish Cooking
Push the beef and onions to the edges of the pan, creating a well in the center. Add the remaining 1 tbsp of butter and the dried potato cubes. Sprinkle a generous pinch of black pepper. Let the potatoes sit undisturbed for 3‑4 minutes to develop a golden crust, then flip them with a spatula, mixing with the beef. Continue to cook, stirring occasionally, for another 10‑12 minutes until the potatoes are tender inside and crisp outside.
Poach the Eggs
While the hash finishes, bring 1 qt of water to a gentle simmer in a shallow saucepan. Add the white vinegar and a pinch of salt; the vinegar helps the whites coagulate quickly. Crack each egg into a small ramekin, then slide it gently into the water, keeping the eggs spaced apart. Poach for 3‑4 minutes for a runny yolk, or 5 minutes for a firmer center. Use a slotted spoon to lift each egg, letting excess water drip off.
✨ Phase 3: Finishing & Plating
The final touches bring everything together into a beautiful, Instagram‑ready dish.
Season and Garnish
Remove the skillet from heat. Taste the hash and adjust seasoning with additional pepper if needed. Sprinkle the chopped parsley, chives, and a pinch of red pepper flakes for a subtle heat. The fresh herbs add a pop of color and a bright flavor contrast to the rich hash.
Plate the Hash
Spoon a generous mound of hash onto each warmed plate, creating a shallow well in the center. Gently place a poached egg into the well, allowing the yolk to nestle against the potatoes and beef. The visual of the bright yolk against the golden hash is both appetizing and elegant.
Final Drizzle
If desired, drizzle a thin stream of melted butter or a dash of hot sauce over the top for extra richness and a hint of spice. This optional step adds a glossy finish that catches the light beautifully.
Serve Immediately
Serve the hash while the potatoes are still crisp and the egg yolk is molten. Pair with a simple green salad or crusty sourdough bread to round out the meal. Encourage diners to cut through the yolk, letting it cascade over the hash for an indulgent burst of flavor.
💡 Expert Tips & Tricks
🛒 Choosing the Right Ingredients
When shopping for corned beef, look for a piece that still has its natural brine, usually indicated by a pinkish hue and a light layer of fat. The fat is essential for flavor, but you can trim excess if you prefer a leaner dish. For potatoes, select russets that feel heavy for their size; they have the right starch content to become crispy without falling apart. Fresh herbs should be vibrant, not wilted, as they lose their aromatic oils quickly.
🔪 Preparation Techniques
Uniform cutting is the secret to even cooking. Use a sharp chef’s knife to dice the beef and potatoes quickly, reducing the time the ingredients spend on the cutting board and preserving their freshness. After dicing potatoes, a brief soak in cold water not only removes starch but also prevents oxidation, keeping the cubes white.
🌡️ Mastering the Cooking Process
Heat control is crucial. Start the skillet over medium‑high to get a quick sear on the beef, then lower to medium when adding potatoes. This prevents the potatoes from burning while the beef finishes cooking. Use a cast‑iron pan for even heat distribution; it retains heat and creates a superior crust.
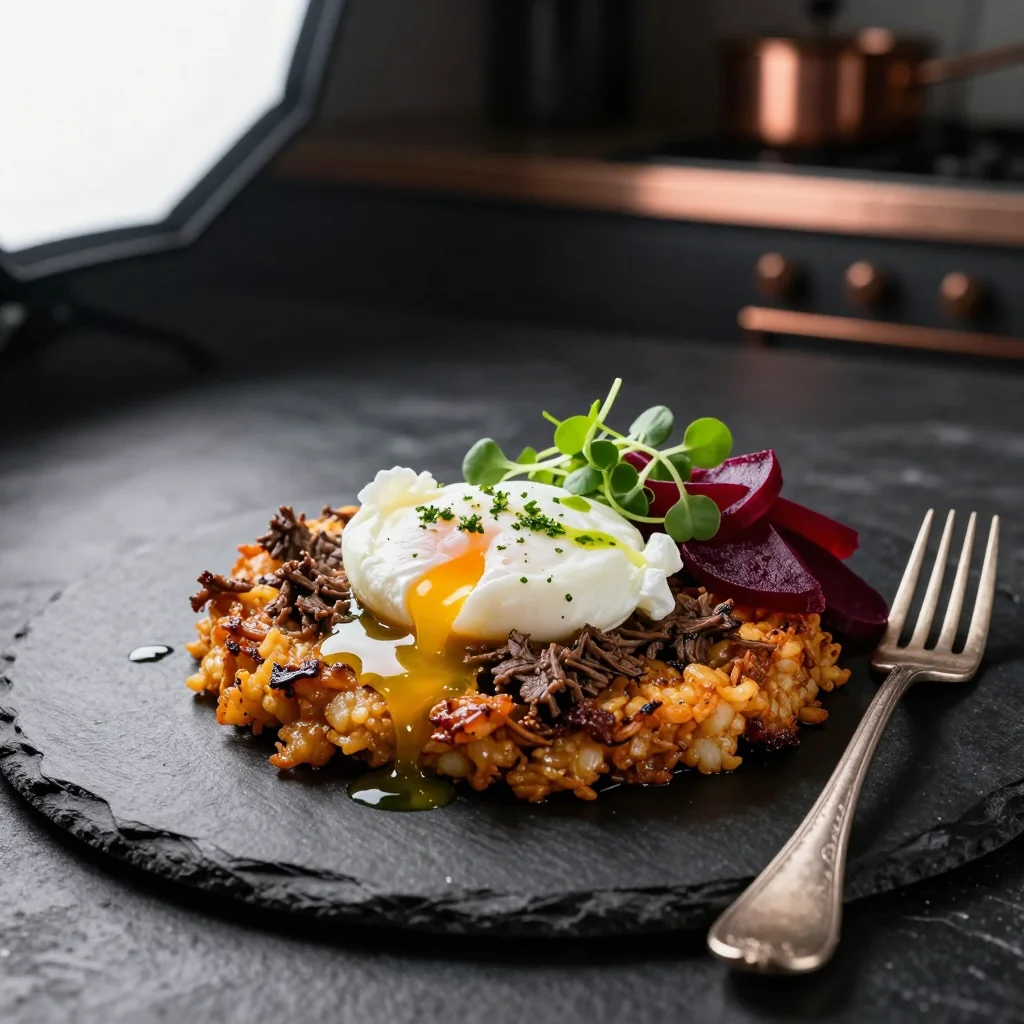
🍽️ Presentation & Service
For a restaurant‑style presentation, use a shallow bowl to shape the hash before transferring to the plate. This gives a neat, compact mound. Position the poached egg centrally, and finish with a light dusting of fresh herbs and a drizzle of melted butter. Serve with a side of toasted sourdough for added texture.
🏆 Pro Tips
Elevate your hash from home‑cooked comfort to a dish that could sit on a fine‑dining menu.
- 🎯 Use a Two‑Stage Sear: First, sear the corned beef alone to develop deep umami, then remove and set aside. Cook the potatoes in the rendered fat, and finally reincorporate the beef for a harmonious flavor blend.
- 🎯 Finish with a Butter‑Herb Emulsion: Whisk softened butter with minced parsley, chives, and a splash of lemon juice. Fold this emulsion into the hash just before plating for a glossy, luxurious finish.
- 🎯 Control Poaching Temperature: Keep the water just below a simmer (around 80 °C / 176 °F). Too vigorous a boil will cause the egg whites to fragment, while too low a temperature won’t set the whites properly.
- 🎯 Use a Silicone Spatula for Flipping: This tool allows you to turn the potatoes without breaking them, preserving their shape and ensuring uniform browning.
- 🎯 Add a Touch of Sweetness: A teaspoon of maple syrup or a drizzle of honey mixed into the butter can balance the saltiness of the corned beef, creating a more rounded flavor profile.
- 🎯 Rest Before Serving: Let the hash sit for 2‑3 minutes after removing from heat; this allows the flavors to meld and the potatoes to firm up slightly, preventing them from becoming soggy on the plate.
“A great hash is about balance—salt, fat, and a hint of acidity. When you master that, you’ve mastered comfort food.” — Chef Thomas Keller
🔄 Variations & Adaptations
The base recipe is a versatile canvas; feel free to experiment with flavors, textures, and dietary needs.
🥬 Vegetarian / Vegan Version
Replace the corned beef with smoked tempeh or marinated tofu cubes. Use vegetable broth in place of beef broth and add a pinch of smoked paprika to mimic the smoky depth. For a vegan poached “egg,” try a soft‑cooked chickpea patty seasoned with turmeric for a yolk‑like color.
- Substitution 1: 400 g smoked tempeh, diced
- Substitution 2: 4 tbsp vegan butter or olive oil for richness
🌶️ Flavor Variations
Play with global influences by adjusting spices and herbs. Below are three distinct flavor pathways you can follow.
Spicy Cajun Version:
Add 1 tsp Cajun seasoning, ½ tsp smoked paprika, and a dash of hot sauce to the hash. Top with sliced jalapeños for extra heat.
Mediterranean Twist:
Stir in chopped sun‑dried tomatoes, Kalamata olives, and a sprinkle of feta cheese. Finish with fresh oregano instead of parsley.
Asian Fusion Approach:
Incorporate 1 tbsp soy sauce, 1 tsp sesame oil, and a handful of sliced green onions. Garnish with toasted sesame seeds and a drizzle of sriracha mayo.
⚠️ Dietary Adaptations
Gluten‑Free:
All ingredients are naturally gluten‑free; just ensure the corned beef isn’t processed with wheat‑based fillers.
Lactose‑Free:
Replace butter with a lactose‑free margarine or extra olive oil. The dish remains rich without dairy.
Low‑Calorie:
Use half the amount of butter, add extra non‑starchy vegetables like bell peppers, and serve with a side of mixed greens to increase volume without many calories.
👶 Kid‑Friendly Version
For younger palates, reduce the amount of black pepper and omit red pepper flakes. Dice the potatoes into smaller, bite‑size pieces and consider using a milder ham instead of corned beef. Serve with a side of applesauce for a sweet‑savory contrast that children love.
📦 Storage & Reheating
🧊 Conservation
Refrigerator:
- Duration: 3 days
- Container: Airtight glass or BPA‑free plastic container
- Tip: Store the hash and poached eggs separately to maintain texture.
Freezer:
- Duration: 2 months
- Method: Cool the hash completely, portion into freezer‑safe bags, and label with date.
- Defrosting: Transfer to refrigerator overnight; reheat directly from frozen if needed.
💡 For best results, reheat only the hash portion; freshly poached eggs are always superior.
♨️ Reheating
🔥 Oven (Recommended):
- Preheat to 180 °C (350 °F).
- Cover the hash loosely with aluminum foil.
- Heat for 12‑15 minutes, stirring halfway.
- Remove foil, increase heat to 200 °C and crisp for an additional 3‑4 minutes.
⚡ Microwave (Quick):
- Place hash in a microwave‑safe dish, cover with a microwave‑safe lid.
- Heat on medium power for 1 minute, stir, then continue in 30‑second bursts until hot.
🍳 Skillet:
Reheat over medium heat with a splash of water or broth, stirring frequently to prevent sticking. This method restores crispness better than the microwave.
🍷 Perfect Pairings
🥗 Side Dishes
- Mixed Green Salad: A simple vinaigrette of lemon, olive oil, and Dijon adds brightness that cuts through the richness.
- Sautéed Spinach with Garlic: The slight bitterness balances the salty hash.
- Roasted Sweet Potato Wedges: Their natural sweetness complements the savory beef.
🍷 Wine & Beverage Pairings
- Irish Red Ale: Its caramel notes echo the sweet‑savory profile of the hash.
- Dry Riesling: The crisp acidity lifts the richness while matching the dish’s herbal notes.
- Non‑Alcoholic: Sparkling apple cider provides a fruity fizz that refreshes the palate.
🍰 To Complete the Meal
Begin with a light citrus sorbet to awaken the palate, follow with the hash as the main course, and finish with a warm apple crumble topped with a scoop of vanilla ice cream for a comforting finish.
❓ Frequently Asked Questions
Q: Can I use a pressure cooker for the hash?
While a pressure cooker can quickly tenderize the potatoes, it won’t give the desired crispy texture. The hallmark of a great hash is the caramelized crust, which is best achieved in a hot skillet. If you prefer to speed up the process, you can par‑boil the potatoes for 5 minutes before sautéing, but still finish them in the pan for crispness.
Q: How do I know when the poached egg is perfectly done?
A perfectly poached egg has a set white and a runny yolk. After 3‑4 minutes of gentle simmering, lift the egg with a slotted spoon and gently tap the side; the white should feel firm while the yolk yields to light pressure. If you prefer a firmer yolk, add an extra minute to the poaching time.
Q: What if I don’t have corned beef?
You can substitute with smoked ham, pastrami, or even a well‑seasoned brisket. The key is to retain a salty, slightly smoky profile. Adjust the seasoning accordingly—if the substitute is less salty, add a pinch more black pepper or a dash of soy sauce.
Q: My potatoes turn mushy; what went wrong?
Over‑crowding the pan and insufficient heat are common culprits. Ensure the skillet is hot before adding potatoes, and avoid stirring constantly; let each side develop a crust before flipping. Also, make sure the potatoes are thoroughly dried after soaking, as excess moisture creates steam.
Q: Can I make this recipe ahead of time?
Yes! Prepare the hash up to the final seasoning step, then cool and store. Reheat in the oven or skillet just before serving, and poach fresh eggs at the last minute for the best texture.
Q: How do I adjust the recipe for more or fewer servings?
Use the portion adjuster at the bottom of the recipe card. The script automatically recalculates ingredient quantities based on the number of servings you select. For manual scaling, keep the same ratio of beef to potatoes (approximately 1.25 : 1 by weight) and maintain the same number of eggs per serving.
🎉 Let’s Get Cooking!
This Corned Beef Hash with Poached Eggs brings together comfort, flavor, and a touch of elegance—all in one skillet. The combination of crispy potatoes, savory beef, and a luscious runny yolk makes it a perfect brunch centerpiece or a hearty dinner after a long day. By following the detailed steps, you’ll achieve a restaurant‑quality result that impresses family and friends alike.
Don’t be shy—experiment with the variations, adjust the heat, and make the dish truly yours. Share your creations, ask questions in the comments, and give the recipe a rating if you love it as much as we do.
Have you tried this recipe?
Leave a comment and rating below! Share your photos on Instagram with #HashAndEggs for a chance to be featured.
Corned Beef Hash with Poached Eggs
A hearty breakfast combining crisp potatoes, savory corned beef, and silky poached eggs.
📝 Ingredients
Hash Base
Poached Eggs
Garnish
👨🍳 Instructions
- 1
Dice the corned beef into 1 cm cubes, pat dry, and set aside.
- 2
Peel and cube the potatoes, soak in cold water for 10 minutes, then drain and pat dry.
- 3
Finely chop the onion and set aside; keep parsley and chives separate for later.
- 4
Heat butter and olive oil in a large skillet over medium‑high; sauté onion until translucent.
- 5
Add the corned beef, spread evenly, and sear without stirring for 5 minutes to develop a crust.
- 6
Push meat to the side, add remaining butter, then add potatoes; let them sit untouched for 3 minutes before flipping.
- 7
Continue cooking, stirring occasionally, until potatoes are golden and tender, about 12 minutes total.
- 8
Meanwhile, bring water with vinegar to a gentle simmer; poach each egg for 3‑4 minutes.
- 9
Season the hash with black pepper, fold in fresh herbs, and optionally add red pepper flakes.
- 10
Plate the hash, nestle a poached egg on top, drizzle with melted butter if desired, and serve immediately.
🥗 Nutritional Information (per serving)
*Values are estimates based on standard ingredient brands.
📚 You Might Also Like
Classic Irish Beef Stew
Smoked Salmon Eggs Benedict
Potato and Herb Frittata


💬 Comments & Reviews
Leave a Comment
No comments yet. Be the first to share your thoughts!