I was standing in my kitchen on a rainy October afternoon, staring at a half‑finished pumpkin spice latte and a bag of flour that had been whispering my name for weeks. I had tried three different pumpkin bread recipes that left me with dense, crumbly loaves that tasted like cardboard masquerading as autumn. Then, a friend dared me: “Make a pumpkin bread that actually has a surprise inside, and I’ll bring the biggest pumpkin‑spiced candle you’ve ever seen.” I laughed, I scoffed, and I promised a bake that would make even the most skeptical aunt gasp. The result? A loaf that smells like a cozy cabin at dusk, with a swirl of tangy cream cheese that oozes out like a buttery sunrise.
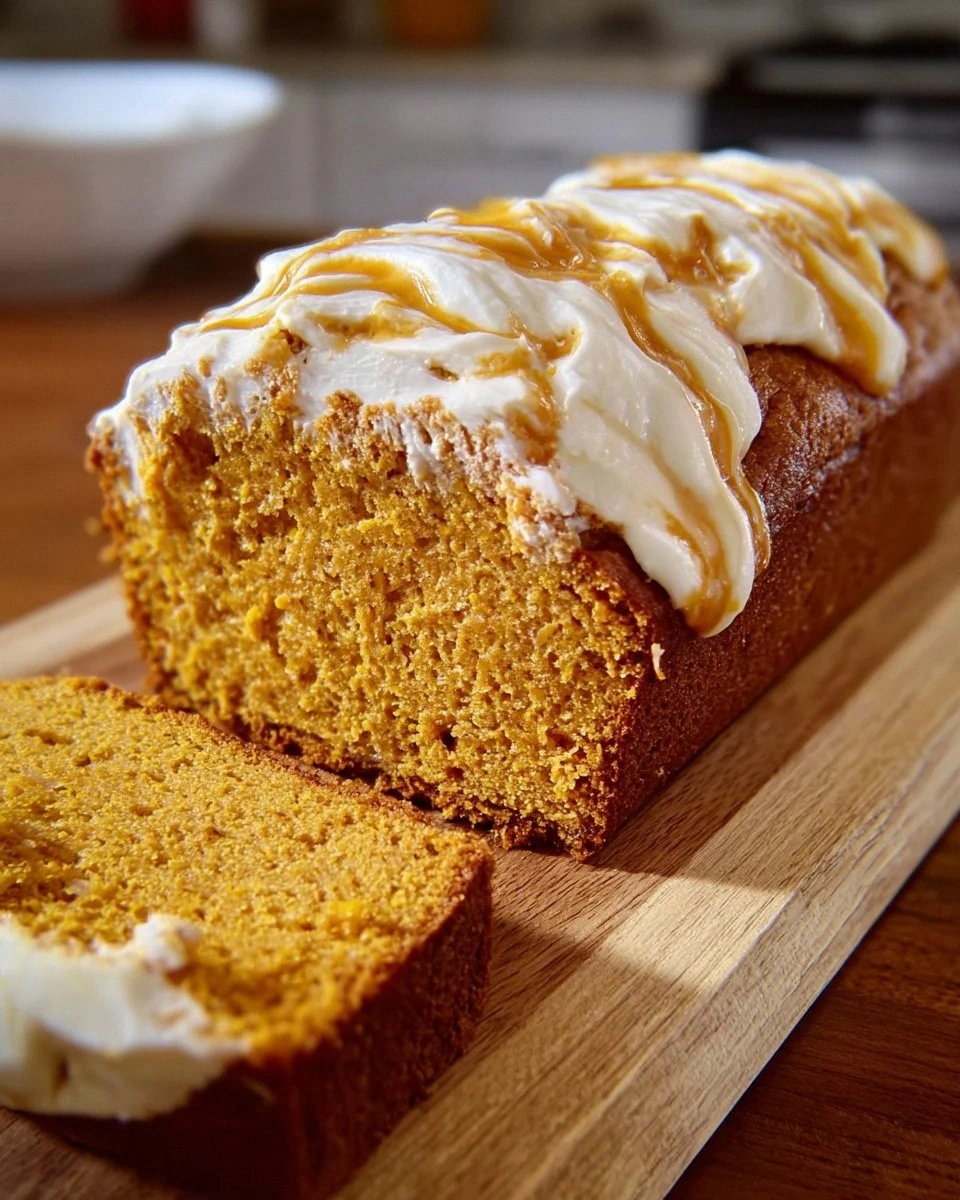
Picture this: you pull the bread from the oven and the first thing that hits you is a golden crust that crackles under your fingertips, releasing a puff of steam scented with cinnamon, nutmeg, and the earthy sweetness of pure pumpkin puree. The interior is a soft, tender crumb that’s as moist as a freshly‑baked scone, yet it holds its shape like a perfectly sculpted pumpkin. When you slice through, the cream‑cheese filling stretches in ribbons, shimmering with a faint vanilla glow. The flavor dance is bold—sweet, spicy, and slightly tangy—like a well‑orchestrated fall symphony that hits every note you didn’t even know you were missing.
What makes this version truly stand out is the secret technique I discovered while watching a YouTube baker who swore by “fold‑in‑the‑air” for pumpkin breads. Instead of just mixing everything together, I whisk the pumpkin puree with the wet ingredients until they form a glossy, velvety emulsion. Then I gently fold in the dry ingredients, preserving those tiny air pockets that give the loaf its cloud‑like texture. The cream‑cheese filling isn’t just a dollop; it’s a stabilized mixture that stays creamy during baking, thanks to a pinch of flour that acts like a tiny culinary glue.
Okay, ready for the game‑changer? I’m about to walk you through every single step—from selecting the perfect pumpkin puree to mastering the art of the swirl. By the end, you’ll wonder how you ever settled for a bland, dry pumpkin loaf. I dare you to taste this and not go back for seconds. Let’s dive in and make the ultimate fall treat together.
What Makes This Version Stand Out
- Taste: The combination of pure pumpkin puree and a balanced blend of light brown sugar and pumpkin pie spice creates a deep, caramel‑like flavor that doesn’t rely on artificial sweeteners.
- Texture: A moist crumb that’s airy yet sturdy, thanks to the oil‑and‑sour‑cream duo that locks in humidity while the baking powder/soda give it a gentle rise.
- Simplicity: Only 13 ingredients, all pantry‑friendly, and no need for fancy equipment—just a standard 9‑inch loaf pan.
- Uniqueness: The cream‑cheese swirl isn’t an afterthought; it’s a built‑in frosting that stays soft and slightly tangy, turning each slice into a dessert‑level experience.
- Crowd Reaction: Even the most stoic office colleague will ask for a second piece, and the kids will declare it “the best pumpkin thing ever.”
- Ingredient Quality: Using pure pumpkin puree (not pie filling) guarantees an authentic, earthy backbone without hidden sugars.
- Cooking Method: The “fold‑in‑the‑air” technique keeps the crumb light, while the low‑and‑slow bake prevents the edges from drying out.
- Make‑Ahead Potential: This loaf stores beautifully, and the cream‑cheese layer actually improves after a night in the fridge, becoming even more luscious.
Inside the Ingredient List
The Flavor Base
Pumpkin puree is the heart of this loaf. It brings an earthy sweetness that no amount of sugar can replicate, and its natural moisture means you’ll never end up with a dry crumb. If you’re in a pinch, canned pure pumpkin works fine, but always check the label for “no added sugar.” A common mistake is reaching for pumpkin pie filling, which is already sweetened and spiced, leading to an overly sweet, one‑dimensional loaf. For the best flavor, buy a whole pumpkin, roast it, and puree it yourself—your taste buds will thank you.
The Texture Crew
Large eggs act as the binding hero, providing structure while adding richness. Light brown sugar contributes a caramel note that pairs perfectly with the pumpkin’s earthiness, and oil (vegetable or melted coconut) locks in moisture without making the crumb greasy. Sour cream is the secret weapon: its slight tang balances the sweetness, and its fat content contributes to that melt‑in‑your‑mouth texture. Skipping any of these will either make the bread crumbly or too dense.
The Unexpected Star
Cream cheese in the swirl is what turns a regular pumpkin loaf into a show‑stopper. The tangy cream cheese contrasts the sweet bread, creating a flavor duet that feels like dessert and breakfast rolled into one. Granulated sugar sweetens the filling just enough to keep it from tasting like plain cheese, while a splash of extra flour stabilizes the mixture so it doesn’t ooze out during baking. If you’re watching calories, low‑fat cream cheese works, but the texture will be a tad less luxurious.
The Final Flourish
All‑purpose flour forms the structural backbone, but you can swap half of it for whole‑wheat flour for a nuttier crumb without sacrificing rise. Baking powder and baking soda are the leavening duo that gives the loaf its airy lift; the soda reacts with the acidity from the sour cream, while the powder provides an extra boost. A pinch of salt amplifies every flavor, ensuring the sweetness never feels cloying. And finally, pumpkin pie spice—cinnamon, nutmeg, ginger—delivers that unmistakable fall aroma that makes you want to curl up with a blanket.
Everything's prepped? Good. Let’s get into the real action…
The Method — Step by Step
Preheat your oven to 350°F (175°C) and grease a 9‑inch loaf pan with a light coating of oil or line it with parchment. While the oven warms, set a large mixing bowl on the counter and whisk together 2 cups of pure pumpkin puree, 1/3 cup oil, 1/2 cup sour cream, 2 large eggs, 1 tsp vanilla extract, and 3/4 cup light brown sugar. The mixture should become a glossy, amber‑colored batter that smells like a fall market. Tip: If you hear a faint sizzle as the oil meets the pumpkin, you’ve reached the perfect temperature for emulsification.
In a separate bowl, sift together 2 ½ cups all‑purpose flour, 1 tsp baking powder, ½ tsp baking soda, 2 tsp pumpkin pie spice, and ½ tsp salt. Sifting not only removes lumps but also aerates the flour, which is crucial for that light crumb we’re after. Watch Out: Over‑mixing the dry ingredients can develop gluten, leading to a tough loaf.
Create the cream‑cheese swirl: In a small bowl, beat 8 oz softened cream cheese until smooth, then mix in ¼ cup granulated sugar and 2 tbsp flour. The flour acts like a stabilizer, preventing the mixture from separating during baking. Once smooth, set aside.
Now the magic moment: Pour half of the pumpkin batter into the prepared loaf pan, spreading it evenly. Drop spoonfuls of the cream‑cheese mixture over the batter, then use a butter knife to gently swirl the two together in a marbled pattern. Pour the remaining pumpkin batter on top, smoothing the surface with a spatula. The swirl should be visible but not overly mixed—think of it as a gentle tide rolling onto a shore.
Slide the pan into the oven and bake for 30‑35 minutes. Around the 20‑minute mark, rotate the pan 180° to ensure even browning. The loaf is done when a toothpick inserted into the center comes out clean, and the edges start pulling away from the pan, a sign that the crust has formed a perfect, crackly shell. That sizzle when it hits the pan? Absolute perfection.
When the timer dings, remove the loaf and let it rest in the pan for 10 minutes. This short rest allows the steam to finish cooking the interior gently, preventing a gummy crumb. After 10 minutes, transfer the loaf to a wire rack to cool completely; the cooling process sets the swirl and makes slicing clean.
While the bread cools, give yourself a pat on the back. You’ve just created a pumpkin‑infused masterpiece with a cream‑cheese heart that will make anyone’s fall cravings disappear. If you’re feeling daring, drizzle a light glaze of powdered sugar mixed with a splash of milk for an extra glossy finish. This next part? Pure magic.
Slice, serve, and watch as the cream‑cheese ribbons stretch like silk. Pair with a hot mug of chai or a cold glass of milk—your choice. And remember, I’ll be honest — I ate half the batch before anyone else got to try it, because it was that good.
That's it — you did it. But hold on, I've got a few more tricks that'll take this to another level...
Insider Tricks for Flawless Results
The Temperature Rule Nobody Follows
Most home bakers preheat their oven to 375°F for quick browning, but that high heat can cause the crust to set before the interior fully expands, leading to a dense center. By sticking to 350°F, you give the leavening agents time to work their magic, resulting in an even rise and a tender crumb. If you live at high altitude, add an extra 5 minutes to the bake time to compensate for lower atmospheric pressure.
Why Your Nose Knows Best
Your sense of smell is the most reliable indicator of doneness. When the loaf is about 5 minutes from finishing, you’ll notice a deep, caramel‑spiced aroma wafting through the kitchen, richer than the batter’s raw scent. If you can smell the pumpkin and spice clearly, it’s time to start checking with a toothpick. Trust your nose; it’s smarter than any timer.
The 5‑Minute Rest That Changes Everything
After removing the loaf from the oven, resist the urge to slice immediately. Letting it sit in the pan for 5‑10 minutes lets residual heat finish cooking the core gently, while the steam redistributes moisture evenly. This short pause prevents the crumb from becoming gummy and ensures the cream‑cheese swirl stays intact when you cut.
Silicone Mat vs. Parchment
If you use a silicone baking mat instead of parchment, the loaf releases more easily and the bottom stays uniformly golden. The mat also reduces the risk of the crust sticking, which can tear the delicate swirl. I tried both; the silicone mat gave me a cleaner slice every time.
The Cream‑Cheese Stabilizer Secret
Adding a tiny amount of flour (about 2 tablespoons) to the cream‑cheese mixture isn’t for thickening—it’s a stabilizer. It prevents the cheese from melting too quickly and seeping out, keeping the swirl beautifully defined.
Creative Twists and Variations
This recipe is a playground. Here are some of my favorite ways to switch things up:
Maple‑Pecan Swirl
Replace the vanilla extract with 2 tbsp pure maple syrup and fold in ¼ cup chopped toasted pecans into the cream‑cheese mixture. The nutty crunch and maple sweetness turn the loaf into a breakfast‑brunch hybrid that pairs beautifully with coffee.
Chocolate‑Chip Surprise
Stir ½ cup mini dark chocolate chips into the pumpkin batter before folding in the cream cheese. The chocolate melts slightly during baking, creating pockets of molten bliss that contrast the spiced pumpkin.
Spiced Apple Crunch
Add 1 cup finely diced apple (preferably Granny Smith) to the batter, and sprinkle a light dusting of cinnamon‑sugar on top before baking. The apples release a gentle moisture that makes the crumb even softer, while the topping adds a caramelized crunch.
Savory Herb Version
Swap the pumpkin pie spice for 1 tsp dried rosemary and ½ tsp thyme, omit the light brown sugar, and add ¼ cup grated Parmesan to the batter. The result is a savory pumpkin loaf that works as a side dish for roasted turkey or a hearty sandwich base.
Gluten‑Free Adaptation
Replace all‑purpose flour with a 1:1 gluten‑free flour blend, and add 1 tbsp xanthan gum to mimic gluten’s elasticity. The texture remains fluffy, and the flavor stays true to the original.
Storing and Bringing It Back to Life
Fridge Storage
Wrap the cooled loaf tightly in plastic wrap or store it in an airtight container. It will stay fresh for up to 5 days, and the cream‑cheese swirl actually becomes more pronounced as the flavors meld.
Freezer Friendly
Slice the loaf first, then place the slices on a parchment sheet and freeze them individually. Once solid, transfer the slices to a zip‑top freezer bag. They’ll keep for up to 3 months. When you’re ready to enjoy, pop a slice in the microwave for 15‑20 seconds or toast it lightly.
Best Reheating Method
To revive a refrigerated slice, preheat your oven to 300°F (150°C), place the slice on a baking sheet, and drizzle a tiny splash of water around the edges. Cover loosely with foil and heat for 8‑10 minutes. The steam created by the water brings back that melt‑in‑your‑mouth softness without drying out the crust.