My first attempt at homemade pickles ended in what I can only describe as a cucumber crime scene. The jars sat on my counter like green glass tombstones, each one containing limp, soggy spears that tasted like they'd been marinating in a swimming pool. I stood there, pickle juice dripping from my disappointed fingers, wondering how something so simple could go so catastrophically wrong. Fast forward through three months of obsessive testing, twelve different vinegar ratios, and enough cucumbers to feed a small army, and I've cracked the code to the crunchiest, most addictive canned dill pickles you'll ever taste.
Picture this: It's 3 AM, and I'm standing in my kitchen bathed in refrigerator light, crunching into a perfectly preserved pickle that snaps so loudly my cat bolts from the room. The brine hits my tongue with that perfect balance of tang and salt, the garlic whispers its presence, and the dill blooms across my palate like summer in a jar. That first successful batch disappeared faster than free pizza at a college party, and I found myself hiding jars in the back of the pantry like some kind of pickle dragon guarding her treasure.
If you've ever struggled with soft pickles, over-salted brine, or that weird metallic aftertaste that haunts store-bought versions, you're not alone — and I've got the fix. This isn't just another canning recipe; it's a foolproof system that guarantees that satisfying crunch every single time. We're talking about pickles so good, you'll be making excuses to open jars just to hear that perfect pop of the seal breaking.
Let me walk you through every single step — by the end, you'll wonder how you ever made it any other way.
What Makes This Version Stand Out
Armageddon-Level Crunch: The secret lies in a calcium-rich bath that transforms cucumber cell walls into fortresses of crispness. While most recipes skip this crucial step, we're using a natural ingredient that keeps every bite snapping like fresh snow underfoot. Your teeth will thank you, and your sandwich game will never be the same.
Flavor That Punches Back: This isn't your grandmother's polite pickle. We're building layers of flavor that start with bright vinegar, dive into savory garlic, and finish with dill that tastes like it was picked five minutes ago. Each jar is a flavor bomb that explodes across your taste buds.
Idiot-Proof Simplicity: No special equipment, no confusing ratios, no chemistry degree required. I've stripped this down to the absolute essentials that guarantee success, even if you've never canned anything in your life. If you can boil water and count to three, you can master this recipe.
The Perfect Salt Balance: Most recipes either leave you reaching for water or tasting nothing but brine. We've cracked the code on the exact salt ratio that makes flavors sing without overwhelming the delicate cucumber essence. It's like finding the perfect volume on your favorite song.
Year-Round Garden Magic: These pickles capture the essence of summer in a way that transports you to backyard gardens even in the dead of winter. Opening a jar in January feels like cheating time itself.
Crowd Psychology: Bring these to any gathering and watch grown adults turn into competitive pickle monsters. I've seen polite dinner parties devolve into full-contact jar passing, with guests claiming dibs on the last spear like it's the final lifeboat on the Titanic.
Inside the Ingredient List
The Fresh Foundation
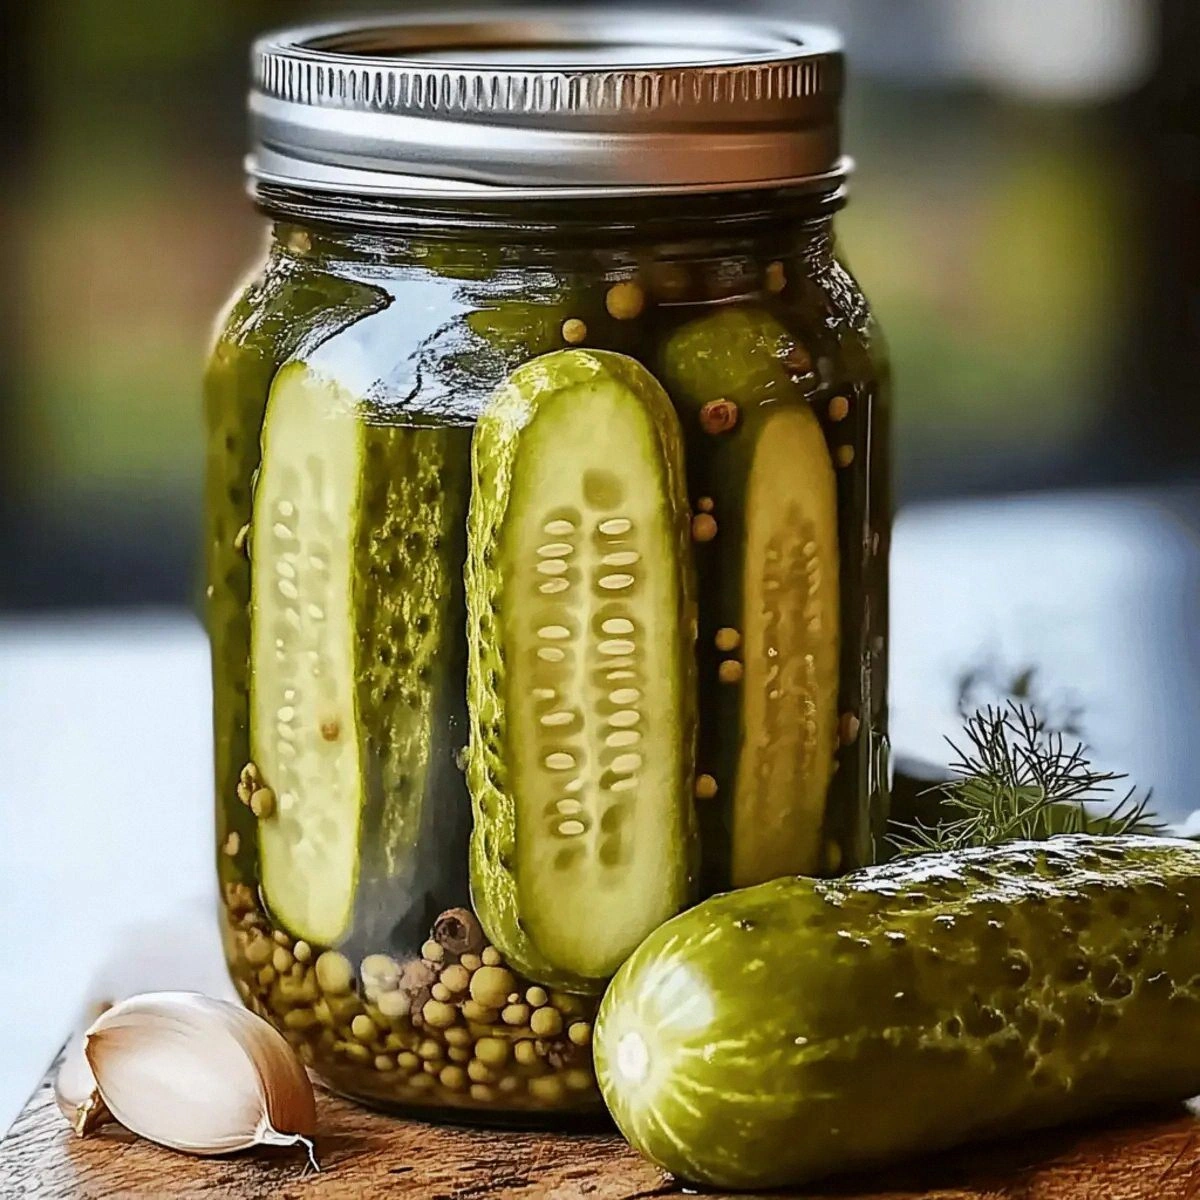
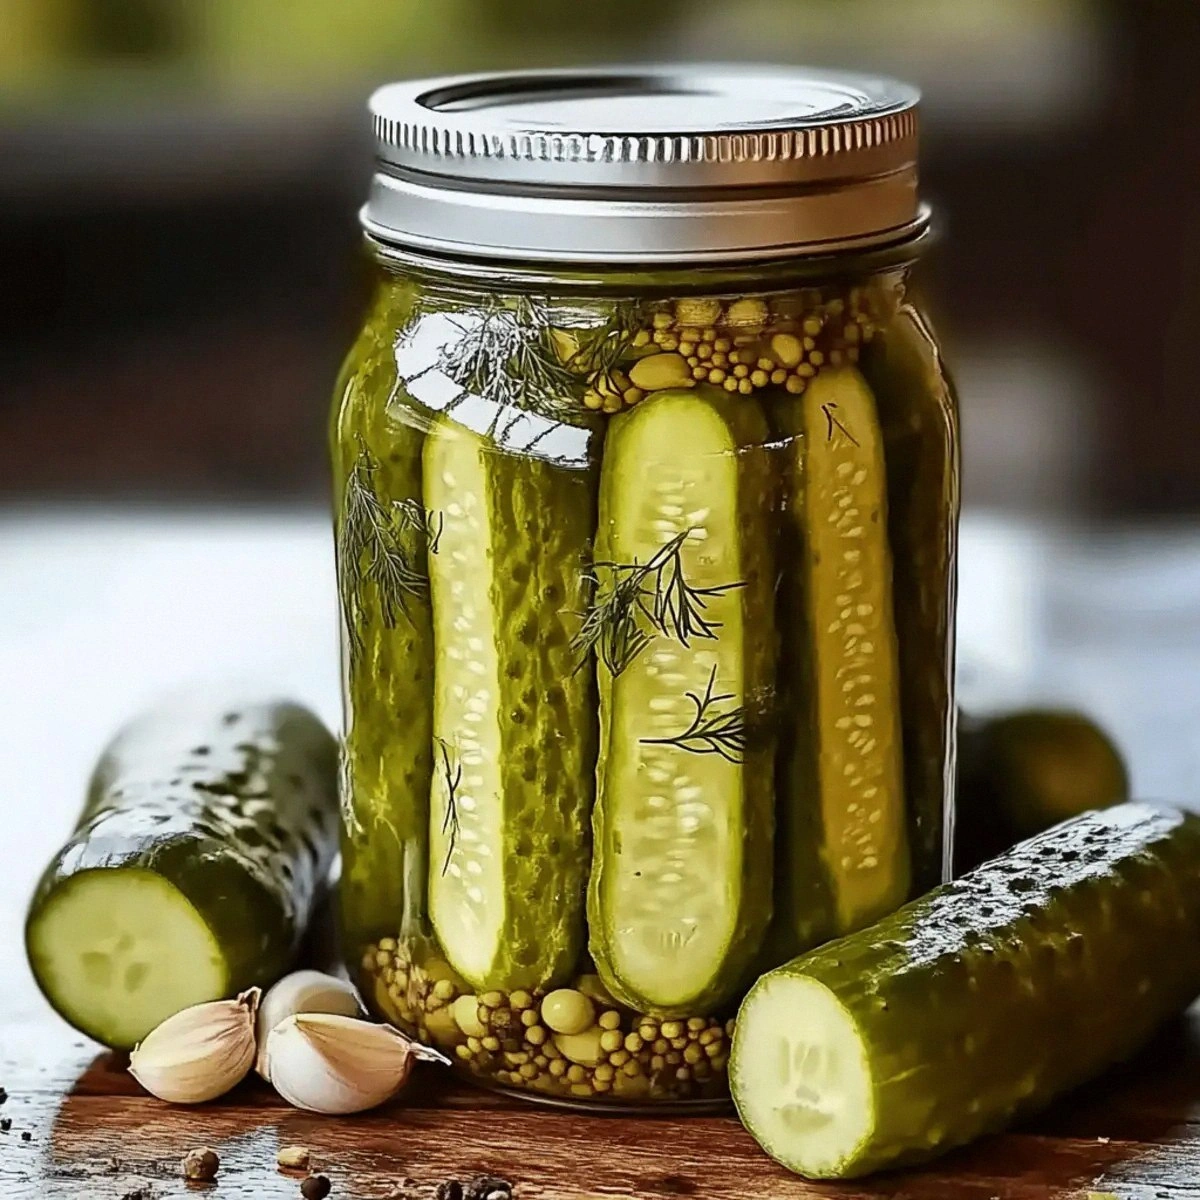
Pickling cucumbers are the undisputed stars of this show, and choosing them wrong is like casting a drama student in an action movie. You want small, firm specimens that feel heavy for their size, with skins so tight they practically squeak when you rub them. Avoid anything with yellow spots or soft ends — those are retirement-home cucumbers that have given up on life. The fresher your cucumbers, the more snap they'll retain through the canning process, so buy from farmers markets if possible, or at least choose the perkiest ones from your grocery store.
Garlic cloves aren't just along for the ride; they're flavor depth charges that slowly infuse the brine with savory complexity. Skip the pre-minced stuff in jars — it tastes like disappointment and regret. Fresh garlic should feel solid and tight in its papery skin, not hollow or sprouting green shoots. Each clove releases its essence over time, transforming the brine from simple vinegar to something that makes your mouth water just thinking about it.
The Herb Heroes
Fresh dill sprigs are what separate the real dill pickles from the imposters that rely on dried herbs or (gasp) dill seed alone. Fresh dill fronds should look perky and bright green, never wilted or yellowing. The feathery leaves carry volatile oils that dance between grassy and citrusy, creating that unmistakable pickle perfume. If you can find dill heads with seeds attached, grab them — those seeds add another layer of dill complexity that makes each bite more interesting.
The Brine Builders
Water quality matters more than you'd think. If your tap water tastes like a swimming pool, your pickles will too. Use filtered water or spring water for the cleanest flavor canvas. The water carries all the other flavors, so starting with something that tastes like nothing is actually perfect.
White vinegar provides the acidic backbone that makes pickles safe for canning and gives them their signature tang. Don't get fancy with apple cider vinegar or rice vinegar here — they have lower acidity levels that can compromise both flavor and food safety. The vinegar should be 5% acidity, which is standard for most brands, but check the label to be sure.
The Flavor Balancers
Salt isn't just for saltiness — it's a flavor amplifier that makes everything else taste more like itself. Use pickling salt or kosher salt, never table salt with iodine, which can turn your brine cloudy and give pickles a metallic edge. The salt ratio is non-negotiable for safety, so don't try to reduce it for health reasons.
Sugar might seem like an odd addition to dill pickles, but it's the secret weapon that rounds out harsh edges and creates depth. Just one tablespoon transforms the entire brine from one-dimensional to complex and satisfying. It's like the difference between a solo performance and a full orchestra.
Everything's prepped? Good. Let's get into the real action...
The Method — Step by Step
- Start with a hot soapy bath for your cucumbers — scrub them gently but thoroughly under cool running water. This removes the waxy coating that can prevent brine absorption and any field dirt that snuck through. Trim off the blossom ends (the flat, scarred side) using a sharp knife or vegetable peeler, because these contain enzymes that can turn your pickles mushy faster than you can say "failed experiment." Leave them whole for maximum crunch, or slice them into spears if you're feeling fancy and want faster flavor penetration.
- Pack your sterilized jars like you're playing Tetris, standing the cucumbers upright and cramming them in until you can't fit another one. Add garlic cloves and dill sprigs between layers, distributing them evenly so every serving gets its fair share of flavor. The goal is to fill the jar completely while leaving 1/2 inch of headspace at the top — too much air leads to floating pickles that look sad and defeated.
- Create your brine by combining water, vinegar, salt, and sugar in a non-reactive saucepan. Bring it to a rolling boil that looks like it's auditioning for a witch's cauldron, stirring occasionally to dissolve the salt and sugar completely. This is the moment of truth when separate ingredients become something magical.
- Pour the hot brine over the cucumbers slowly, working a little at a time to let air bubbles escape. Use a chopstick or plastic knife to slide along the sides, releasing any trapped air pockets that could cause spoilage. Leave that crucial 1/2 inch headspace at the top — this isn't the time to be generous with liquid.
- Wipe the jar rims with a clean, damp cloth to remove any brine that could prevent proper sealing. Place the lids on and screw the bands until just fingertip-tight — overtightening prevents air from escaping during processing, which leads to buckled lids and broken seals.
- Process the jars in a boiling water bath for exactly 15 minutes, starting the timer when the water returns to a full boil. The water should cover the jars by at least 1 inch — add more boiling water if needed. This isn't the time to multitask and fold laundry, because timing is crucial for both safety and texture.
- Remove the jars using jar lifters and place them on a towel-covered counter, leaving them undisturbed for 24 hours. Listen for the satisfying "pop" of the seals setting — it's like tiny applause for your canning success. Resist the urge to press on the lids or check them obsessively; let them do their thing in peace.
- After 24 hours, check that all lids have sealed by pressing the center — it shouldn't flex up and down. Any unsealed jars go straight into the fridge for immediate consumption, which isn't exactly a punishment. Store sealed jars in a cool, dark place for at least 2 weeks before opening to let flavors develop and mingle.
- When you're ready to open your first jar, run it under hot water for 30 seconds to loosen the lid, then listen for that beautiful pop. The first taste is always a revelation — bright, tangy, with that perfect crunch that makes you close your eyes involuntarily. Fair warning: once you start, it's genuinely hard to stop.
That's it — you did it. But hold on, I've got a few more tricks that'll take this to another level...
Insider Tricks for Flawless Results
The Temperature Rule Nobody Follows
Here's the thing that separates pickle masters from pickle disasters: temperature control throughout the entire process. Start with ice-cold cucumbers straight from the fridge, because cold cell walls hold their structure better when hit with hot brine. Your brine should be at a full rolling boil when it hits the jars, creating a temperature shock that sets the texture. After processing, cool the jars gradually at room temperature — no fridge shortcuts or cold water baths, which can cause thermal shock and mushy pickles. I learned this the hard way after a batch that tasted fine but had the texture of wet tissue paper.
Why Your Nose Knows Best
Trust your sense of smell at every stage. Fresh cucumbers should smell like morning dew and garden soil, never sour or musty. The brine should smell bright and vinegary with herbal notes, never harsh or chemical. When you open a properly sealed jar months later, the aroma should make your mouth water instantly — if it smells off or has any moldy, yeasty notes, trust your instincts and toss it. Your nose is your built-in quality control system that's been perfected over thousands of years of evolution.
The 5-Minute Rest That Changes Everything
After you fill the jars with brine but before you apply the lids, let them sit for exactly 5 minutes. This brief pause allows the cucumbers to absorb some liquid and settle, often dropping enough to add another spear or two. It also lets air bubbles rise to the surface naturally, so you don't have to chase them around with a knife. Those five minutes feel like an eternity when you're eager to finish, but they make the difference between amateur and professional-looking jars.
The Crunch Test Protocol
Before committing to a full batch, test your cucumber quality with a simple crunch test. Break one in half — it should snap cleanly with almost no bending. If it bends like a green bean or has a rubbery texture, these cucumbers are past their prime and will never achieve true crunch no matter how perfectly you follow the recipe. Fresh cucumbers sound different when you cut them too — listen for that crisp, almost musical sound when your knife hits them.
Creative Twists and Variations
This recipe is a playground. Here are some of my favorite ways to switch things up:
The Spicy Inferno
Add one sliced jalapeño and a teaspoon of red pepper flakes to each jar for pickles that pack heat. The vinegar carries the capsaicin throughout the brine, creating a slow-building burn that complements the cool cucumber perfectly. These disappear fastest at summer barbecues, where people keep returning for "just one more" until the jar's empty.
The Garlic Bomb
Double the garlic and add a teaspoon of garlic powder to the brine for pickle breath that could kill vampires. The garlic intensifies over time, so these actually get better after a month. Serve them to people you really like, because they'll be breathing garlic for hours afterward.
The Bread and Butter Remix
Add a cinnamon stick, a few cloves, and increase the sugar to 1/4 cup for a sweet-savory hybrid that converts even dill pickle purists. The warm spices create a nostalgic flavor that reminds people of their grandmother's pickles, even if their grandmother never made pickles.
The Everything Bagel
Add a teaspoon each of sesame seeds, poppy seeds, dried onion, and dried garlic to each jar. The result tastes like your favorite bagel seasoning got drunk and fell into a pickle jar. They're absolutely incredible on sandwiches or chopped into potato salad.
The Asian Fusion
Replace half the white vinegar with rice vinegar and add a tablespoon of soy sauce, a slice of fresh ginger, and a star anise to each jar. These pickles have an umami depth that works beautifully with Asian-inspired meals or as a surprising addition to a cheese board.
The Garden Overload
Add a slice of carrot, a strip of bell pepper, and a few cauliflower florets to each jar for colorful mixed pickles. The different vegetables absorb the brine at different rates, creating textural variety and making each bite a surprise. Plus, it's a great way to use up garden excess before it goes bad.
Storing and Bringing It Back to Life
Fridge Storage
Once opened, your pickles will keep in the refrigerator for up to 2 months if properly stored. Always use a clean fork or tongs to remove pickles — no fingers, no used utensils, no exceptions. The brine is naturally acidic and salty, creating an environment hostile to most bacteria, but introducing contaminants can still cause spoilage. Keep the pickles submerged in brine by adding a small piece of crumpled plastic wrap on top if needed, which prevents oxidation and keeps them crisp.
Freezer Friendly
While you can't freeze the pickles themselves (the texture turns to mush when thawed), you can freeze the brine for future batches. Pour cooled brine into ice cube trays, freeze, then transfer to freezer bags. These brine cubes are perfect for adding acidity to soups, stews, or for quick pickling vegetables when you don't want to make a full batch. They're also fantastic in Bloody Marys — just drop one in instead of ice.
Best Reheating Method
These pickles are meant to be served cold, straight from the fridge for maximum crunch. However, if you find yourself with a jar of pickles that have lost their snap, you can revive them by soaking in ice water for 30 minutes before serving. For chopped pickles in recipes like tuna salad or potato salad, dice them while they're cold but let them come to room temperature for 10 minutes before mixing — cold pickles straight from the fridge can make your other ingredients seize up and not combine properly.