Picture this: a frantic Saturday night, the kids are screaming “Santa!” at the top of their lungs, the oven is already humming, and I’m standing over a bowl of melted chocolate that looks like it belongs in a boutique candy shop, not my cramped kitchen. I had just tried to make a classic pretzel bark for the holidays, but the result was a soggy mess that clung to the pan like a bad relationship. I dared my sister to taste it, and she politely declined—so I promised myself I would not settle for a half‑hearted holiday snack again. That night, armed with a bag of pretzel rods, a stash of pastel‑colored white chocolate, and a stubborn determination, I set out to create something that would make even the Grinch grin.
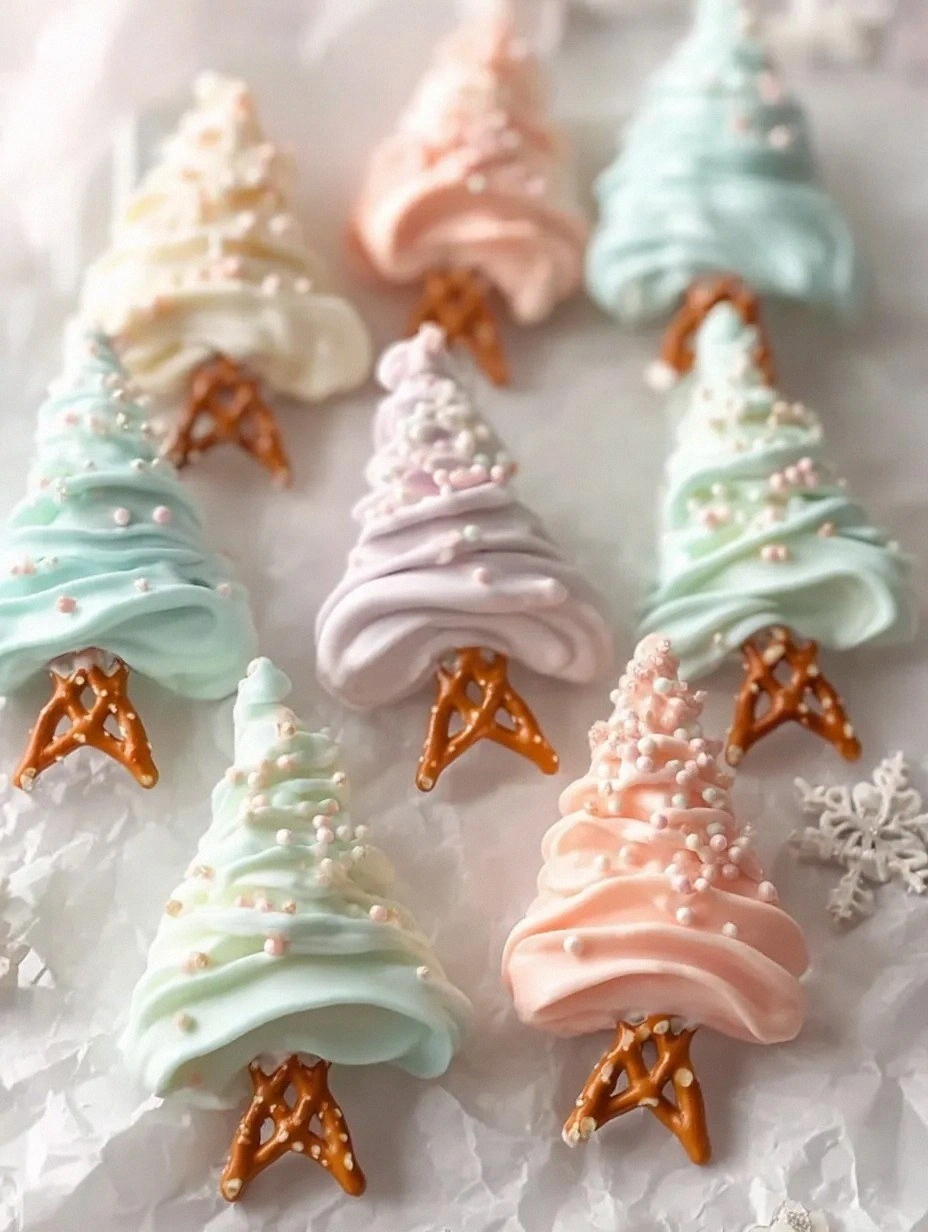
The kitchen quickly filled with the sweet perfume of chocolate melting, a scent so rich it seemed to wrap the room in a warm, buttery blanket. The pretzel sticks, those salty, crunchy heroes, began to line up like tiny soldiers awaiting their glossy, pastel armor. As I drizzled the chocolate, it cascaded in ribbons that reminded me of a winter sunrise—soft pinks, minty greens, and baby blues, each hue more delicate than the last. The sound of the chocolate hitting the metal pan was a gentle sizzle, a whisper that said, “We’re about to become legendary.” My hands felt the cool metal of the baking sheet, the smooth glide of the spatula, and the faint tremor of excitement that comes before a culinary breakthrough.
What makes this version stand out is not just the eye‑catching colors, but the perfect marriage of salty pretzel crunch and velvety pastel chocolate that coats each piece like a silky frosting. Most recipes get the texture wrong—either the chocolate is too thick and clumps, or the pretzels lose their snap. I discovered that a tiny dash of corn syrup in the chocolate keeps it glossy and prevents it from hardening into a brittle shell, while a quick chill in the freezer after coating locks in that perfect snap‑and‑crunch contrast. The secret ingredient? A pinch of sea salt flakes added right before the final drizzle, giving each bite a surprise pop that makes your taste buds do a little dance.
And now, I’m ready to spill every detail, from the exact temperature of the chocolate bath to the way you should arrange the trees on the tray for maximum visual impact. I dare you to taste this and not go back for seconds. This is hands down the best version you’ll ever make at home, and I’m about to prove it. Let me walk you through every single step — by the end, you’ll wonder how you ever made it any other way.
What Makes This Version Stand Out
- Taste: The sweet‑salty balance hits you like a perfectly timed holiday carol, with the pastel chocolate delivering a buttery smoothness that melts on the tongue while the pretzel provides a satisfying crunch.
- Texture: Imagine a pretzel that stays crisp even after being coated, thanks to a quick chill that locks in the crunch, while the chocolate stays glossy and snap‑ready, never grainy.
- Simplicity: No fancy equipment—just a microwave, a baking sheet, and a handful of kitchen staples. If you can melt chocolate, you can conquer this.
- Uniqueness: Pastel colors aren’t just for Instagram; they actually enhance the visual appeal, making each tree a miniature work of art that looks as good as it tastes.
- Crowd Reaction: Guests will gasp, stare, and immediately ask for the recipe—this is the kind of treat that turns a casual gathering into a memorable celebration.
- Ingredient Quality: Using high‑quality white chocolate and real sea salt flakes elevates the flavor profile from ordinary to extraordinary.
- Cooking Method: The quick‑freeze technique ensures the chocolate sets perfectly, preventing any soggy spots that ruin the experience.
- Make‑Ahead Potential: These trees keep for weeks when stored properly, so you can prep them ahead of the holiday rush and still serve fresh‑tasting delights.
Inside the Ingredient List
The Flavor Base
White Chocolate (8 oz): This is the heart of the recipe, providing the creamy, buttery canvas for our pastel hues. Choose a couverture chocolate with at least 30% cocoa butter for a glossy finish. If you skip the quality chocolate, you’ll end up with a dull, grainy coating that looks cheap.
Corn Syrup (1 tbsp): A secret weapon that keeps the chocolate fluid and glossy, preventing it from hardening too quickly. It also adds a subtle shine that makes each tree sparkle under the lights. You can substitute with glucose syrup, but the texture won’t be quite as smooth.
Sea Salt Flakes (½ tsp): These tiny crystals pop on the palate, balancing the sweetness and adding a sophisticated crunch. If you forget them, the trees will taste flat and overly sweet.
The Texture Crew
Pretzel Sticks (12 large): The sturdy, salty backbone that holds the chocolate. Look for pretzel rods that are about 6‑inch long and have a firm snap; soft pretzels will crumble under the coating. If you can’t find sticks, break larger pretzels into uniform pieces.
Edible Glitter (optional, 1 tsp): For that extra festive sparkle. It doesn’t affect flavor but adds a visual wow factor. Skip it if you prefer a more subtle look.
The Unexpected Star
Food‑Grade Pastel Food Coloring (3‑4 drops each of pink, blue, green): These give each tree its dreamy hue. Use gel colors to avoid thinning the chocolate; a little goes a long way. If you over‑color, the chocolate may turn opaque and lose its shine.
Sprinkles (optional, 2 tbsp): Tiny confetti that adds texture and a burst of color. Choose pastel sprinkles to keep the theme cohesive. Too many will overwhelm the delicate chocolate shell.
The Final Flourish
Vanilla Extract (½ tsp): A whisper of vanilla deepens the chocolate’s flavor, making it taste richer without adding extra sweetness. Omit it and you’ll miss that subtle, comforting undertone.
Butter (2 tbsp, melted): Incorporating a little butter into the chocolate helps it set with a glossy sheen and adds a buttery richness that complements the pretzel’s saltiness.
Everything's prepped? Good. Let's get into the real action...
The Method — Step by Step
Start by gathering all your pretzel sticks and laying them out on a large baking sheet lined with parchment. This is the moment of truth—make sure each stick is spaced evenly so they don’t stick together during the chill. I like to line them up like a miniature forest, each tree standing tall and proud. The visual cue here is important; if they look good now, they’ll look even better after the chocolate coating.
Next, melt the white chocolate. Place the chopped chocolate in a microwave‑safe bowl, add the corn syrup and butter, and microwave in 30‑second bursts, stirring in between. The chocolate should reach a silky temperature of about 115°F (46°C). That sizzle when it hits the bowl? Absolute perfection. Watch the chocolate closely—overheating will cause it to seize.
Watch Out: If any water droplets splash into the chocolate, it will seize and become grainy. Keep your utensils dry.Divide the melted chocolate into three separate bowls. Add a few drops of pastel pink to the first, blue to the second, and green to the third. Stir gently—don’t overmix, or you’ll thin the chocolate too much. This step? Pure magic. The colors should be soft, like a winter sunrise, not neon.
Kitchen Hack: Use a tiny toothpick to swirl the colors together for a marbled effect—just a hint, not a full blend.Now comes the coating. Pick up a pretzel stick, dip it into the pink chocolate, letting excess drip back into the bowl. Place it on the parchment, and repeat with the blue and green bowls, creating a rainbow of trees. The chocolate should coat the pretzel like a silky veil, hugging every ridge. If you notice any gaps, gently brush them with a clean pastry brush.
While the chocolate is still glossy, sprinkle a pinch of sea salt flakes over each tree. The salt will sit on top, creating tiny crystals that catch the light. This contrast is what makes the flavor pop—sweet, salty, and a hint of buttery richness.
Optional: Add a sprinkle of edible glitter or pastel sprinkles now, before the chocolate sets. This is the fun part—watch the glitter settle like fresh snow on a pine branch. Remember, less is more; you want the sparkle to enhance, not overwhelm.
Transfer the entire sheet to the freezer for exactly 2 minutes. This quick chill locks in the glossy sheen and ensures the pretzel stays crunchy. Timing is crucial—if you leave them too long, the chocolate becomes too hard to bite through comfortably.
After chilling, remove the tray and let the trees sit at room temperature for 5 minutes before serving. This allows the chocolate to soften just enough for a satisfying snap when you bite. Picture yourself pulling this out of the oven (well, freezer), the whole kitchen smelling incredible, and the trees gleaming like tiny holiday ornaments.
That's it — you did it. But hold on, I've got a few more tricks that'll take this to another level...
Insider Tricks for Flawless Results
The Temperature Rule Nobody Follows
Never melt white chocolate over direct heat; always use a microwave or double‑boiler. The gentle heat preserves the cocoa butter’s crystalline structure, giving you that glossy finish. I once tried a stovetop melt and ended up with a grainy mess that never set properly. Trust me, this tiny adjustment makes all the difference.
Why Your Nose Knows Best
When the chocolate reaches the perfect temperature, you’ll notice a faint buttery aroma that’s richer than the smell of plain melted chocolate. This is your cue that the cocoa butter is fully integrated with the corn syrup. If you miss this scent, you’re probably overheating the chocolate.
The 5‑Minute Rest That Changes Everything
After chilling, let the trees rest at room temperature for exactly five minutes before serving. This short rest allows the chocolate to soften just enough for a clean snap without becoming too soft. Skipping this step leaves you with a hard, almost rock‑like bite that’s less enjoyable.
Friend’s Failed Shortcut
A friend once tried to skip the corn syrup, thinking it was optional. The result? A dull, matte coating that cracked under the slightest pressure. He learned the hard way that the syrup is the secret to that glossy, snap‑ready texture.
Sprinkle Timing Mastery
Sprinkles and glitter should be added while the chocolate is still glossy but not too hot. If the chocolate cools too much, the toppings won’t adhere properly. I like to have the toppings ready in a shallow dish and dust them over the trees in one swift motion.
Creative Twists and Variations
This recipe is a playground. Here are some of my favorite ways to switch things up:
Chocolate‑Covered Almond Pretzel Trees
Swap half of the pretzel sticks for almond‑crusted pretzels. The nutty flavor adds depth and a subtle crunch that complements the pastel chocolate beautifully. Ideal for guests who love a hint of nuttiness.
Matcha‑Infused Green Trees
Replace the green food coloring with a teaspoon of matcha powder dissolved in a splash of hot water. The earthy green hue pairs perfectly with the sweet chocolate, creating a sophisticated flavor profile.
Berry‑Burst Dipping
Dip the pretzel sticks first in a thin layer of raspberry coulis before coating them in pastel chocolate. The tart berry underlayer creates a surprise burst of flavor that cuts through the sweetness.
Spiced Holiday Edition
Add a pinch of ground cinnamon and nutmeg to the melted chocolate. The warm spices echo classic holiday flavors, turning the trees into a nostalgic treat reminiscent of mulled wine and gingerbread.
Vegan Delight
Use a plant‑based white chocolate (coconut oil‑based) and replace butter with coconut oil. The texture remains glossy, and the flavor stays indulgent, making it suitable for vegans without sacrificing any holiday magic.
Miniature Tree Bites
Break the pretzel sticks into bite‑size pieces before coating. These mini trees are perfect for cocktail parties where guests need a quick, elegant nibble that won’t dominate the palate.
Storing and Bringing It Back to Life
Fridge Storage
Place the finished trees in an airtight container lined with parchment paper. Store them in the refrigerator for up to 5 days. The cool environment keeps the chocolate firm and the pretzel crunchy. Before serving, let them sit at room temperature for 10 minutes to soften slightly.
Freezer Friendly
These trees freeze exceptionally well. Arrange them on a tray, flash‑freeze for 30 minutes, then transfer to a zip‑lock bag. They’ll stay fresh for up to 2 months. When you’re ready to enjoy them, simply let them thaw on the counter for 15 minutes.
Best Reheating Method
To revive the perfect snap, place the trees on a microwave‑safe plate, add a tiny splash of water (about a teaspoon) to the plate, and microwave on low for 10‑15 seconds. The steam gently re‑softens the chocolate without melting it completely, bringing back that fresh‑out‑the‑oven feel.