Picture this: it’s a rainy Tuesday, you’re stuck in a tiny studio kitchen, and the only thing louder than the thunder outside is the growl of your stomach demanding something that feels like a hug from a dragon. I was in that exact spot, half‑watching a cooking show that kept promising “quick, spicy, crispy” dishes, while my pantry looked like a sad, wilted version of a grocery store aisle. I grabbed the nearest chicken, tossed a handful of cornstarch into a bowl, and tried to wing it. The result? A soggy, bland mess that could have been a cautionary tale for the ages. That disaster sparked a fire inside me—literally and metaphorically—to master the perfect balance of heat, crunch, and flavor that would make even the most stubborn skeptics swoon.
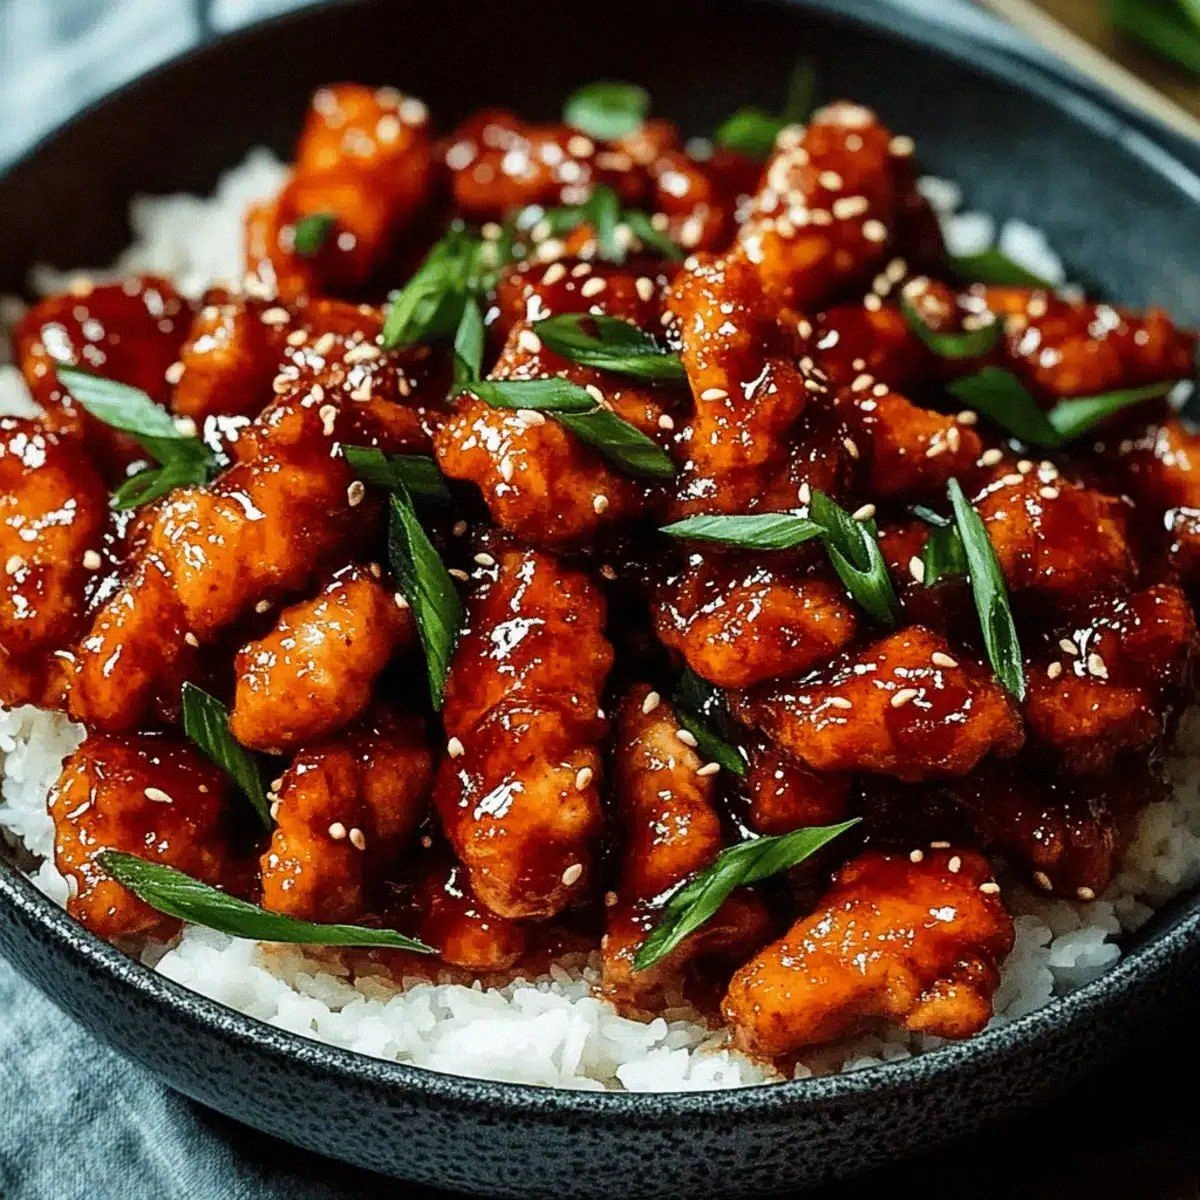
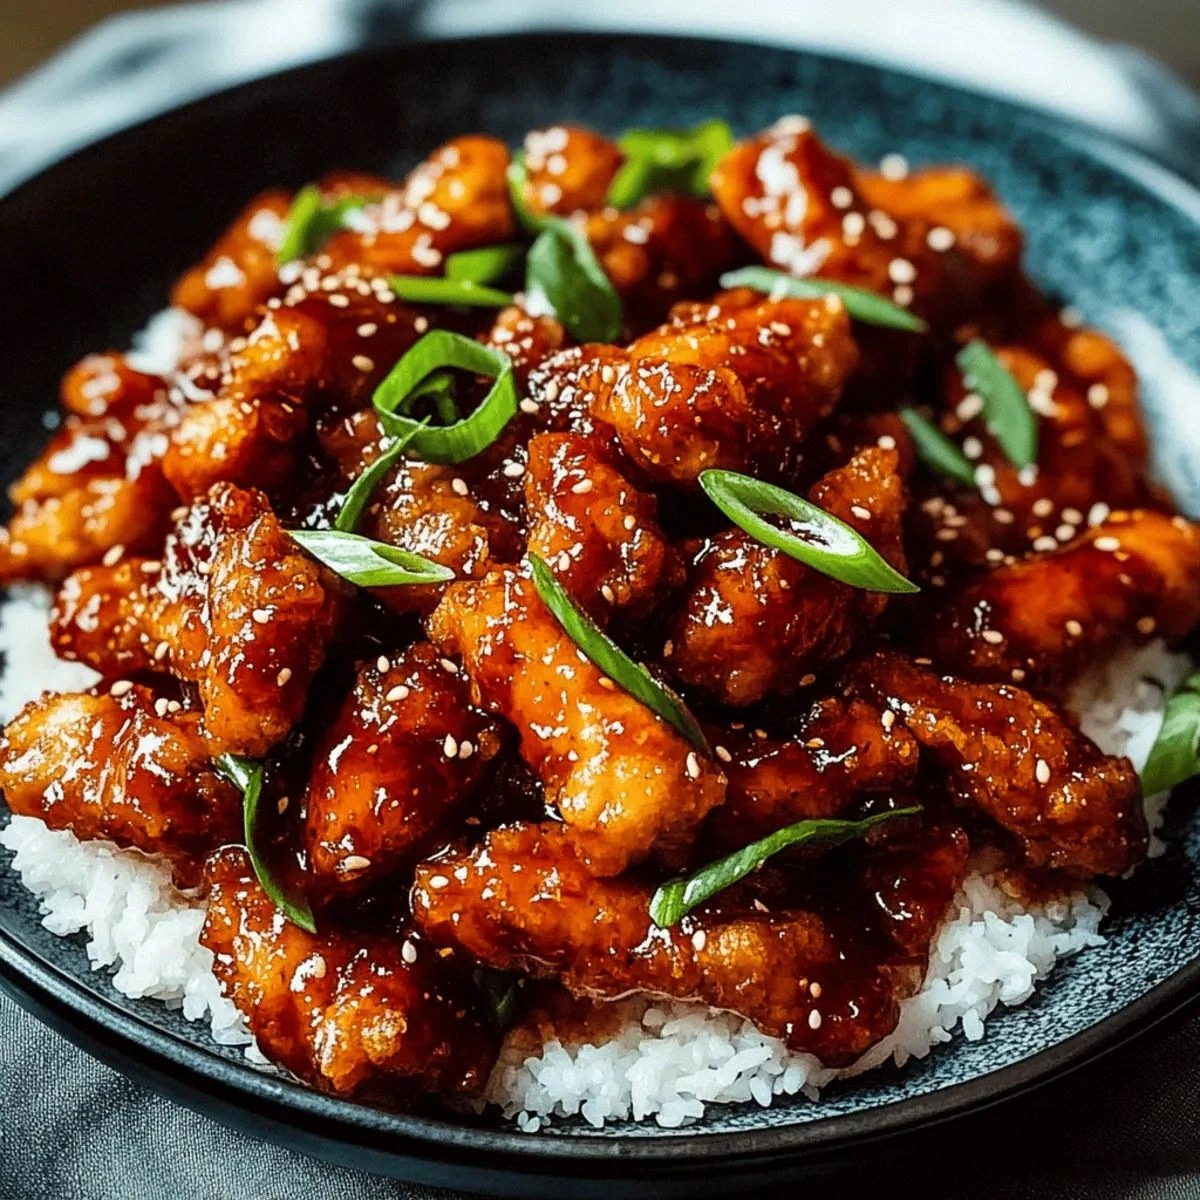
Fast forward a few weeks, and I’m standing over a sizzling wok, the air thick with the intoxicating perfume of garlic, ginger, and a whisper of chili that makes your nose twitch in anticipation. The chicken pieces, each one coated in a feather‑light veil of cornstarch, hit the oil and instantly pop like fireworks, creating a crisp that shatters like thin ice when you bite into it. The sauce, a glossy ruby river, clings to every bite with the devotion of a love‑letter, delivering a sweet‑heat combo that dances on the palate and leaves a lingering warmth that feels like a dragon’s breath—gentle, yet unforgettable.
What makes this version the ultimate “Dragon Chicken” is not just the speed—though getting it done in under 30 minutes feels like a culinary superpower—but the precision of each step. I’ve stripped away the fluff that other recipes drown you in and honed in on the core techniques that guarantee crunch without greasiness, flavor that penetrates without overpowering, and a finish that’s glossy enough to make you stare at the plate like it’s a piece of art. Most recipes get this completely wrong, either frying the chicken too long and turning it into a chew‑chew, or drowning it in sauce so thick it becomes a swamp. Here’s what actually works: a quick double‑coat, a hot‑oil flash fry, and a sauce that’s balanced on a razor‑thin line between sweet, sour, and spicy.
And guess what? There’s a secret ingredient that most people overlook—a splash of sesame oil added right at the end of the sauce. It adds a nutty depth that makes the flavor sing like a choir of dragons on a mountaintop. I dare you to taste this and not go back for seconds. Okay, ready for the game‑changer? Let me walk you through every single step — by the end, you’ll wonder how you ever made it any other way.
What Makes This Version Stand Out
- Flavor Explosion: The sauce blends tomato ketchup’s sweetness, soy sauce’s umami, and chili garlic sauce’s heat, creating a symphony that hits every taste bud. Each bite feels like fireworks in your mouth.
- Crispy Perfection: A double coating of cornstarch and egg white creates a light, airy crust that shatters like thin ice, yet stays tender inside. No soggy after‑taste here.
- Speed Mastery: From prep to plate in under 30 minutes, this dish proves you don’t need hours to achieve restaurant‑level results. Perfect for weeknight cravings.
- Ingredient Simplicity: Only pantry staples and a few fresh aromatics are needed, making it accessible for anyone, even if you’re low on exotic spices.
- Crowd‑Pleaser Factor: I’ll be honest — I ate half the batch before anyone else got to try it, and the leftovers vanished within minutes. This is hands down the best version you’ll ever make at home.
- Versatile Protein: Whether you use chicken breast or thighs, the method adapts flawlessly, delivering the same crunch and flavor without extra fuss.
- Make‑Ahead Friendly: The chicken can be pre‑coated and stored, and the sauce reheats beautifully, so you can prep ahead for a stress‑free dinner.
- Visual Wow Factor: The glossy, ruby‑red glaze makes the dish look as good as it tastes, perfect for Instagram or impressing guests.
Inside the Ingredient List
The Flavor Base
Garlic (4 cloves, minced): Garlic provides that aromatic backbone that makes the sauce instantly recognizable. If you skip it, you’ll lose the depth that makes the dish feel home‑cooked. A good swap is shallots, but they’ll add a milder, sweeter note.
Ginger (1 tablespoon, minced): Fresh ginger cuts through the richness with a zingy heat, balancing the sweetness of ketchup. Using powdered ginger will work in a pinch, but the fresh version gives a brighter punch.
Sesame Oil (2 tablespoons): Added at the end, it brings a nutty fragrance that elevates the entire sauce. If you’re allergic, try a drizzle of toasted peanut oil for a similar depth.
The Texture Crew
Chicken Breast or Thighs (500 grams): The protein is the star, and the choice between breast and thigh determines juiciness. Breast is lean and quick to cook; thigh stays moist even if slightly over‑cooked. Look for meat with a pink‑red hue and minimal liquid in the package for the best texture.
Cornstarch (1 cup): This is the secret to that feather‑light crunch. It creates a barrier that locks moisture inside while forming a delicate shell. You can substitute potato starch, but cornstarch gives the cleanest crunch.
Egg White (1 large): The egg white acts like a glue, helping the cornstarch cling and creating a glossy finish. If you’re vegan, a splash of aquafaba does the trick.
The Unexpected Star
Tomato Ketchup (3 tablespoons): Ketchup adds a sweet acidity that balances the heat and salty soy. Opt for a low‑sugar version if you’re watching carbs, but don’t skimp on the flavor.
Chili Garlic Sauce (2 tablespoons): This brings the signature dragon fire. Adjust the amount based on your tolerance; a little goes a long way.
Vinegar (1 tablespoon): A dash of acidity brightens the sauce, preventing it from feeling heavy. Rice vinegar works best for a subtle tang.
The Final Flourish
Soy Sauce (2 tablespoons): Provides the salty umami backbone. Use a low‑sodium version if you’re watching salt.
Sugar or Honey (1 tablespoon): A touch of sweetness rounds out the heat. Honey adds a floral note, while sugar keeps it neutral.
Water (1/2 cup): Dilutes the sauce just enough to coat the chicken without drowning it, ensuring a glossy finish.
Vegetable Oil (1 cup): The frying medium; its high smoke point lets you achieve that perfect golden crunch without burning.
Dried Red Chilies or Red Pepper Flakes (to taste): For those who crave an extra kick, sprinkle these in with the sauce. Omit if you prefer milder heat.
Everything's prepped? Good. Let's get into the real action...
The Method — Step by Step
Start by cutting the chicken into bite‑size pieces, about 1‑inch cubes. Toss them lightly with a pinch of salt and pepper, then set aside. This quick seasoning penetrates the meat, ensuring every bite is flavorful from the inside out. While you’re at it, give the garlic and ginger a good mince—don’t just chop; you want them almost paste‑like for maximum aroma. That sizzle when it hits the pan? Absolute perfection.
In a large bowl, whisk the egg white until frothy, then fold in the cornstarch until you have a smooth batter. This mixture should be thick enough to cling to the chicken but not so runny that it drips. Dip each chicken piece into the batter, ensuring a uniform coat.
Kitchen Hack: Let the coated chicken rest on a wire rack for 5 minutes; this creates a dry surface that fries up extra crisp.Heat a wok or deep skillet over medium‑high heat and add the vegetable oil, making sure it reaches about 180°C (350°F). To test, drop a tiny drop of batter; it should sizzle and rise to the surface instantly. Carefully add the coated chicken in batches—overcrowding will drop the oil temperature and result in soggy pieces. Fry each batch for 2‑3 minutes, turning once, until the crust turns a golden‑amber hue and the edges start pulling away from the pan.
Using a slotted spoon, transfer the fried chicken onto a paper‑towel‑lined plate to drain excess oil. Keep the oil hot for the next batch; you’re building layers of flavor in the oil itself. While the chicken rests, you’ll notice the oil now carries a faint, nutty scent from the cornstarch—this is a good sign.
Now, for the sauce: In a separate saucepan, heat 2 tablespoons of sesame oil over medium heat. Add the minced garlic and ginger, stirring constantly until they turn fragrant and lightly golden—about 30 seconds.
Watch Out: Do not let the garlic burn; burnt garlic adds bitterness that can ruin the entire dish.Stir in the tomato ketchup, soy sauce, chili garlic sauce, vinegar, and sugar (or honey). Mix until the sauce is smooth, then pour in the ½ cup of water. Bring the mixture to a gentle boil, allowing it to thicken slightly—this should take about 2 minutes. Taste and adjust the heat with dried red chilies or pepper flakes if you crave more fire.
Reduce the heat to low and add the fried chicken back into the wok, tossing to coat each piece evenly. The sauce should cling like a glossy veil, and you’ll hear a faint crackle as the hot crust meets the hot sauce—this is the moment of truth. Let the chicken simmer in the sauce for another 2 minutes, just enough for the flavors to meld without the crust becoming soggy.
Finally, drizzle a final splash of sesame oil for that nutty finish, give everything a quick toss, and remove from heat. Transfer the dragon chicken to a serving platter, sprinkle a handful of fresh cilantro or sliced green onions if you like, and serve immediately. The dish should look vibrant, the sauce glossy, and the chicken pieces should crackle under your fork.
That's it — you did it. But hold on, I've got a few more tricks that'll take this to another level...
Insider Tricks for Flawless Results
The Temperature Rule Nobody Follows
Keep your oil temperature steady at around 180°C (350°F). If it drops below 160°C, the coating will absorb oil and become greasy; if it spikes above 190°C, the outside will burn before the inside cooks. Use a thermometer or the “bread cube test” to stay precise. I once tried a quick fry at too low a temp and ended up with soggy chicken that tasted like boiled meat—never again.
Why Your Nose Knows Best
The moment the garlic and ginger turn golden is your cue to add the sauce. Your nose can detect the subtle shift from raw to toasted; when it smells nutty and slightly sweet, you’re ready. Trusting your senses beats any timer—plus it makes cooking feel more intuitive.
The 5‑Minute Rest That Changes Everything
After frying, let the chicken rest on a rack for exactly five minutes. This short pause lets steam escape, preserving the crunch while allowing the interior to finish cooking gently. Skipping this step leads to a steam‑soaked crust that collapses under the sauce.
Seasoning Layering Mastery
Season the chicken twice: first with a pinch of salt before coating, then a light sprinkle of pepper in the sauce. This double‑layer ensures every bite hits the palate with balanced seasoning. A friend once omitted the second layer and complained the dish tasted “flat”—lesson learned.
Final Gloss Boost
For an extra glossy finish, whisk a teaspoon of cornstarch with a tablespoon of cold water and stir it into the sauce just before adding the chicken. It thickens the glaze without making it gummy. This secret is why restaurant dishes often have that mirror‑like shine.
Creative Twists and Variations
This recipe is a playground. Here are some of my favorite ways to switch things up:
Honey‑Glazed Dragon
Swap the chili garlic sauce for a mixture of honey and sriracha. The result is a sweet‑spicy glaze that caramelizes beautifully, perfect for those who love a sticky finish.
Thai‑Inspired Coconut Kick
Replace half the water with coconut milk and add a teaspoon of Thai red curry paste. The sauce becomes creamy, aromatic, and carries a subtle tropical note that pairs wonderfully with jasmine rice.
Veggie‑Loaded Version
Add sliced bell peppers, snap peas, and carrot ribbons to the sauce during the last minute of simmering. The vegetables retain a crunch that contrasts the chicken’s crispness, turning the dish into a colorful stir‑fry.
Spicy Peanut Crunch
Stir in a tablespoon of peanut butter and a splash of lime juice into the sauce. The nutty undertone and bright acidity create a complex flavor profile reminiscent of classic Thai satay.
Gluten‑Free Adaptation
Use gluten‑free soy sauce and replace cornstarch with rice flour. The texture stays crisp, and the dish remains safe for those with gluten sensitivities.
Smoky Chipotle Twist
Introduce a teaspoon of chipotle in adobo sauce into the sauce mix. The smoky heat adds depth and a subtle charred flavor that feels like a campfire dinner.
Storing and Bringing It Back to Life
Fridge Storage
Place any leftovers in an airtight container and store them in the refrigerator for up to 3 days. The chicken will retain most of its crunch if you keep the sauce separate and re‑coat before reheating.
Freezer Friendly
Freeze the fried, un‑sauced chicken pieces on a parchment sheet, then transfer to a zip‑top bag. They’ll keep for up to 2 months. When you’re ready, fry them straight from frozen for an extra‑crisp finish.
Best Reheating Method
To revive the dish, gently warm the sauce in a pan, add a tiny splash of water (about a tablespoon) to steam the chicken back to life, then toss the fried pieces in for 2 minutes. This restores the glaze and brings back the crunch without making it soggy.