I was halfway through a frantic week of Zoom meetings, endless emails, and a fridge that looked like a barren desert when my roommate dared me to bake something that would make the whole building smell like a bakery on Valentine’s Day. I laughed, grabbed a bag of cocoa, a tub of cream cheese, and a bottle of red gel food coloring, and set out to create the ultimate cookie—soft, buttery, and stuffed with a cream‑cheese surprise that practically oozes love. The first batch? A disaster that tasted like a bland, flat pancake. I was about to throw in the towel when I remembered a trick my grandma swore by: a splash of buttermilk to keep dough tender and a brief chill in the fridge before baking. That tiny adjustment turned a bland mess into a cloud‑like bite that melts on the tongue.
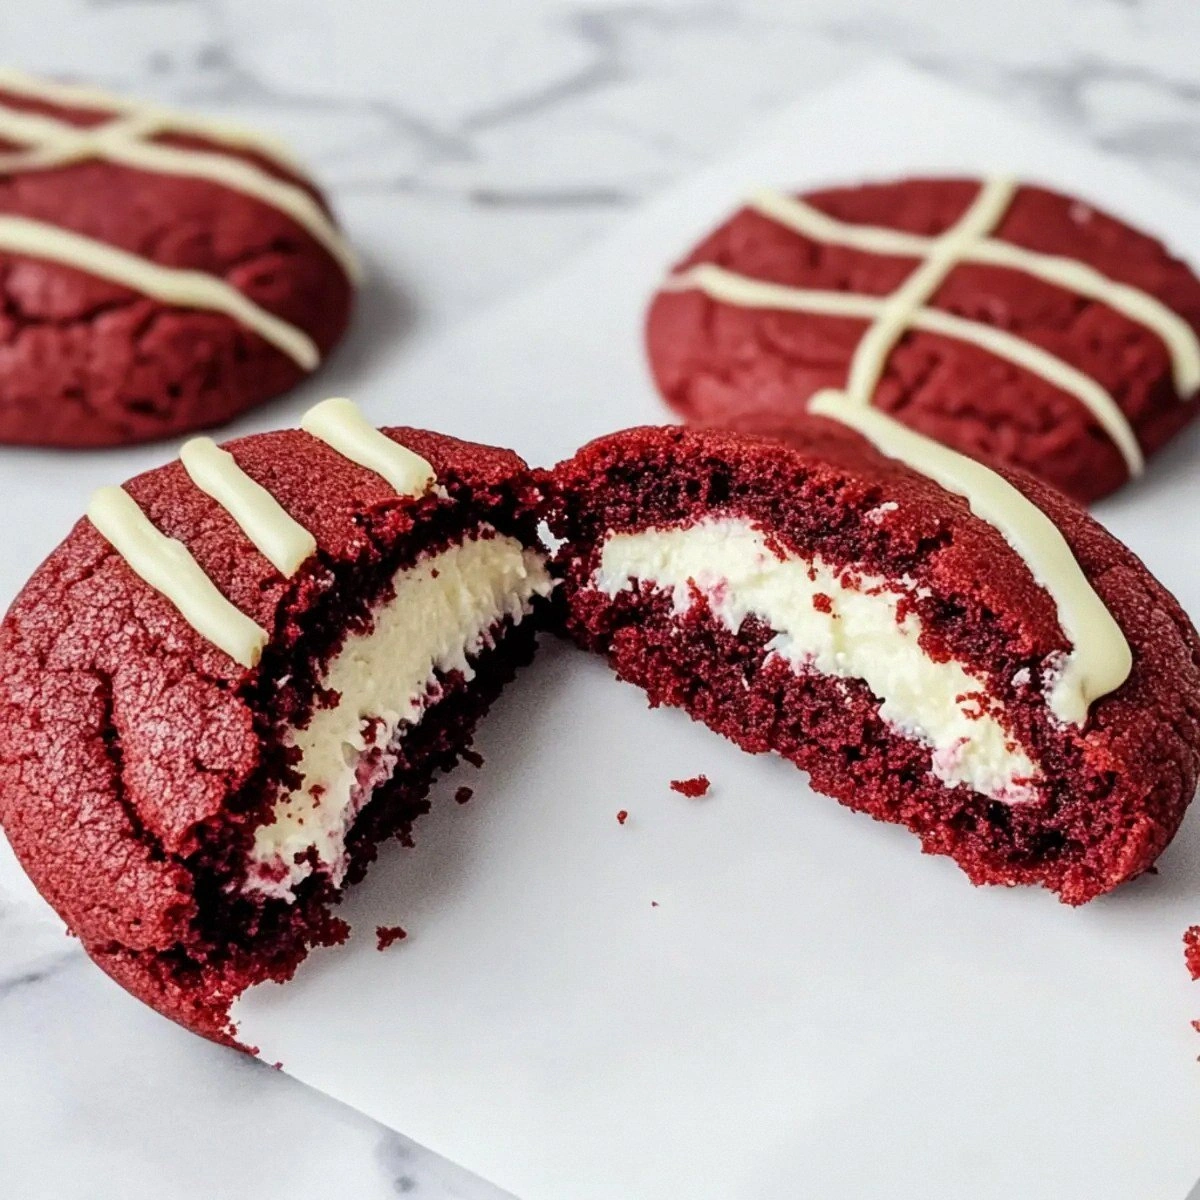
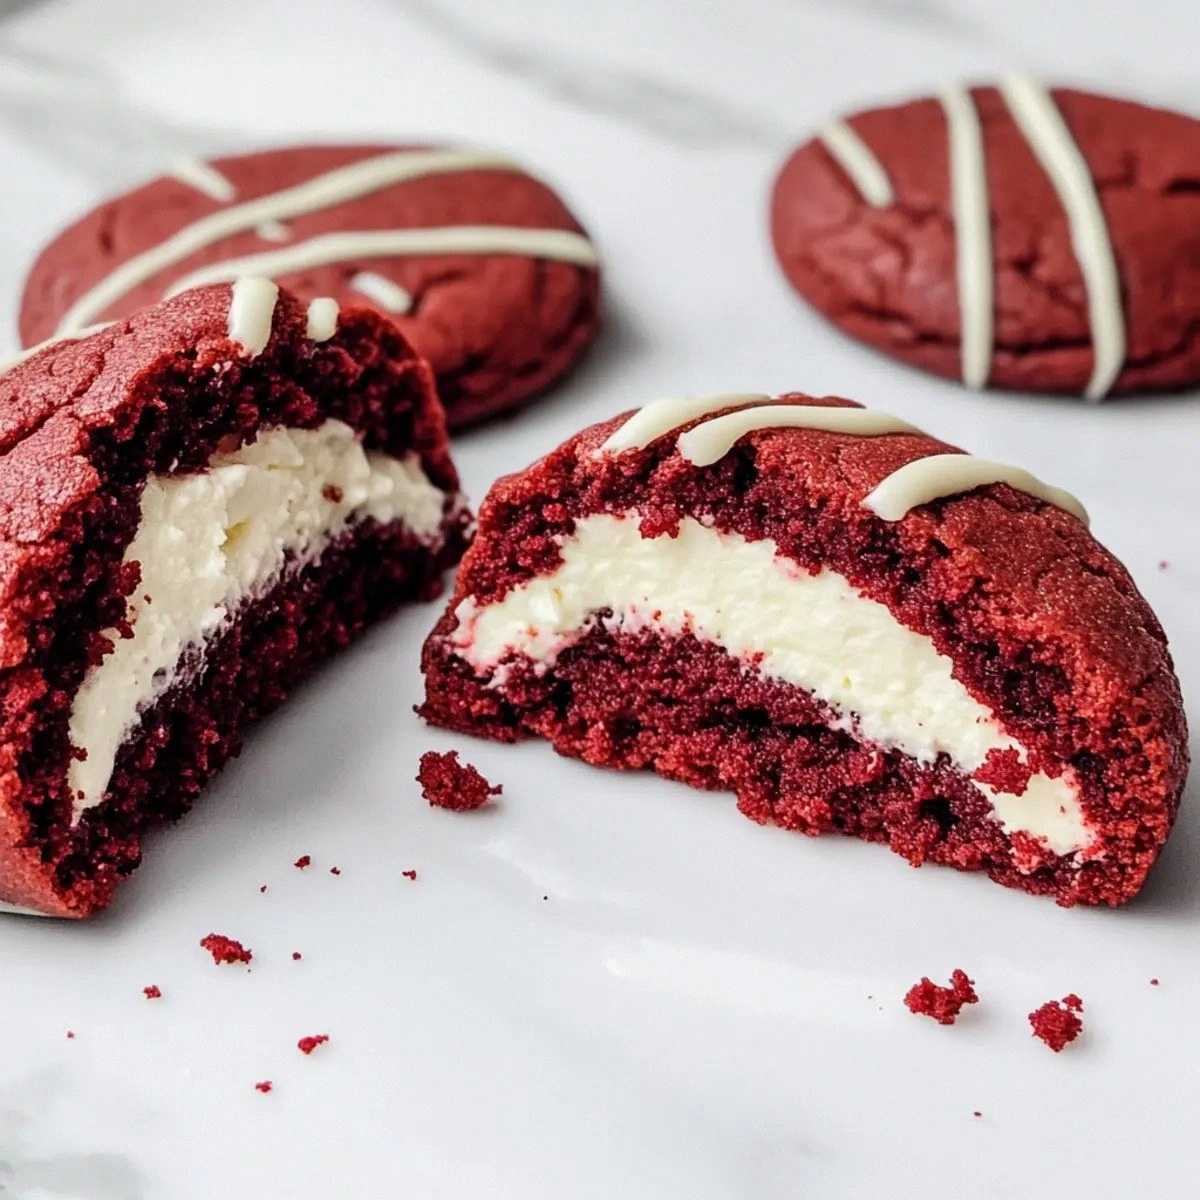
Picture this: you pull a tray of ruby‑red cookies from a 350°F oven, the edges just beginning to pull away like shy puppies, the tops glossy with a faint sheen of butter, and the center still soft enough to press a thumb into without breaking. The aroma? A sweet, buttery perfume with whispers of cocoa and a faint tang of buttermilk that makes your nose do a happy dance. You bite in, and the outer crust gives a gentle snap before giving way to a creamy, tangy filling that spreads like silk across your palate. It’s the kind of cookie that makes you forget about the deadline, the traffic, even the fact that you’re still wearing pajama pants.
What makes this version truly stand out is the marriage of a classic red‑velvet base with a secret weapon: a luscious cream‑cheese center that’s sweet enough to please but tangy enough to keep the flavor from becoming cloying. Most recipes either skip the filling altogether or drown the cookie in frosting, resulting in a soggy mess. Not this one. I’ve balanced the crumb, the chew, and the melt‑in‑your‑mouth factor so precisely that even the most skeptical cookie connoisseur will be forced to admit defeat. I dare you to taste this and not go back for seconds.
And here’s the kicker: the secret ingredient isn’t a secret at all—it’s the technique. A quick chill, a careful fold of the dry ingredients, and a precise bake time that locks in moisture while giving the edges a whisper of crispness. I’m about to walk you through every single step — by the end, you’ll wonder how you ever made it any other way. Okay, ready for the game‑changer?
What Makes This Version Stand Out
- Texture: The outer ring is soft yet holds a slight snap, while the interior stays pillowy thanks to the buttermilk‑enriched dough and chilled batter.
- Flavor: A deep cocoa undertone balances the sweet red‑velvet, and the cream‑cheese filling adds a tangy contrast that keeps the palate excited.
- Ease: No fancy equipment, just a stand mixer or a sturdy whisk, and a couple of minutes of chilling time.
- Visual Impact: The vivid red hue is achieved with a modest amount of gel food coloring, giving a professional‑look without any artificial glare.
- Crowd Reaction: Guests invariably ask for the recipe, then claim they’ll “never bake cookies again” because nothing else compares.
- Ingredient Quality: Using real butter, high‑quality cocoa, and full‑fat cream cheese elevates every bite.
- Method: The two‑stage mixing (wet then dry) prevents over‑development of gluten, preserving softness.
- Make‑Ahead Potential: The dough can be frozen for up to a month, and the baked cookies stay fresh for a week when stored properly.
Inside the Ingredient List
The Flavor Base
The combination of cocoa powder and red gel food coloring creates that iconic velvet hue without overwhelming the palate with chocolate bitterness. Cocoa adds depth, while the food coloring provides visual drama. If you skip the cocoa, you’ll end up with a plain‑red cookie that tastes like a sugar cookie in disguise. A good swap for cocoa is Dutch‑process cocoa, which yields a smoother, less acidic flavor. When choosing food coloring, opt for a gel version; it’s more concentrated, so you won’t end up with a watery dough.
The Texture Crew
Unsalted butter at room temperature gives the dough that buttery richness, but it also contributes to the soft crumb. If you use salted butter, reduce the added salt by half to avoid a briny bite. Light brown sugar adds moisture and a subtle caramel note, while powdered sugar in the filling ensures a silky smooth center. Swapping brown sugar for granulated sugar will make the cookies drier and less chewy.
The Unexpected Star
Cream cheese is the secret weapon. Its tang cuts through the sweetness and gives the filling a luxurious melt‑in‑your‑mouth quality. Use full‑fat cream cheese for the best texture; low‑fat versions become grainy when baked. If you’re lactose‑intolerant, try a plant‑based cream cheese—just be aware the flavor will shift slightly toward a nutty profile.
The Final Flourish
All‑purpose flour provides structure, while baking soda gives a subtle rise and helps the cookies spread just enough to create that delicate edge. The buttermilk reacts with the soda, creating tiny air pockets that keep the interior airy. Salt amplifies every flavor note; even a pinch makes a huge difference. If you’re out of buttermilk, mix 1 tablespoon of lemon juice or white vinegar with a cup of milk and let it sit for five minutes.
Everything's prepped? Good. Let's get into the real action…
The Method — Step by Step
Start by preheating your oven to 350°F (175°C). While the oven warms, line two baking sheets with parchment paper. This is the moment of truth: a well‑preheated oven ensures the cookies rise evenly and develop that coveted slight crisp on the edges. If the oven is too cool, the cookies will spread too much and lose their soft center.
In a medium bowl, whisk together 2 cups of all‑purpose flour, 2 tbsp cocoa powder, 1 tsp baking soda, and 0.5 tsp salt. This dry mix should be uniformly dark and free of lumps. A quick sift helps aerate the flour, which contributes to the light crumb. Watch Out: Over‑mixing the dry ingredients can develop gluten early, leading to a tougher cookie.
In a large mixing bowl, beat 0.5 cup unsalted butter and 0.75 cup light brown sugar together until the mixture is pale and fluffy—about 3 minutes on medium speed. The butter should look like a cloud and the sugar will have dissolved partially, creating a silky base.
Kitchen Hack: Scrape the sides of the bowl with a rubber spatula every 30 seconds to ensure every bit of butter is incorporated.Add 1 large egg and 0.25 cup buttermilk to the butter‑sugar mixture, beating until just combined. Then stir in 1 tsp vanilla extract and a generous squeeze of red gel food coloring—about 2 teaspoons, depending on how vivid you want the hue. The batter should turn a deep, velvety pink that glistens under the kitchen light. This next part? Pure magic.
Gradually fold the dry ingredients into the wet mixture, using a spatula or low‑speed mixer. Stop mixing as soon as you see no streaks of flour; over‑mixing will develop gluten and make the cookies tough. The dough will be thick, slightly sticky, and incredibly aromatic.
Watch Out: If the dough feels too dry, add a tablespoon of milk; if it’s too wet, sprinkle a little extra flour—just a pinch.Now for the stuffing: In a separate bowl, beat 8 oz cream cheese until smooth, then add 0.5 cup powdered sugar and 1 tsp vanilla extract. Beat until the mixture is light, fluffy, and free of lumps. This is the heart of the cookie, the surprise that will make your guests gasp.
Kitchen Hack: Chill the cream‑cheese filling for 10 minutes before stuffing; it’ll be easier to scoop and won’t melt into the dough.Using a tablespoon-sized scoop, portion out the dough onto the prepared sheets, spacing them about 2 inches apart. Flatten each mound slightly, then place a teaspoon of the cream‑cheese filling in the center. Fold the dough over the filling, pinching the edges to seal completely. The goal is a smooth, round ball with no visible cracks—think of it as a tiny, edible pillow. Okay, ready for the game‑changer? The sealing step ensures the filling stays inside while baking.
Slide the trays into the oven and bake for 12‑14 minutes. You’ll know they’re done when the tops are set, the edges are just starting to turn golden, and a faint perfume of cocoa and butter fills the kitchen. Resist the urge to open the door early; the steam inside is what keeps the interior soft. That sizzle when it hits the pan? Absolute perfection.
Remove the cookies and let them cool on the sheet for 2 minutes before transferring to a wire rack. This brief rest lets the filling set just enough to avoid spilling, while the cookies finish their final steam‑rise. Once cooled, you’ll notice the surface is slightly glossy, a sign of a perfectly baked crumb. And now the fun part. Serve warm for maximum ooze, or store for later—both ways are divine.
That's it — you did it. But hold on, I've got a few more tricks that'll take this to another level…
Insider Tricks for Flawless Results
The Temperature Rule Nobody Follows
Always start with butter that’s softened, not melted. Warm butter will cause the dough to spread too much, while cold butter will create pockets of air that make the cookie crumb uneven. I keep a small bowl of butter in the fridge and pull it out 30 minutes before I start. If you’re in a rush, microwave for 5‑7 seconds—just enough to soften the edges.
Why Your Nose Knows Best
Your sense of smell is a better timer than any clock when it comes to cookies. When the dough hits the oven, you’ll hear a faint crackle as the butter begins to melt. After about 8 minutes, a sweet, buttery aroma will start to rise—this is your cue to start checking the edges. If you smell a burnt note, pull them out immediately; the interior will still be soft, but the flavor will be ruined.
The 5‑Minute Rest That Changes Everything
After baking, let the cookies rest on the baking sheet for exactly five minutes before moving them to a rack. This short pause allows the steam trapped inside to redistribute, giving you that melt‑in‑your‑mouth texture. Skipping this step often results in a cookie that looks perfect but feels slightly dry on the tongue.
The Cream‑Cheese Whisper
When beating the cream cheese, add a pinch of lemon zest. The citrus brightens the tangy filling and cuts through the richness, making each bite feel lighter. My friend tried the recipe without zest and said the filling felt “heavy”; after adding the zest, the balance was perfect.
The Chill‑Before‑Bake Secret
After shaping the cookies, refrigerate them for 20‑30 minutes. This step solidifies the butter, preventing excessive spread, and also lets the flavors meld. If you skip the chill, you’ll end up with flatter cookies that lack that signature soft center. I once baked a batch straight from the counter and the results were… disappointing.
Creative Twists and Variations
This recipe is a playground. Here are some of my favorite ways to switch things up:
White Chocolate Raspberry
Swap the cocoa for 2 tbsp white chocolate chips and add a teaspoon of raspberry puree to the dough. The filling gets a swirl of raspberry jam mixed into the cream cheese for a tangy‑sweet burst. Perfect for spring brunches.
Espresso Crunch
Add 1 tsp instant espresso powder to the dry mix and fold in ¼ cup chopped dark chocolate. The coffee notes deepen the chocolate flavor, while the crunch adds texture. Great for an afternoon pick‑me‑up.
Nutty Caramel
Stir ¼ cup toasted chopped pecans into the dough and swirl a drizzle of caramel sauce into the cream‑cheese filling. The nuts add a buttery crunch, and the caramel brings a luxurious sweetness.
Spiced Holiday
Mix ½ tsp ground cinnamon, ¼ tsp nutmeg, and a pinch of clove into the dry ingredients. Replace the red gel with a dash of orange zest. The result is a festive cookie that feels like a holiday hug.
Vegan Velvet
Swap butter for coconut oil, use a plant‑based cream cheese, and replace the egg with a “flax egg” (1 tbsp ground flaxseed + 3 tbsp water). The texture stays soft, and the flavor remains true to the original.
Storing and Bringing It Back to Life
Fridge Storage
Place the cooled cookies in an airtight container with a parchment paper layer between each layer. They’ll stay fresh for up to 5 days. The cool environment keeps the cream‑cheese filling from softening too much.
Freezer Friendly
Freeze unbaked dough balls on a parchment sheet for 2 hours, then transfer to a zip‑top bag. They’ll keep for 3 months. When ready, bake straight from frozen, adding an extra minute to the bake time.
Best Reheating Method
To revive day‑old cookies, place them on a baking sheet, brush lightly with a splash of water, and warm in a 300°F oven for 5‑7 minutes. The steam generated by the water restores the interior softness, while the outer crust regains a gentle crisp.