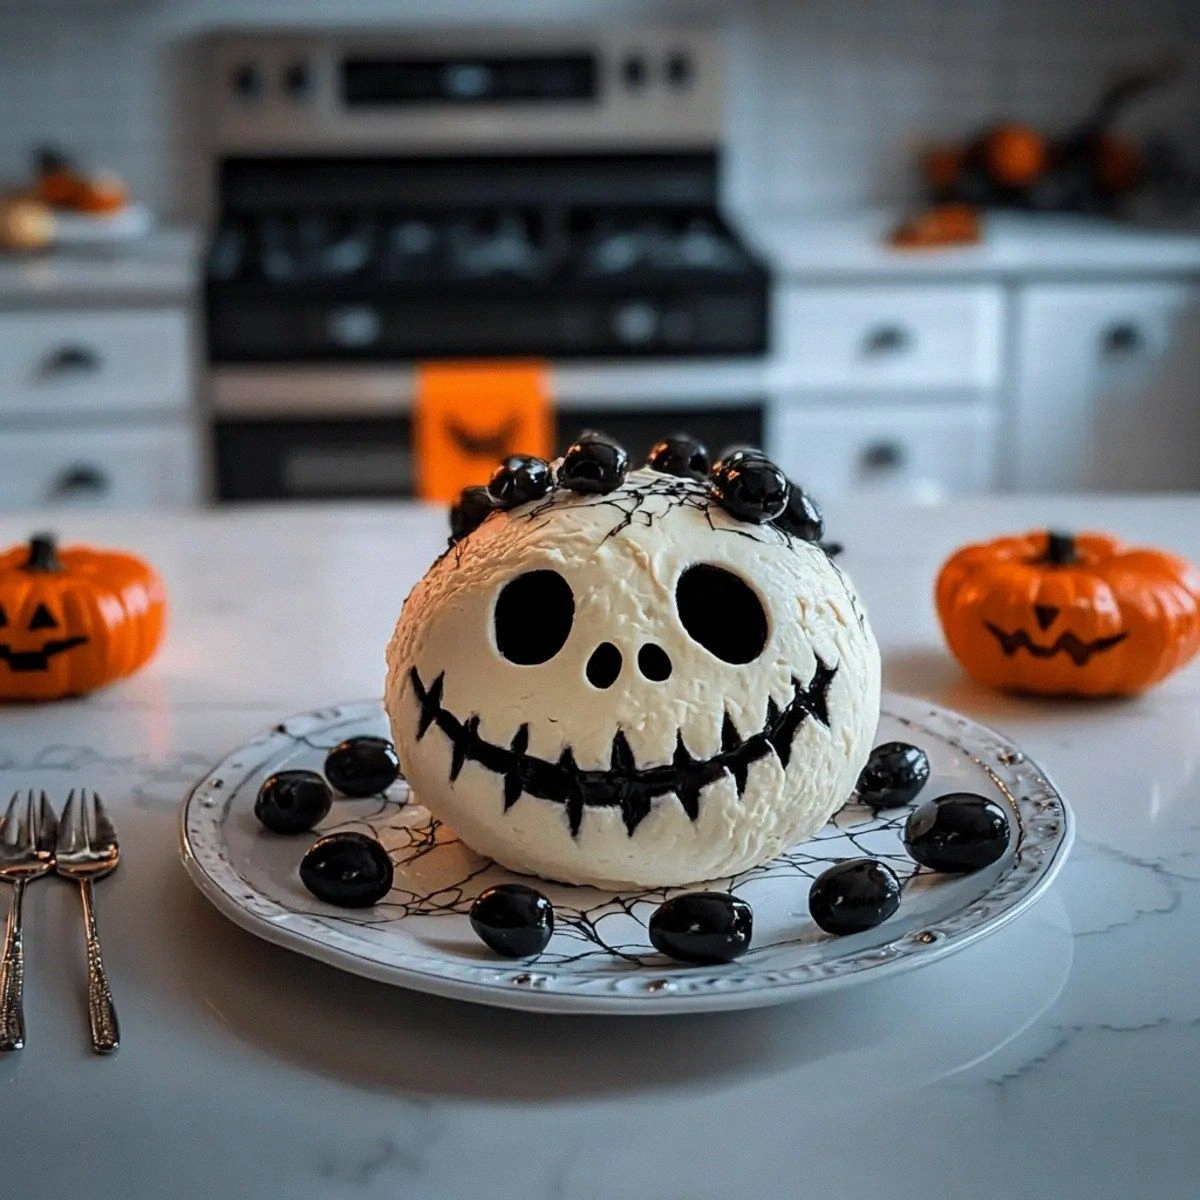
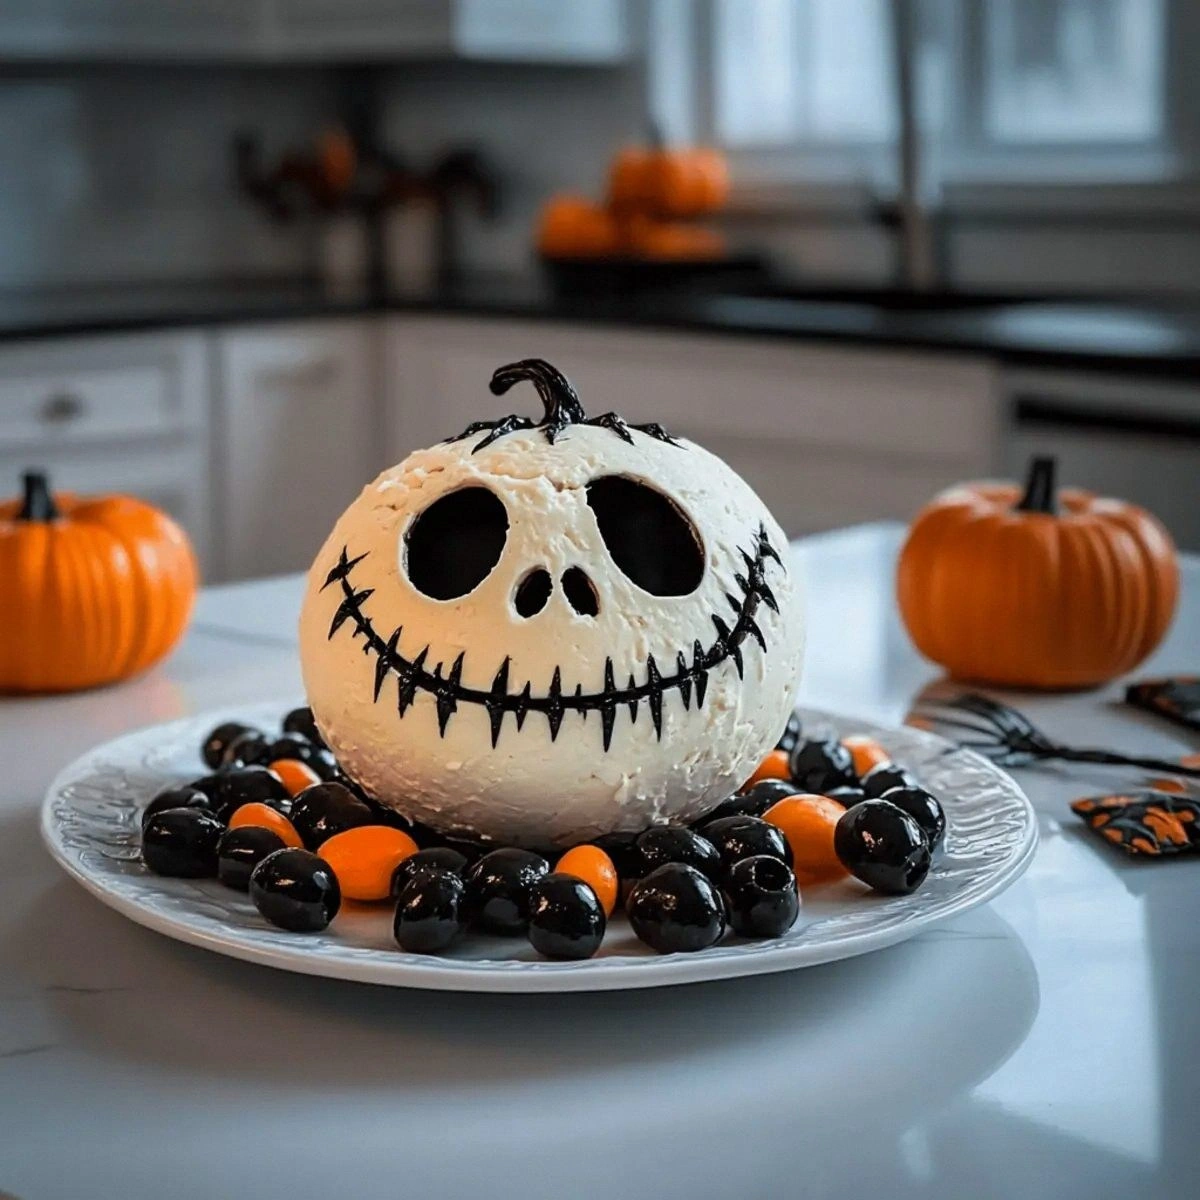
I still remember the Halloween party where my carefully carved jack-o'-lantern collapsed into a soggy mess, taking my confidence with it. Determined not to let that disaster define me, I grabbed a bag of cream cheese and whatever was in my fridge, muttering something about creating "the cutest darn skeleton anyone's ever seen." Thirty minutes later, this grinning Skellington cheese ball emerged, and suddenly everyone forgot about my pumpkin failure. The room went quiet as guests gathered around, phones out, whispering about how I'd managed to make something so adorable yet so ridiculously delicious.
Picture this: you're rushing to get your costume on, the doorbell's already ringing with early trick-or-treaters, and you need something that'll make guests gasp when they walk in. That's exactly where this recipe shines like a full moon on Halloween night. The combination of ultra-creamy cream cheese and sharp white cheddar creates a flavor bomb that coats your tongue like velvet, while the garlic and onion powders add depth that makes people close their eyes and sigh. And here's the kicker — those black olive eyes and stitched smile aren't just decorative; they add a briny pop that cuts through the richness like a pirate's cutlass through sails.
What makes this version different from every other cheese ball on the internet? I'm glad you asked. Most recipes get this completely wrong by making the mixture too soft, resulting in a sad, collapsing blob that looks more like a melted snowman than Jack Skellington. I've cracked the code with a ratio that holds its shape even when the room heats up from all those bodies dancing to "Thriller." Plus, I'll let you in on a secret technique that makes the face design look professionally sculpted, even if you can't draw a stick figure to save your life.
Stay with me here — this is worth it. By the end of this post, you'll know exactly how to create a centerpiece that'll have guests fighting for selfies, and the flavor will make them forget all about the candy bowl. The best part? You can make this entire thing the night before, wrap it up, and pull it out when guests arrive looking like a Halloween hero. Let me walk you through every single step — by the end, you'll wonder how you ever made it any other way.
What Makes This Version Stand Out
- Shape Stability: Unlike typical cheese balls that slump into puddles, this formula includes just enough structure to maintain Skellington's iconic skull shape for hours. The secret lies in the precise cream cheese to cheddar ratio that took me six attempts to perfect.
- Face Design Simplicity: I'll show you a foolproof olive-cutting technique that creates perfect circles and curves every single time. Even my nephew who still eats crayons managed to nail this design on his first try.
- Flavor Balance: Most cheese balls taste like, well, just cheese. This version layers garlic and onion powders with black pepper to create a complex flavor profile that keeps people coming back for "just one more bite" until it's gone.
- Make-Ahead Magic: The mixture actually improves after 24 hours as the flavors meld together. I dare you to taste this after an overnight rest and not go back for seconds — it's scientifically impossible.
- Photogenic Perfection: In our Instagram-obsessed world, this cheese ball delivers the perfect spooky aesthetic without looking like you tried too hard. The contrast between white cheese and black olives creates a striking image that practically photographs itself.
- Kid-Friendly Assembly: This becomes a fantastic family activity where even the littlest goblins can help place olive features. My seven-year-old takes charge of the smile every year, and her pride is almost as sweet as the final product.
Alright, let's break down exactly what goes into this masterpiece...
Inside the Ingredient List
The Flavor Foundation
Cream cheese forms the silky base that makes this cheese ball spread like a dream across crackers or vegetables. Don't reach for the generic store brand here; splurge on the good stuff that's actually made with real cream. The difference hits your palate immediately — it's like comparing a silk scarf to a paper towel. Eight ounces might seem like a lot, but remember we're creating a centerpiece that needs to feed a crowd and hold its shape for hours of party time.
The shredded white cheddar isn't just for show — it provides that sharp, tangy backbone that makes people close their eyes and make that little "mmm" sound. Skip the pre-shredded bags with their anti-caking chemicals; they create a grainy texture that'll ruin your smooth finish. Buy a block and shred it yourself in under two minutes. Your food processor makes quick work of this, or use the large holes on a box grater and channel your ancestors who shredded cheese before electricity.
The Seasoning Squad
Garlic powder brings that warm, savory depth that makes guests ask "what's in this?" as they reach for another cracker. Fresh garlic would be too harsh here, and the powder distributes evenly throughout the mixture. One teaspoon hits the sweet spot — enough to add complexity without overwhelming the cheese's natural flavors. If you've ever wondered why your homemade dips taste flat compared to restaurant versions, this is probably what you're missing.
Onion powder partners with garlic to create a flavor symphony that dances across your taste buds. These two seasonings are like the dynamic duo of the spice world — good alone, but magical together. The key is using both in equal amounts so neither dominates. Many recipes skimp here, but I'm telling you, this is where the magic lives.
Black pepper adds that gentle heat and floral note that elevates this from "just cheese" to "what IS this amazing thing?" Freshly ground makes a noticeable difference here — the pre-ground stuff tastes like sawdust in comparison. You're only using half a teaspoon, so make it count with the good stuff.
The Show-Stopping Garnish
Black olives transform this from a plain white ball into Jack Skellington's iconic face. Buy whole olives and slice them yourself — the pre-sliced ones are too thin and dry out quickly. You'll need about six to eight olives total, but grab a whole can because you'll snack on them while assembling. The briny pop they provide cuts through the rich cheese like a refreshing autumn breeze.
Everything's prepped? Good. Let's get into the real action...
The Method — Step by Step
- Start by softening your cream cheese properly — this is crucial for a smooth mixture. Unwrap the blocks and place them on a plate at room temperature for about 30 minutes. If you're impatient like me, the microwave method works: 45 seconds on half power, flip the blocks, then another 30 seconds. The edges should feel pliable but the center still slightly cool. This prevents the mixture from becoming too warm and greasy, which would make your cheese ball weep and lose shape later.
- Grab your trusty mixing bowl and add the softened cream cheese, shredded white cheddar, garlic powder, onion powder, and black pepper. Now here's where most people mess up — they attack this mixture with a spoon and end up with a lumpy mess. Instead, use a hand mixer on medium speed for exactly 90 seconds. Watch the transformation as the ingredients come together into a smooth, fluffy cloud that looks like it belongs in a pillow commercial. The mixture should lighten in color and increase in volume, which means you've incorporated air for that perfect spreadable texture.
- Now comes the moment of truth — taste testing. Dip in a cracker and take a bite. The flavors should hit you in waves: first the creamy richness, then the sharp cheddar tang, followed by the warm garlic and onion, finishing with that gentle pepper heat. If it tastes flat, add a pinch more salt. If the garlic seems shy, add an extra 1/4 teaspoon. This is your chance to customize it to your palate, and trust me, nobody will judge you for "testing" three or four crackers worth.
- Time to shape our skull! Lay out a large sheet of plastic wrap on your counter. Scoop the mixture into the center and gather up the plastic wrap around it, twisting the top to form a tight ball. This next part? Pure magic. Place the wrapped ball in a small bowl that will help it maintain a round shape, then refrigerate for at least 2 hours. During this time, the fats will firm up and the flavors will meld together into something greater than the sum of their parts. Your patience here pays dividends later.
- While your cheese ball chills, let's craft Jack's face. Drain your black olives and pat them dry with paper towels. For the eyes, slice two thick rounds about 1/4 inch thick — these need to be substantial enough to stay put. For the nose, cut a small triangle. The stitched smile is where the magic happens: slice thin strips lengthwise, then use kitchen shears to snip them into small rectangular pieces. Lay everything out on a plate so you can see your palette. This prep work prevents you from frantically hacking at olives while guests arrive.
- After chilling, unwrap your cheese ball and place it on your serving platter. The surface might have condensation — gently pat it dry with a paper towel so the olives will adhere properly. Now for the fun part: press the eye pieces firmly into the surface, spacing them about 2 inches apart. Add the nose triangle centered below and between the eyes. For the stitched smile, start from one side and work across, pressing each piece in a curved line. Step back frequently to check your spacing — Jack's expression should look mischievous, not like he's in pain.
- The final touch involves creating definition around the face. Use a butter knife to gently score a line separating the face from the rest of the skull — this creates visual interest and makes Jack pop. If you want to get fancy, sprinkle a tiny bit of paprika around the edges for a warm glow effect. Cover loosely with plastic wrap and refrigerate until serving time. The completed cheese ball will keep for up to 3 days, making this perfect for party prep.
- When serving, surround your Skellington with an assortment of dippers: black crackers for a monochromatic theme, colorful vegetables for contrast, or even apple slices for that sweet-savory combination. Watch guests' faces light up when they recognize the Nightmare Before Christmas reference, then witness their eyes close in bliss when they taste it. The sizzle when someone spreads it on a warm cracker? Absolute perfection. This next part? Pure magic — people will hover around this appetizer like moths to a flame.
That's it — you did it. But hold on, I've got a few more tricks that'll take this to another level...
Insider Tricks for Flawless Results
The Temperature Rule Nobody Follows
Here's what separates amateur cheese balls from show-stopping centerpieces: temperature management. Your mixture should be between 68-72°F when shaping — warm enough to mold smoothly but cool enough to hold definition. If it's too cold, the surface will crack like a dry lakebed. Too warm, and it'll slump into a sad puddle before the party even starts. I keep a kitchen thermometer handy and check the mixture before forming the ball. This tiny step prevents 90% of cheese ball disasters.
I'll be honest — I ate half the batch before anyone else got to try it during my first attempt because I didn't wait for proper chilling. The mixture looked perfect, smelled incredible, and I convinced myself it needed "quality control testing." Twenty minutes later, I'd polished off enough to make a mini cheese ball, learning the hard way that patience pays off in the end.
Why Your Nose Knows Best
Your sense of smell is your secret weapon for perfectly balanced seasoning. After mixing, the mixture should smell like the best cheese shop you've ever visited — rich and inviting with hints of garlic and onion dancing in the background. If all you smell is cream cheese, you need more seasoning. If the garlic punches you in the face, you've gone too far. Trust your nose; it's been refined over thousands of years to detect perfect flavor balance.
A friend tried skipping this step once — let's just say it didn't end well. She added seasonings blindly, ended up with garlic-heavy mixture that cleared the room faster than a fire drill. We had to open windows in October, and the cheese ball became a conversation piece for all the wrong reasons.
The 5-Minute Rest That Changes Everything
After removing your cheese ball from the refrigerator, let it rest for exactly 5 minutes before serving. This brief pause allows the surface to soften just enough for easy spreading while maintaining its shape. Skip this step and guests will struggle, tearing crackers as they try to excavate cold, hard cheese. Wait too long and you'll watch your beautiful skull melt into anonymity. Set a timer — your future self will thank you.
The Olive Placement Technique That Professionals Use
Professional caterers use a simple trick for perfect olive placement every time: create paper templates. Cut a small circle from parchment paper the size of your cheese ball face, draw Jack's features on it, then use it as a guide to mark placement points with toothpicks. Remove the template and press olives into the marked spots. This guarantees perfect spacing and expression, even if you've had a few Halloween cocktails while assembling.
Creative Twists and Variations
This recipe is a playground. Here are some of my favorite ways to switch things up:
Spooky Spider Ball
Transform your skull into a spider by adding eight black olive legs made from thin strips, radiating from the cheese ball's center. Create eyes using whole olives cut in half, placed on top rather than the side. Serve surrounded by black tortilla chips that look like webbing. Kids go absolutely bananas for this version, and the dramatic presentation makes it perfect for classroom parties where you need to feed a crowd.
Sally-Inspired Patchwork
Channel Sally from Nightmare Before Christmas by creating patchwork sections using different colored cheeses. Divide your mixture into thirds: leave one plain white, mix blue food coloring into another, and add a touch of green to the third. Press sections together to create a marbled effect, then add simple olive eyes. The result looks like Sally's stitched-together dress in cheese form, and guests love the colorful twist on the classic.
Zero the Ghost Dog
For a sweeter take, swap the cheddar for marscarpone and add a tablespoon of honey. Shape into a rounded triangle for Zero's head, use thin carrot strips for his ears, and create his glowing nose with a small piece of roasted red pepper. This dessert version pairs beautifully with graham crackers and fruit, perfect for those who prefer their Halloween treats on the sweeter side.
Haunted Graveyard
Create a cemetery scene by making individual mini cheese balls shaped like ghosts. Use a small ice cream scoop for uniform portions, roll in shredded coconut for texture, and add faces with tiny bits of olive. Arrange them on a bed of crushed chocolate cookies to look like dirt, add cookie tombstones, and you've got an edible graveyard that'll have guests cackling with delight.
Oogie Boogie Edition
Channel the bogeyman himself by mixing in a tablespoon of pesto for green color and herby flavor. Roll the finished ball in finely chopped green onions to create Oogie's burlap texture. Use black sesame seeds for eyes and create his stitched smile with thin strips of roasted red pepper. Serve with "bug" additions like roasted pumpkin seeds and dried cranberries mixed around the platter.
Christmas Town Twist
When Halloween meets the holidays, swap the garlic and onion powders for 1/2 teaspoon of dried rosemary and 1/4 teaspoon of nutmeg. Add dried cranberries and chopped pecans to the mixture, creating a festive flavor that bridges the seasons. Shape into a snowman head instead of a skull, use peppercorns for eyes and mouth, and serve with gingerbread cookies for dipping.
Storing and Bringing It Back to Life
Fridge Storage
Wrap your finished Skellington cheese ball tightly in plastic wrap, pressing the wrap directly against the surface to prevent air exposure that causes drying. Store in the coldest part of your refrigerator, not in the door where temperatures fluctuate. Properly wrapped, it stays fresh for up to 5 days, though the olive decorations might start looking tired after day 3. For best presentation, add fresh olive features on day 2 or 3 if you're stretching it through the week.
If you've already cut into it, press plastic wrap directly onto the cut surface before wrapping the whole thing. This prevents the exposed area from hardening and developing that unappetizing dark crust. Add a tiny splash of water before rewrapping cut surfaces — it steams back to perfection, maintaining that just-made texture and appearance.
Freezer Friendly
Here's where this recipe really shines: freeze the shaped but undecorated cheese ball for up to 2 months. Wrap it in plastic wrap, then aluminum foil, and label with the date. Thaw overnight in the refrigerator, then add fresh olive decorations before serving. The texture remains perfect because the high fat content prevents ice crystal formation that ruins other frozen foods. I always keep one frozen for emergency entertaining — it's my secret weapon against unexpected guests.
Best Reheating Method
Technically, you don't reheat a cheese ball, but you might need to revive one that got too cold or dried out. If the surface seems dry, let it sit at room temperature for 15 minutes, then gently smooth the surface with a butter knife dipped in warm water. For overly firm cheese balls, microwave on defrost for 10-second intervals, checking after each burst. The goal is to soften just enough for easy spreading without melting the structure.