I was standing in my kitchen on a chilly October night, the wind howling outside, when a frantic text pinged in: “You have to bring something epic to the Halloween potluck or you’re out of the friend group forever.” I laughed, grabbed my favorite apron, and declared a culinary war on the dreaded store‑bought witch hat cookies that always turned out soggy and bland. The pantry was a battlefield of flour, butter, and a lonely jar of purple gel food coloring that had been waiting for a moment like this. I could already smell the buttery sweetness mingling with a faint nutty whisper, and I knew I was about to create a legend.
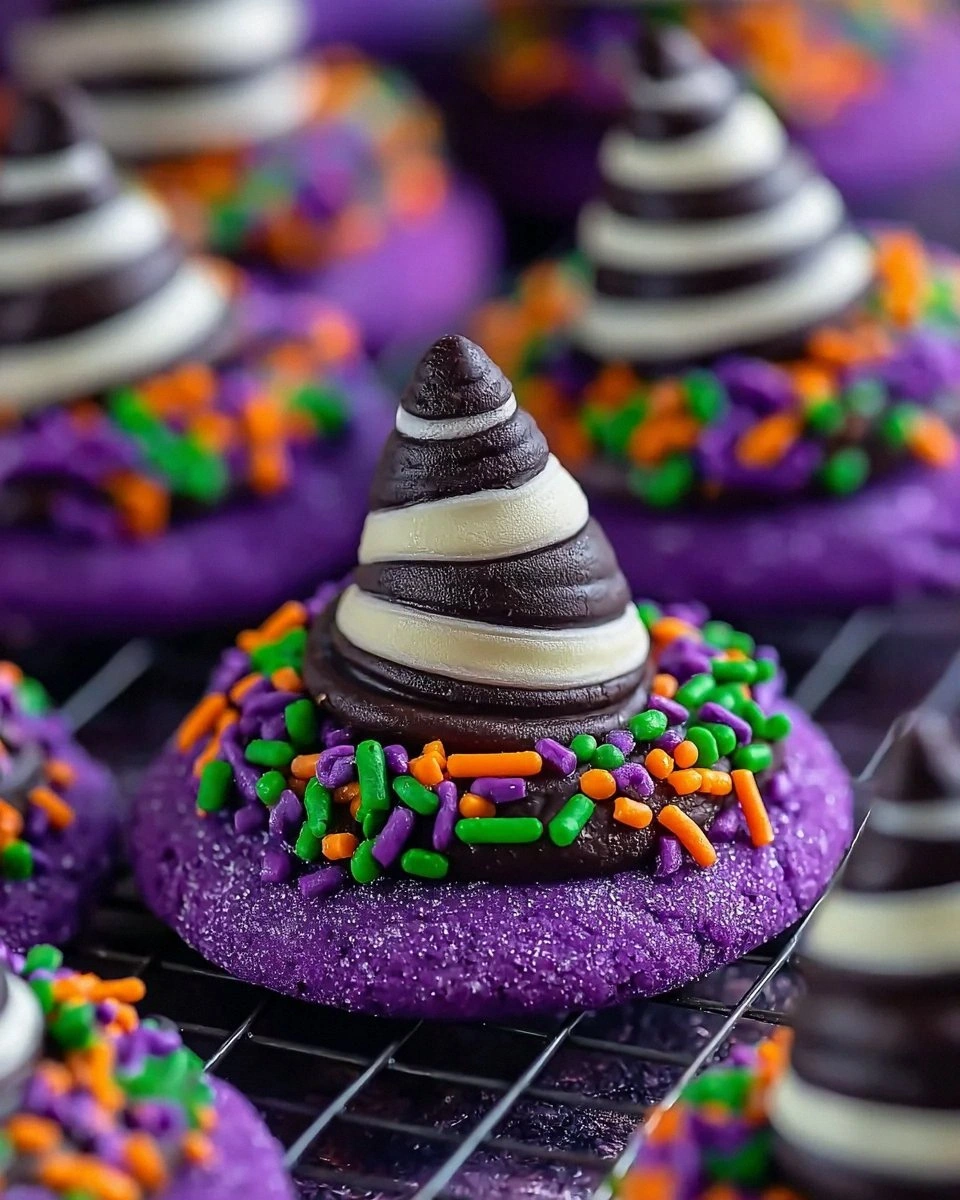
Picture this: a tray of cookies emerging from the oven, each one a perfect little witch’s hat, the purple hue as deep as a midnight sky, the edges crisped to a caramelized whisper, the centers chewy like a well‑kissed caramel. The chocolate kisses perched on top glisten like tiny moons, while the optional sprinkles add a sparkle that makes the whole batch look like a constellation of treats. The aroma? A warm, buttery perfume that wraps around your senses, with a subtle hint of vanilla that teases you into taking that first bite before you even see it. The moment you bite, the cookie’s exterior cracks with a gentle snap, giving way to a soft, peanut‑buttery heart that melts in your mouth. That, my friend, is the kind of sensory overload that makes you forget the world outside.
Most witch hat cookie recipes out there are either too hard, too soft, or they miss the magic of that deep violet color. I’ve tried the “quick fix” versions that use food‑grade dye and a pinch of cocoa, and they always ended up looking like a sad, faded lavender. The secret to this version? A precise balance of cornstarch and a dash of baking soda that creates a tender crumb while keeping the shape sturdy enough to hold its hat‑like silhouette. And let’s not forget the smooth peanut butter, the unsung hero that adds a depth of flavor you never expected in a Halloween cookie. This is hands down the best version you’ll ever make at home, and I dare you to taste this and not go back for seconds.
Let me walk you through every single step — by the end, you’ll wonder how you ever made it any other way. Okay, ready for the game‑changer? The technique that will transform your dough from ordinary to extraordinary is a simple chill‑and‑roll method that locks in moisture and guarantees those perfect, pointed hats. Stay with me here — this is worth it. I’ll be honest — I ate half the batch before anyone else got to try it, but that’s because the first bite feels like a tiny, edible celebration. So grab your mixing bowls, preheat that oven, and let’s conjure some witchy magic together.
What Makes This Version Stand Out
- Flavor Fusion: The combination of smooth peanut butter with a hint of vanilla creates a rich, nutty backdrop that elevates the cookie beyond ordinary sugar sweetness.
- Texture Mastery: Cornstarch and a touch of baking soda give the cookie a melt‑in‑your‑mouth interior while the edges stay crisp and buttery.
- Color Perfection: Purple gel food coloring is fully water‑based, so it blends seamlessly without altering the dough’s consistency, delivering a vivid, Halloween‑ready hue.
- Simple Ingredients: No exotic flours or hard‑to‑find spices; everything lives in a typical pantry, making the recipe accessible for any home cook.
- Show‑Stopping Presentation: Chocolate kisses or Hugs candies act as the perfect “hat topper,” turning each cookie into a miniature masterpiece that dazzles guests.
- Make‑Ahead Friendly: The dough can be refrigerated for up to 24 hours, allowing you to prep ahead of a busy Halloween party schedule.
- Kid‑Approved: The sweet, nutty flavor combined with the fun visual appeal means even the pickiest little monsters will devour them without complaint.
- Scalable: Whether you need a batch for a small family gathering or a full‑scale party, the serving adjuster in the recipe card scales everything perfectly.
Inside the Ingredient List
The Flavor Base
All‑purpose flour forms the structural backbone of our cookies, giving them that classic, tender crumb. If you substitute with a gluten‑free blend, expect a slightly crumbly texture, though a mix of rice flour and tapioca starch can mimic the original quite well. The fine sea salt isn’t just there for seasoning; a pinch amplifies the sweet and nutty notes, making the flavor pop like fireworks on a dark night. When you’re shopping, look for a salt with a crystalline structure; it dissolves evenly and prevents any gritty surprises.
The Texture Crew
Cornstarch is the unsung hero that lightens the dough, giving each bite a melt‑in‑your‑mouth quality that feels almost ethereal. Skip it, and you’ll end up with a denser, more biscuit‑like cookie that can’t hold its shape. Baking soda and baking powder work in tandem: the soda provides a quick rise while the powder offers a slower, more controlled lift, ensuring the hats stay pointed without ballooning. Unsalted butter, softened but not melted, adds richness and a buttery aroma that makes the kitchen smell like a bakery in October. When butter is too soft, the cookies spread; too cold, they stay flat and dense—so aim for that perfect, pliable consistency.
The Unexpected Star
Smooth peanut butter brings a creamy, nutty depth that transforms a simple sugar cookie into something truly memorable. It also contributes to the chewy interior that contrasts beautifully with the crisp edges. If you’re allergic or prefer a different flavor profile, try almond butter or a seed butter like sunflower for a similar texture with a subtle twist. White sugar is the sweetening agent that caramelizes slightly during baking, giving those golden edges a faint crunch. Large egg acts as the binder, adding moisture and structure; beating it too much can incorporate excess air, leading to a lighter, more cake‑like texture, which we don’t want here.
The Final Flourish
Vanilla extract is the aromatic spark that lifts the entire flavor profile, while purple gel food coloring provides the iconic Halloween hue without altering the dough’s balance. A little goes a long way—just a few drops will turn the batter a deep violet that looks stunning under any light. Optional Halloween sprinkles or purple sanding sugar add a festive sparkle, and the chocolate kisses or Hugs candies serve as the iconic “hat topper,” delivering a burst of chocolate that complements the peanut butter’s earthiness. If you’re feeling adventurous, swap the chocolate kisses for white chocolate drizzle for a contrasting visual effect.
Everything’s prepped? Good. Let’s get into the real action…
The Method — Step by Step
Preheat your oven to 350°F (175°C) and line two baking sheets with parchment paper. This temperature is the sweet spot that lets the butter melt just enough to create a crisp edge while keeping the interior soft. While the oven warms, the aroma of butter will already start to tease your senses, promising the delight to come.
In a large bowl, whisk together the flour, cornstarch, baking soda, baking powder, and fine sea salt. This dry blend ensures even distribution of leavening agents, preventing any bitter pockets of soda. The mixture should look like a fine, pale snow—smooth and ready for the wet ingredients.
In a separate medium bowl, beat the softened unsalted butter with white sugar until the mixture turns light and fluffy, about 2–3 minutes on medium speed. This creaming step incorporates air, giving the cookies a subtle lift. Power transition: Once you see the color lighten, you’re on the right track.
Add the large egg, smooth peanut butter, and vanilla extract to the butter‑sugar mixture. Beat until fully incorporated; the dough should become glossy and cohesive. Then, drizzle in the purple gel food coloring, starting with a few drops and mixing until the desired depth of violet is achieved. Remember, the color intensifies slightly during baking, so aim for a shade a touch brighter than you want the final result to be.
Gradually fold the dry ingredients into the wet mixture, using a spatula or wooden spoon. Mix just until you see no streaks of flour—over‑mixing will develop gluten and make the cookies tough. The dough will feel soft and slightly sticky, which is perfect for shaping.
Cover the bowl with plastic wrap and refrigerate the dough for at least 30 minutes, or up to 24 hours if you’re planning ahead. This chilling step solidifies the butter, preventing excessive spreading, and allows the flavors to meld. When you pull the dough out, you’ll notice it’s firmer and easier to roll.
While the dough chills, prepare your toppings: line up chocolate kisses or Hugs candies on a small plate, and have your Halloween sprinkles or sanding sugar ready. This prep ensures you can add the toppings quickly before the cookies bake, keeping the chocolate from melting.
Scoop out a tablespoon of dough, roll it into a ball, and then gently press it onto the parchment paper, shaping it into a cone by pinching the center and pulling the edges outward. The base should be slightly thicker to support the “hat” while the tip tapers. Place a chocolate kiss at the very tip, pressing lightly so it adheres. If you’re using sprinkles, dust them over the top now while the dough is still soft.
Bake the cookies for 12–14 minutes, or until the edges are golden brown and the tops have set but not darkened. The scent at this stage should be intoxicating—sweet, buttery, with a faint nutty note. Rotate the sheets halfway through for even browning. Remember, the cookies will continue to firm up as they cool, so don’t overbake.
Remove the trays from the oven and let the cookies cool on the parchment for 5 minutes before transferring them to a wire rack. This short rest allows the chocolate kisses to set and prevents the sprinkles from sliding off. As they cool, the cookies will snap lightly at the edges, delivering that perfect textural contrast.
That’s it — you did it. But hold on, I’ve got a few more tricks that’ll take this to another level. Trust me, the next steps are pure magic, and they’ll make your witch hats the talk of every Halloween gathering.
Insider Tricks for Flawless Results
The Temperature Rule Nobody Follows
Never bake cookies straight from the freezer. Letting the dough sit at room temperature for 5‑10 minutes before baking ensures even heat distribution, preventing a soggy center. I once tried a shortcut and ended up with a batch that looked like melted wax—lesson learned. The right temperature also helps the purple dye settle uniformly, giving each hat a consistent shade.
Why Your Nose Knows Best
Your sense of smell is the ultimate timer. When the edges start releasing a caramel‑nut aroma, you’re within minutes of perfection. If you hear a faint sizzle as the cookies hit the pan, that’s the sound of butter bubbling—another cue that they’re on the right track. Trust those olfactory hints more than the clock.
The 5‑Minute Rest That Changes Everything
After baking, let the cookies rest on the rack for exactly five minutes before moving them. This brief pause lets the interior finish setting, turning that chewy center into a melt‑in‑your‑mouth marvel. Skipping this step often results in a crumbly texture that breaks apart when you try to pick them up.
The Secret of the Sprinkles
If you want the sprinkles to stay put, lightly dust them with a pinch of cornstarch before applying. The starch creates a tacky surface that holds the sugar crystals without melting. This trick is especially useful if you’re using bright, colorful sprinkles that might otherwise slide off the warm chocolate.
The Final Chill Before Serving
Place the finished cookies in the fridge for 10 minutes before serving. The chill firms up the chocolate kisses, giving them a satisfying snap when bitten. It also intensifies the purple hue, making the cookies look even more bewitching under party lights.
Creative Twists and Variations
This recipe is a playground. Here are some of my favorite ways to switch things up:
Spooky Espresso Hat
Replace half the white sugar with brown sugar and add a teaspoon of finely ground espresso. The coffee notes deepen the flavor and give the cookies a richer, almost mocha‑like finish. Perfect for adult parties where you want a subtle caffeine kick.
Ghostly White Chocolate
Swap the chocolate kisses for white chocolate chips and drizzle with a thin river of melted dark chocolate after cooling. The contrast of white and dark creates a hauntingly beautiful marble effect, and the flavor profile becomes lighter and sweeter.
Nut‑Free Nightmare
Use sunflower seed butter instead of peanut butter and ensure the chocolate kisses are nut‑free. The seed butter provides a similar creamy texture while keeping the recipe safe for allergy‑prone guests. The flavor shifts slightly toward a toasted, earthy note.
Caramel Drizzle Delight
After the cookies have cooled, drizzle a thin line of caramel sauce over each hat and let it set. The caramel adds a buttery sweetness that pairs beautifully with the peanut butter base, and the visual of caramel ribbons adds a festive flair.
Pumpkin Spice Surprise
Add a pinch of pumpkin spice to the dry ingredients and a dash of orange food coloring to the dough. The spice blend gives a warm, autumnal flavor, while the orange tint creates a two‑tone effect when paired with the purple base. This variation is perfect for a Halloween‑October crossover.
Storing and Bringing It Back to Life
Fridge Storage
Place the cookies in an airtight container with a single sheet of parchment between layers. Store in the refrigerator for up to 5 days. The cool environment preserves the crisp edges while keeping the interior chewy. If you notice any dryness, add a slice of apple to the container to maintain moisture.
Freezer Friendly
Lay the cooled cookies on a baking sheet and freeze them individually for 1 hour, then transfer to a zip‑top freezer bag. They’ll keep for up to 3 months. When you’re ready to enjoy, let them thaw at room temperature for 15 minutes, then pop them in a 300°F (150°C) oven for 5 minutes to revive the crispness.
Best Reheating Method
For a quick refresh, place the cookies on a microwave‑safe plate, sprinkle a tiny splash of water (about a teaspoon) over the top, and microwave for 10‑12 seconds. The steam revives the soft interior, while the brief heat re‑crispes the edges. This trick works wonders when you’re short on time but still want that fresh‑out‑of‑the‑oven feel.