I was standing in my kitchen, half‑asleep, when my roommate burst in with a challenge that still haunts me: “Make a Boston cream that doesn’t look like a sad, soggy slice of cake!” I laughed, grabbed a handful of flour, and thought, what if the classic Boston cream pie could be transformed into a bite‑size wonder that fits perfectly on a party platter? The thought was half‑joking, half‑serious, and the next thing I knew I was whisking butter and sugar together, the whole apartment smelling like a bakery on fire. The oven roared, the pudding thickened, and the chocolate drizzle glistened like midnight on a lake. I dared myself to taste it before it cooled, and let’s just say I didn’t last long enough to finish the batch — I ate half the cupcakes before anyone else could lay a finger on them.
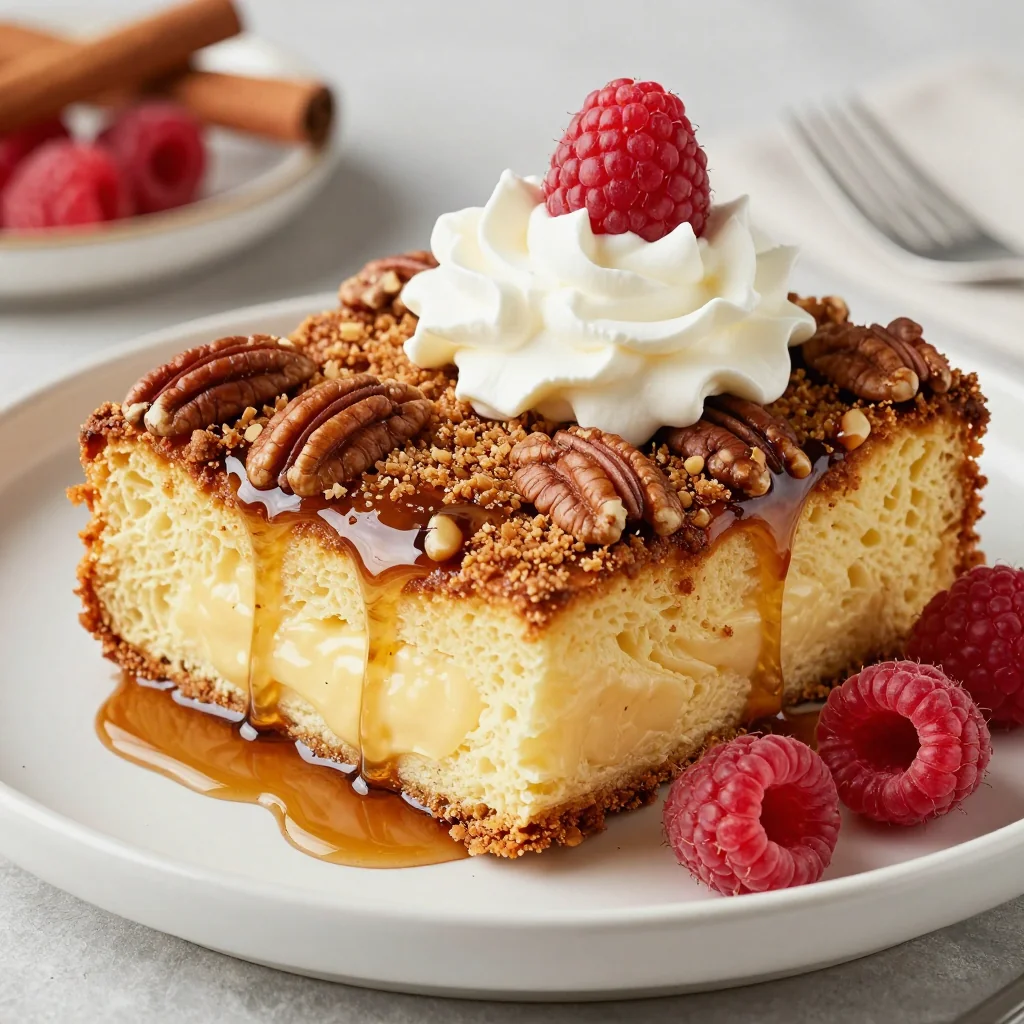
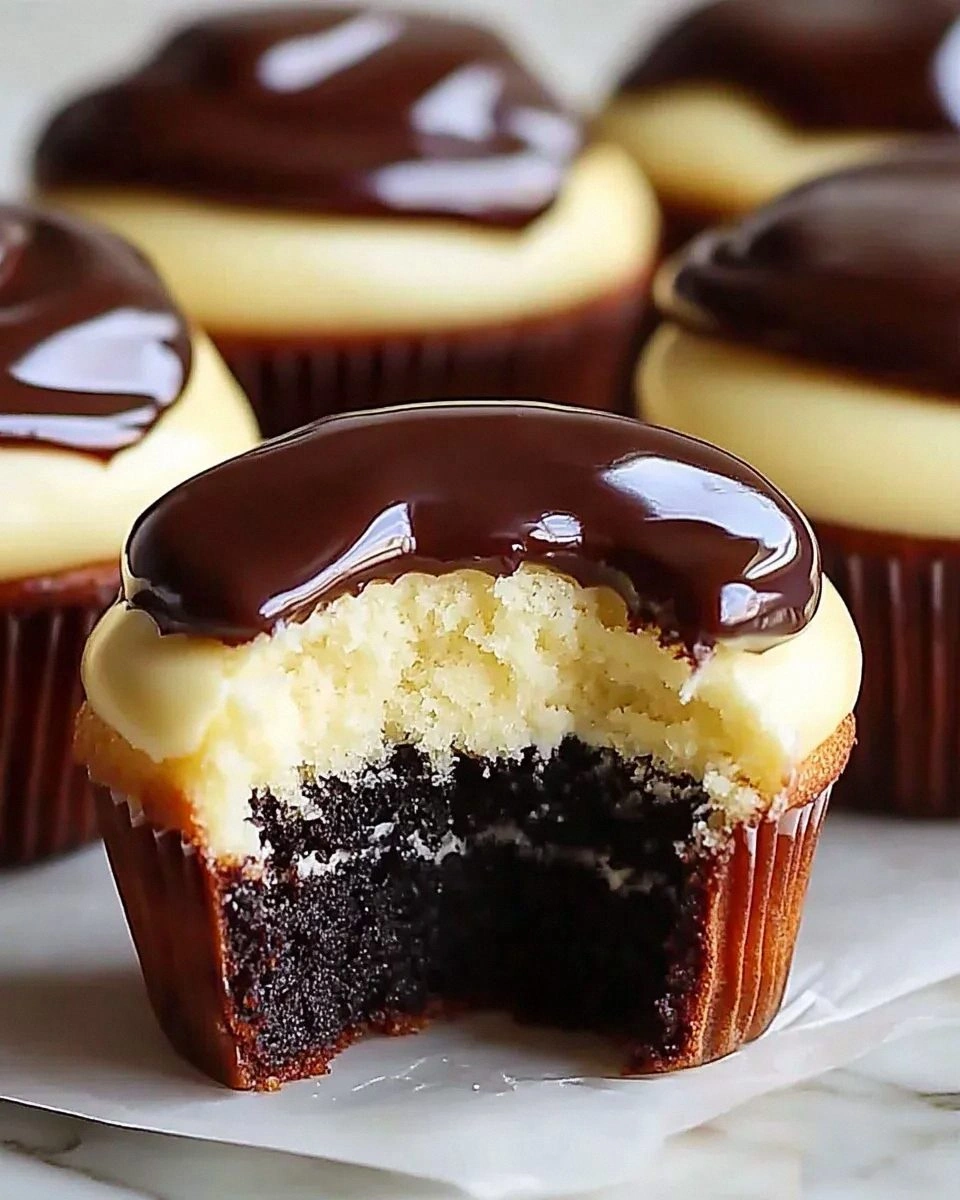
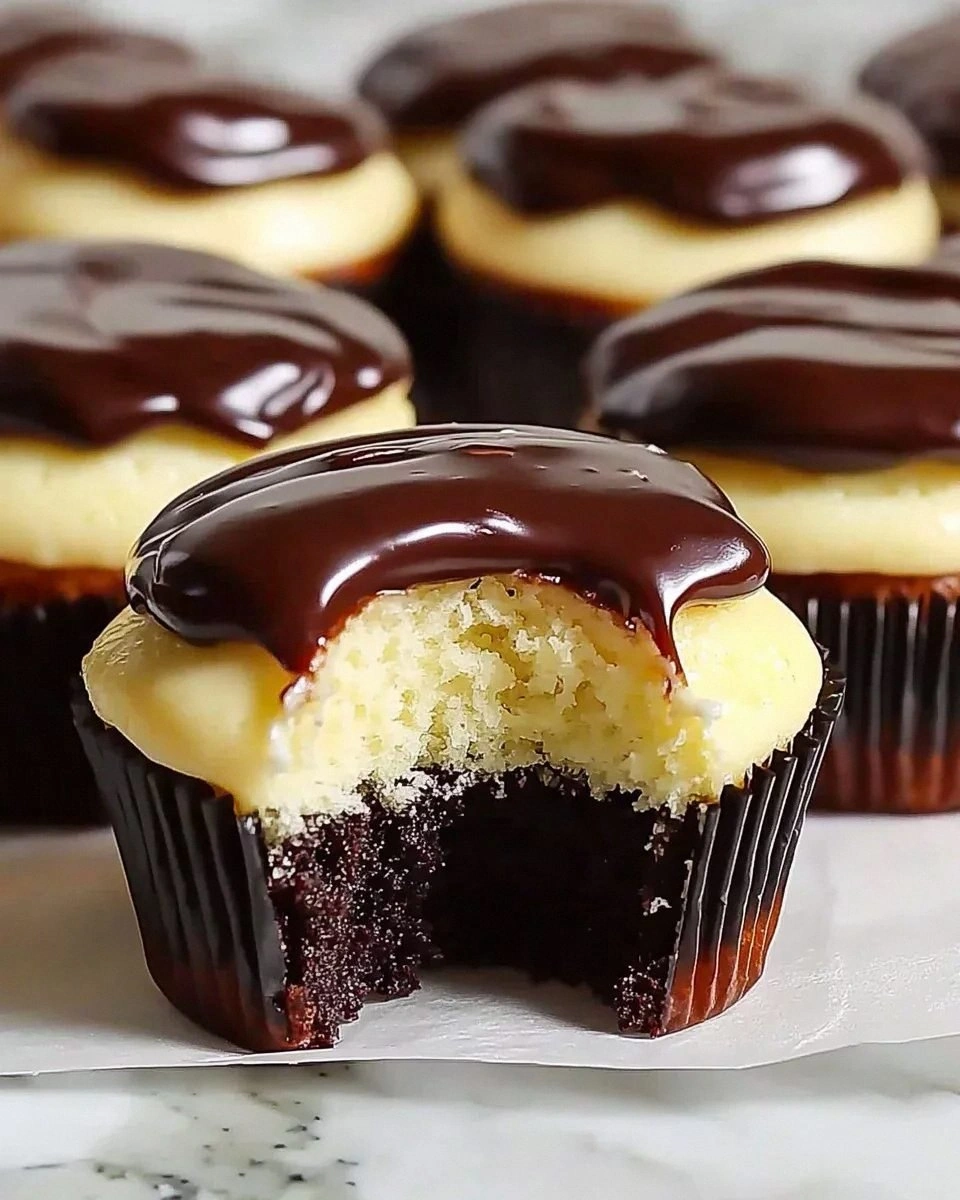
Picture this: you pull a tray of golden‑brown cupcakes from the oven, the tops domed like tiny clouds, the scent of vanilla and butter swirling around you like a warm hug. You cut one open, and the center reveals a silky vanilla custard that oozes out, hugging the crumb like a lover’s embrace. Then comes the chocolate glaze, glossy and rich, coating the top with a sheen that catches the light and makes every bite look Instagram‑ready. The moment the fork meets the frosting, you hear that faint crack, a promise that the exterior is crisp while the interior stays luxuriously creamy. The flavor? A perfect marriage of sweet, buttery cake, airy custard, and bittersweet chocolate that makes you whisper, “I dare you to taste this and not go back for seconds.”
Most Boston cream recipes get the balance wrong: either the cake is dry, the custard is too runny, or the chocolate glaze turns into a gloopy mess. I’ve tried them all, and I’ve learned that the secret lies in treating each component like a soloist in a symphony. In this version, I use a classic butter‑cream cupcake base that’s light enough to let the custard shine, a homemade vanilla pudding that’s thicker than store‑bought, and a chocolate glaze that sets with a snap, not a slide. The result is a cupcake that feels like a bite of nostalgia while delivering a fresh, modern twist that will make your friends question why they ever settled for the ordinary.
And here’s the kicker: I’m going to reveal a technique that most bakers overlook — the “double‑steam” method for the custard, which locks in moisture and creates a custard that’s as smooth as satin. It’s a tiny step that makes a massive difference, and I promise you’ll never go back to the old way again. Let me walk you through every single step — by the end, you’ll wonder how you ever made it any other way.
What Makes This Version Stand Out
- Flavor Harmony: The vanilla pudding is cooked to a velvety thickness that doesn’t overpower the chocolate, creating a balanced sweet‑and‑rich profile that sings in every bite.
- Texture Contrast: A light, fluffy cupcake meets a custard that’s creamy yet firm, topped with a chocolate glaze that cracks like a delicate shell.
- Simplicity: No fancy equipment, just a mixer, a saucepan, and a good oven. The steps are straightforward, yet the outcome feels gourmet.
- Unique Twist: By turning a classic pie into cupcakes, you get portion control, easier serving, and a fun, handheld treat that’s perfect for parties.
- Crowd Reaction: Expect gasps, “Wow!” moments, and the inevitable request for the recipe. This dessert is a guaranteed show‑stopper.
- Ingredient Quality: Using real butter, fresh vanilla, and high‑quality chocolate elevates the whole experience from “good” to “legendary.”
- Cooking Method: The double‑steam custard and the low‑heat chocolate glaze keep everything from drying out or becoming grainy.
- Make‑Ahead Potential: You can prep the custard a day ahead and store the cupcakes unglazed, then finish with chocolate right before serving.
Inside the Ingredient List
The Flavor Base
All‑purpose flour is the backbone of any good cake, providing structure without being too heavy. Why it matters: The gluten it forms holds the cupcake together while still allowing it to rise beautifully. If you skip it or replace it with a gluten‑free blend that’s too dense, you’ll end up with a crumb that’s more biscuit than cake. For the best results, sift the flour with the baking powder and salt; this aerates it and ensures an even rise.
The Texture Crew
Unsalted butter, softened to room temperature, creates that melt‑in‑your‑mouth richness. What if you use margarine? You’ll lose that buttery flavor and the crumb may turn greasy. Sugar not only sweetens but also helps to incorporate air when creamed with butter, giving the cupcakes their light texture. Eggs act as emulsifiers, binding the fat and liquid together; using large eggs ensures enough moisture without making the batter watery. Milk adds tenderness, but you can swap it for almond milk if you’re dairy‑free — just expect a slightly nutty undertone.
The Unexpected Star
Vanilla pudding is the hero that turns this from a simple cupcake into a Boston cream masterpiece. I make it from scratch using milk, sugar, vanilla extract, and a bit of cornstarch to achieve that custard‑like thickness. Pro tip: Cook it over a double boiler (the “double‑steam” method) to prevent scorching and to keep the texture silky. If you’re short on time, a high‑quality instant pudding works, but the flavor won’t be as deep.
The Final Flourish
Semi‑sweet chocolate chips are melted with a splash of heavy cream to create a glossy glaze that sets with a firm snap. The chocolate’s cocoa butter content is crucial; low‑quality chips can become grainy when melted. Heavy cream adds body and shine, turning the glaze into a mirror‑like finish. If you prefer a darker chocolate, swap half of the chips for dark chocolate chunks, but keep the total weight the same to maintain consistency.
Everything's prepped? Good. Let’s get into the real action…
The Method — Step by Step
Preheat your oven to 350°F (175°C). While the oven warms, line a 12‑cup muffin tin with paper liners. This is the moment of truth — the right temperature ensures a golden dome without drying out the crumb.
In a large bowl, cream together the softened butter and granulated sugar until the mixture is light, fluffy, and pale yellow. The sound of the mixer should be a soft whir, and the texture will look almost like whipped cream. Power transition: Okay, ready for the game‑changer?
Add the eggs one at a time, beating well after each addition, then stir in the vanilla extract. The batter should become glossy and smooth, with the eggs fully incorporated, creating a glossy ribbon when you lift the whisk.
In a separate bowl, whisk together the flour, baking powder, and salt. Watch Out: Over‑mixing the dry ingredients can develop gluten, leading to a tough cupcake. Gently fold the dry mixture into the wet ingredients, just until you no longer see streaks of flour.
Pour in the milk and stir until the batter is silky and uniform. The batter should be thick enough to hold its shape when piped, but not so stiff that it resists spreading. Fill each cupcake liner about two‑thirds full; this gives room for the batter to rise without spilling over.
Bake for 18‑20 minutes, or until a toothpick inserted into the center comes out clean and the tops are lightly golden. The edges will start pulling away from the pan, a sign they’re done.
Kitchen Hack: Rotate the pan halfway through baking for an even dome and uniform color.While the cupcakes cool, prepare the vanilla pudding. In a saucepan, combine milk, sugar, and a pinch of salt; bring to a gentle simmer. In a separate bowl, whisk together the pudding mix (or homemade starch blend) with a little cold milk, then pour into the simmering pot, stirring constantly until thickened. Once it reaches a spoon‑coating consistency, remove from heat and whisk in the vanilla extract.
Let the pudding cool slightly, then pipe a generous dollop into the center of each cupcake using a pastry bag fitted with a large tip. The custard should sink just a little, creating a hidden reservoir of silky goodness.
Watch Out: If the custard is too hot, it will melt the cupcake crumb; let it cool to room temperature before filling.For the chocolate glaze, heat the heavy cream in a small saucepan until it just begins to simmer. Remove from heat and pour over the chocolate chips in a heat‑proof bowl. Let sit for a minute, then whisk until smooth and glossy. The glaze should be pourable but thick enough to coat the tops without running off the sides.
Place the filled cupcakes on a wire rack and drizzle the chocolate glaze over each one, allowing it to pool slightly before it sets. The chocolate will form a glossy shell that cracks delightfully when you bite into it. Let the glaze set for about 10 minutes, then serve immediately or store in an airtight container.
That's it — you did it. But hold on, I've got a few more tricks that'll take this to another level, because a good dessert never stops evolving.
Insider Tricks for Flawless Results
The Temperature Rule Nobody Follows
Never bake cupcakes straight from the fridge. Cold batter can cause the oven temperature to drop, resulting in uneven rise. Let the batter sit at room temperature for 10‑15 minutes before scooping; this tiny pause gives the butter a chance to relax and the leaveners to activate fully. I once tried to skip this step and ended up with cupcakes that looked like flat pancakes. Trust me, the extra minute is worth the perfect dome.
Why Your Nose Knows Best
When the cupcakes are in the oven, the aroma will change from buttery to nutty as the Maillard reaction kicks in. If you smell a faint caramel note, the tops are about to turn golden. This sensory cue is more reliable than a timer because ovens vary. I’ve learned to pull the tray when the scent hits that sweet‑but‑slightly‑toasted stage, ensuring a moist interior and a crisp exterior.
The 5‑Minute Rest That Changes Everything
After piping the custard, let the cupcakes rest for five minutes before glazing. This short pause allows the custard to set slightly, preventing it from mixing with the chocolate glaze. A friend once tried to glaze immediately and ended up with a marbled mess — the custard leaked into the chocolate, creating a soggy top. Patience here is the secret to that clean, glossy finish.
Chocolate Tempering Shortcut
If you want a glossy, snap‑y glaze without a tempering machine, simply melt the chocolate with the cream and then let it cool to about 90°F before drizzling. The cream acts as a natural tempering agent, giving the glaze that professional sheen. I’ve used this trick for other desserts and it never fails. The result? A chocolate coat that stays firm at room temperature, perfect for a buffet.
Creative Twists and Variations
This recipe is a playground. Here are some of my favorite ways to switch things up:
Mocha Madness
Add a teaspoon of espresso powder to the chocolate glaze and swap half of the vanilla pudding for chocolate pudding. The result is a coffee‑kissed version that’s perfect for brunch or an afternoon pick‑me‑up.
Berry Burst
Fold fresh raspberries or strawberries into the vanilla pudding before piping. The fruit adds a bright acidity that cuts through the richness, and the little pink specks make the cupcakes look festive.
Salted Caramel Swirl
Drizzle a thin line of homemade salted caramel over the chocolate glaze just before it sets. The salty caramel ribbons create a flavor contrast that feels luxurious and indulgent.
Nutty Crunch
Stir toasted chopped hazelnuts or almonds into the chocolate glaze. The nuts add a pleasant crunch and a buttery flavor that pairs beautifully with the custard.
Vegan Velvet
Replace butter with coconut oil, use almond milk, and swap the eggs for flaxseed “eggs.” Use a dairy‑free chocolate and coconut cream for the glaze. The texture changes slightly, but the flavor remains decadently creamy.
Storing and Bringing It Back to Life
Fridge Storage
Place the cupcakes in an airtight container and refrigerate for up to three days. Keep the chocolate glaze on top; it will firm up, but the custard stays moist. Before serving, let them sit at room temperature for 15 minutes to soften the glaze.
Freezer Friendly
Freeze the baked, unfilled cupcakes for up to two months. When ready, thaw overnight in the fridge, pipe fresh custard, and glaze. This method preserves the crumb structure and lets you have fresh‑baked cupcakes on demand.
Best Reheating Method
To revive a chilled cupcake, place it on a microwave‑safe plate, add a tiny splash (about a teaspoon) of water, and microwave for 10‑12 seconds. The steam generated re‑hydrates the crumb, while the chocolate glaze softens just enough to be luscious again. Avoid microwaving for too long, or you’ll lose the delicate crack of the glaze.