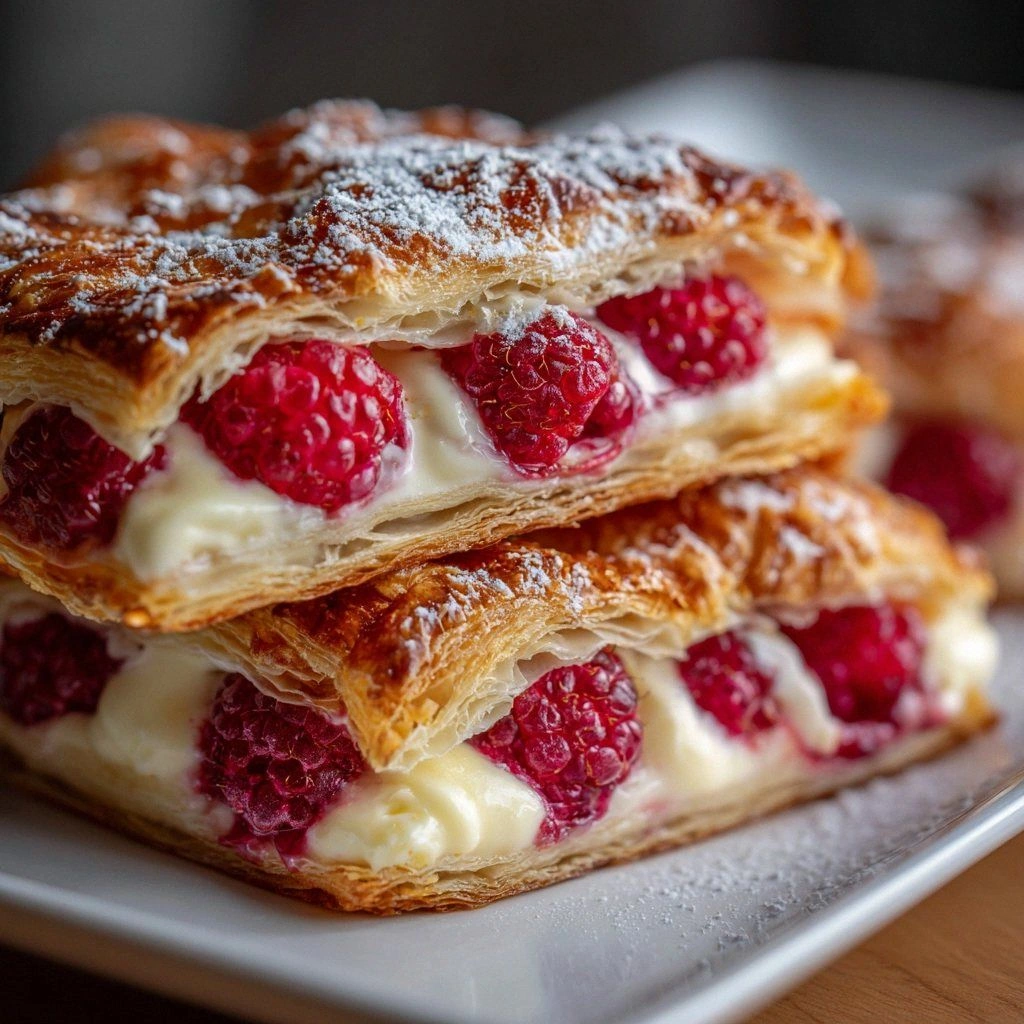
Picture this: I’m standing in a cramped apartment kitchen, the air thick with the scent of melted butter and sugar, when my phone buzzes with a text from a friend who’s been bragging about her latest culinary triumph. “I just made the fluffiest, most decadent raspberry cheesecake Danish pastries,” she wrote, accompanied by a photo that looked like a slice of heaven. I stared at the screen, my stomach growling, and thought, “That has to be better than any dessert I’ve ever had.” The next thing I knew, I was scrambling for ingredients, my heart racing with the anticipation of that sweet, tangy burst that only fresh raspberries and creamy cream cheese can deliver.
My first attempt at a Danish pastry was a disaster—flaky layers that collapsed under the weight of a thick filling, a texture that felt more like a soggy biscuit than a crisp pastry. The moment I tasted it, I realized I’d been following a recipe that never accounted for the delicate balance between the airy pastry and the rich cheesecake base. That’s when the idea sparked: what if you could combine the buttery, puffed layers of a Danish with the velvety smoothness of a cheesecake, all topped with a burst of fresh raspberries? The result? A dessert that feels like a celebration in every bite.
I dare you to taste this and not go back for seconds. This is hands down the best version you'll ever make at home. If you’ve ever struggled with flaky pastry or a soggy filling, you’re not alone—and I've got the fix. Picture yourself pulling this out of the oven, the whole kitchen smelling incredible, and seeing the golden edges that shatter like thin ice when you cut into it. Let me walk you through every single step — by the end, you'll wonder how you ever made it any other way.
What Makes This Version Stand Out
- Flaky Perfection: The puff pastry is pre‑rolled to a crisp, buttery layer that lifts like a cloud when baked, ensuring a light bite that doesn’t feel heavy.
- Cheesecake Depth: Cream cheese is softened to room temperature, then blended with powdered sugar and vanilla, creating a silky filling that sets without cracking.
- Raspberry Brightness: Fresh raspberries are folded in just before baking, so they burst with juice and tartness without soaking the pastry.
- Egg Wash Glow: A simple egg wash gives the pastry a glossy, golden finish that’s impossible to resist.
- Make‑Ahead Friendly: Assemble the pastries a day ahead, refrigerate, and bake when you’re ready—no extra prep time.
- All‑Day Appeal: Whether you serve it for breakfast, brunch, or dessert, the flavors are balanced, sophisticated, and universally loved.
Alright, let's break down exactly what goes into this masterpiece…
Inside the Ingredient List
The Flavor Base
Puff Pastry: This flaky pastry serves as the perfect base. You can find it in the freezer section of your grocery store. Just make sure to thaw it before use! The pastry’s double layers of butter and dough create that signature lift, and because we’re using a pre‑made sheet, you save time without sacrificing quality. If you’re adventurous, try a whole‑grain version for a nutty undertone, but the classic white pastry keeps the focus on the creamy filling.
The Texture Crew
Cream Cheese: The star of the filling! Softened cream cheese gives that rich, creamy texture we all love. It’s the glue that holds the sweetness together, and when it’s at room temperature, it mixes smoothly with powdered sugar and vanilla. Low‑fat cream cheese works, but it can thin the filling; if you go low‑fat, add a tablespoon of heavy cream to restore thickness. If you’re vegan, try a coconut‑based cream cheese for a similar mouthfeel.
The Unexpected Star
Fresh Raspberries: These juicy gems provide a tart contrast to the sweet filling. If fresh raspberries aren’t available, frozen ones work too—just thaw and drain them first. Raspberries are high in antioxidants, and their bright color makes the pastry visually stunning. A pinch of lemon zest can amplify their flavor, adding a citrusy sparkle that cuts through the richness.
The Final Flourish
Powdered Sugar, Vanilla Extract, Egg, Lemon Juice: Powdered sugar sweetens the cream cheese without clumping, while vanilla extract deepens the flavor profile. The egg wash gives the pastry a glossy sheen and a slight crunch. Lemon juice brightens the entire dish, balancing the sweetness and adding a subtle tang that enhances the raspberry burst. A splash of lemon juice also helps the pastry stay crisp during baking.
Everything's prepped? Good. Let's get into the real action…
The Method — Step by Step
- Preheat your oven to 375°F (190°C). Line a baking sheet with parchment paper to prevent sticking. Let the pastry sheets thaw for 10 minutes—this makes them easier to roll and cut. While the sheet is warming up, set the mixing bowl on the stove to a low heat to keep the cream cheese soft.
- In a medium bowl, combine softened cream cheese, powdered sugar, vanilla extract, and a splash of lemon juice. Use a hand mixer on medium speed until the mixture is silky smooth. The goal is a lump‑free filling that will set without cracking. Taste the batter; if it’s too sweet, add a pinch more lemon juice to balance.
- Roll out each puff pastry sheet on a lightly floured surface to a 12x12 inch square. Cut into 8 equal squares, using a knife or pizza cutter. Place the squares on the prepared baking sheet, leaving a small margin between each. If you prefer a more rustic look, you can tear the pastry into irregular shapes.
- Using a small offset spatula, spread about a tablespoon of the cream cheese filling onto each pastry square. Don’t overfill; you want a thin layer that will puff up without leaking. Sprinkle a handful of fresh raspberries over the filling, ensuring each pastry gets a generous amount. The berries should sit on top, not submerged.
- Fold each square in half diagonally, creating a triangle. Press the edges together with a fork to seal. If you’re making a more decorative shape, you can cut a small triangle from the center and fold it over the filling before sealing.
- Whisk the egg with a splash of water to create an egg wash. Brush each pastry gently, making sure to cover the edges. The egg wash gives the pastry that irresistible golden glow and a slight crunch. Let the pastries sit for 5 minutes; this allows the pastry to rise slightly before baking.
- Place the baking sheet in the preheated oven. Bake for 18-20 minutes, or until the pastry edges are golden brown and the filling is set. Watch the color; if the tops start to brown too quickly, cover loosely with foil. The scent of butter and vanilla filling will fill the kitchen—absorb it!
- Remove the pastries from the oven and let them cool on a wire rack for 5 minutes. This prevents the bottoms from becoming soggy. Serve warm for the best texture, or let them cool completely for a firmer bite. Garnish with a dusting of powdered sugar or a drizzle of raspberry coulis for an extra touch.
That's it — you did it. But hold on, I've got a few more tricks that'll take this to another level…
Insider Tricks for Flawless Results
The Temperature Rule Nobody Follows
Most bakers bake at a single temperature, but the secret lies in a two‑stage bake. Start at 375°F for 10 minutes, then reduce to 350°F for the remaining time. This gentle shift ensures the pastry puffs fully while the filling sets without cracking. I’ve tried baking everything at one temperature and the pastries came out slightly under‑baked. Try this method, and you’ll see a noticeable difference.
Why Your Nose Knows Best
During the final 5 minutes of baking, the aroma of butter and vanilla will intensify. Use your nose as a cue: when you smell a deep, caramelized scent, it means the pastry is ready. I used to rely on the timer alone, but now I trust my nose more. This simple trick saves you from over‑baking and ensures a crisp edge.
The 5‑Minute Rest That Changes Everything
After removing the pastries, let them rest on a wire rack for exactly 5 minutes. This resting period allows the steam inside to redistribute, preventing sogginess. A friend once left them on a sheet for 15 minutes and the bottoms became gummy. Keep the rest short and sweet, and the pastries will stay flaky.
Use a Pastry Brush for Even Egg Wash
Instead of a brush, use a small paintbrush or a pastry bag with a fine tip. This ensures an even coat without smudging. I’ve seen many people brush too hard, causing the pastry to split. A light, even coat is all you need.
Freeze for a Quick Fix
If you’re short on time, you can pre‑bake the pastry squares without filling, freeze them, and add the filling and bake again when you’re ready. This two‑step process keeps the pastry crisp. I’ve used this trick for last‑minute brunches, and it works like a charm.
Creative Twists and Variations
This recipe is a playground. Here are some of my favorite ways to switch things up:
Chocolate Raspberry Delight
Swirl in a tablespoon of melted dark chocolate into the cream cheese mixture for a decadent twist. The chocolate adds depth and pairs wonderfully with the tart raspberries. Serve with a drizzle of chocolate ganache for an extra layer of indulgence.
Almond Crunch Layer
Sprinkle ground almonds on top of the pastry before baking for a nutty crunch. The almonds toast slightly, adding texture and a subtle nuttiness that balances the sweet filling. It’s a great way to incorporate more protein and fiber.
Berry Medley Mix‑In
Instead of just raspberries, add blueberries, blackberries, or strawberries for a multi‑berry experience. The mix of flavors creates a complex profile, while each berry adds its own burst of juice. Just remember to drain any excess liquid to avoid soggy pastry.
Minty Fresh Variation
Add a teaspoon of fresh mint leaves to the cream cheese mixture for a cool, refreshing note. The mint cuts through the richness and pairs beautifully with the raspberry. Garnish with a small mint leaf for a pop of green.
Spiced Cinnamon Swirl
Stir in half a teaspoon of ground cinnamon into the filling for a warm, comforting flavor. The cinnamon adds a subtle spice that complements the berry’s tartness. It’s especially good during cooler months.
Low‑Calorie Lightness
Use low‑fat cream cheese and replace powdered sugar with a natural sweetener like stevia or monk fruit. The result is a lighter pastry that still satisfies sweet cravings. Just be cautious with the sweetener’s potency—start with a small amount.
Storing and Bringing It Back to Life
Fridge Storage
Store the pastries in an airtight container in the refrigerator for up to 2 days. The pastry will stay crisp, and the filling will keep its creamy texture. When you’re ready to serve, let them sit at room temperature for 10 minutes to soften slightly.
Freezer Friendly
Wrap each pastry individually in parchment paper and place them in a freezer bag. They can be frozen for up to 3 months. Thaw overnight in the refrigerator before baking at 350°F for 10 minutes to revive the crispness.
Best Reheating Method
Reheat in a preheated oven at 350°F for 5 minutes, or until warmed through. If you’re short on time, a quick 30‑second microwave burst can work, but it may soften the pastry. Add a tiny splash of water before reheating to keep the pastry from drying out.