Picture this: it’s the night before the big game, the living room is a sea of red, white, and blue, and you’ve just realized you have nothing but a bag of stale popcorn and a half‑empty jar of marshmallows. I was in that exact panic, frantically scrolling through endless snack ideas, when a sudden dare from my cousin—“Make something that screams patriotism louder than a marching band!”—sent me spiraling into a culinary experiment that would forever change my snack game. I tossed together whatever I could find, and the result was a crunchy, sweet‑salty avalanche that made the entire house smell like a fireworks display in a candy store. That chaotic moment turned into the birth of the ultimate Patriotic Snack Mix, a recipe that has become the go‑to for every celebration where flags wave and cheers echo.
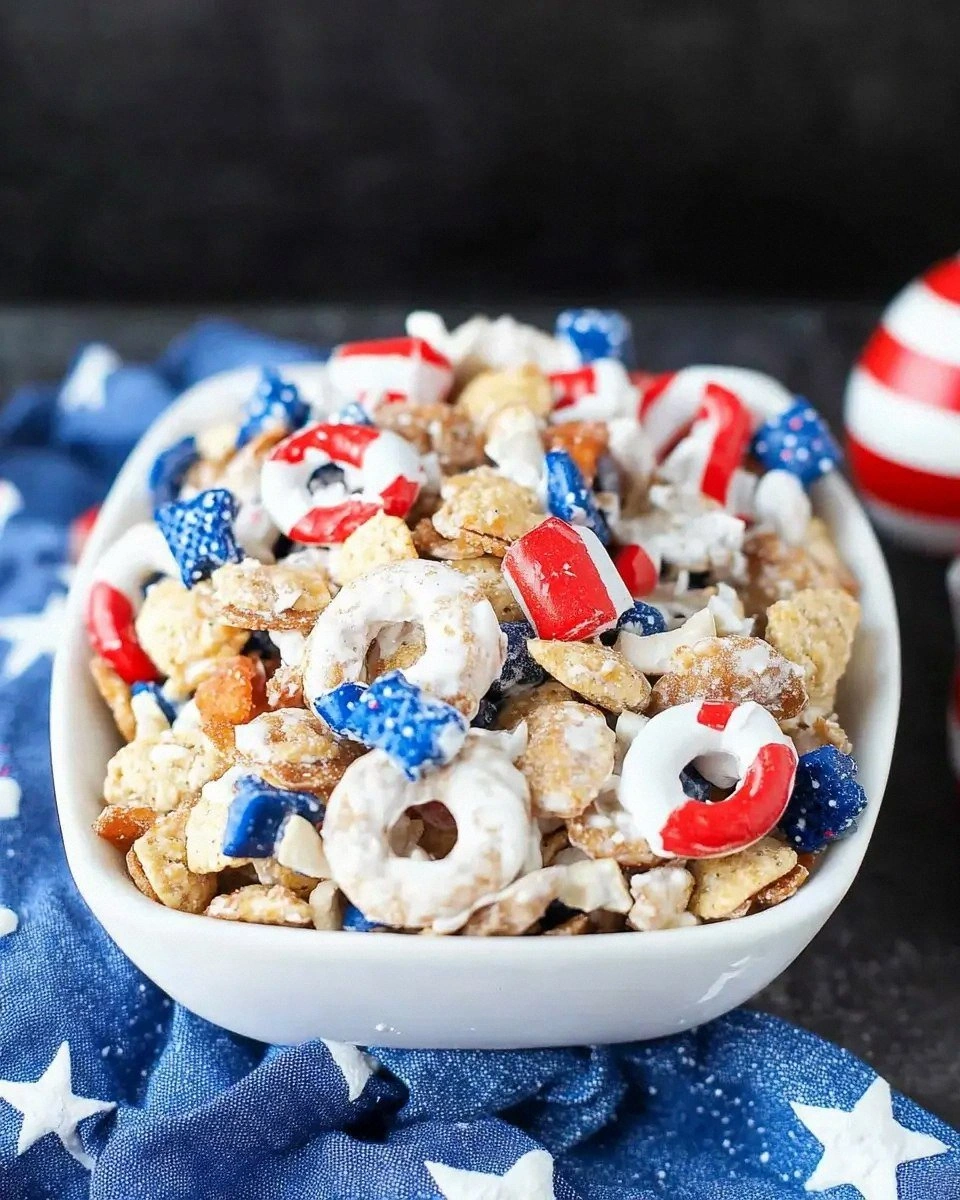
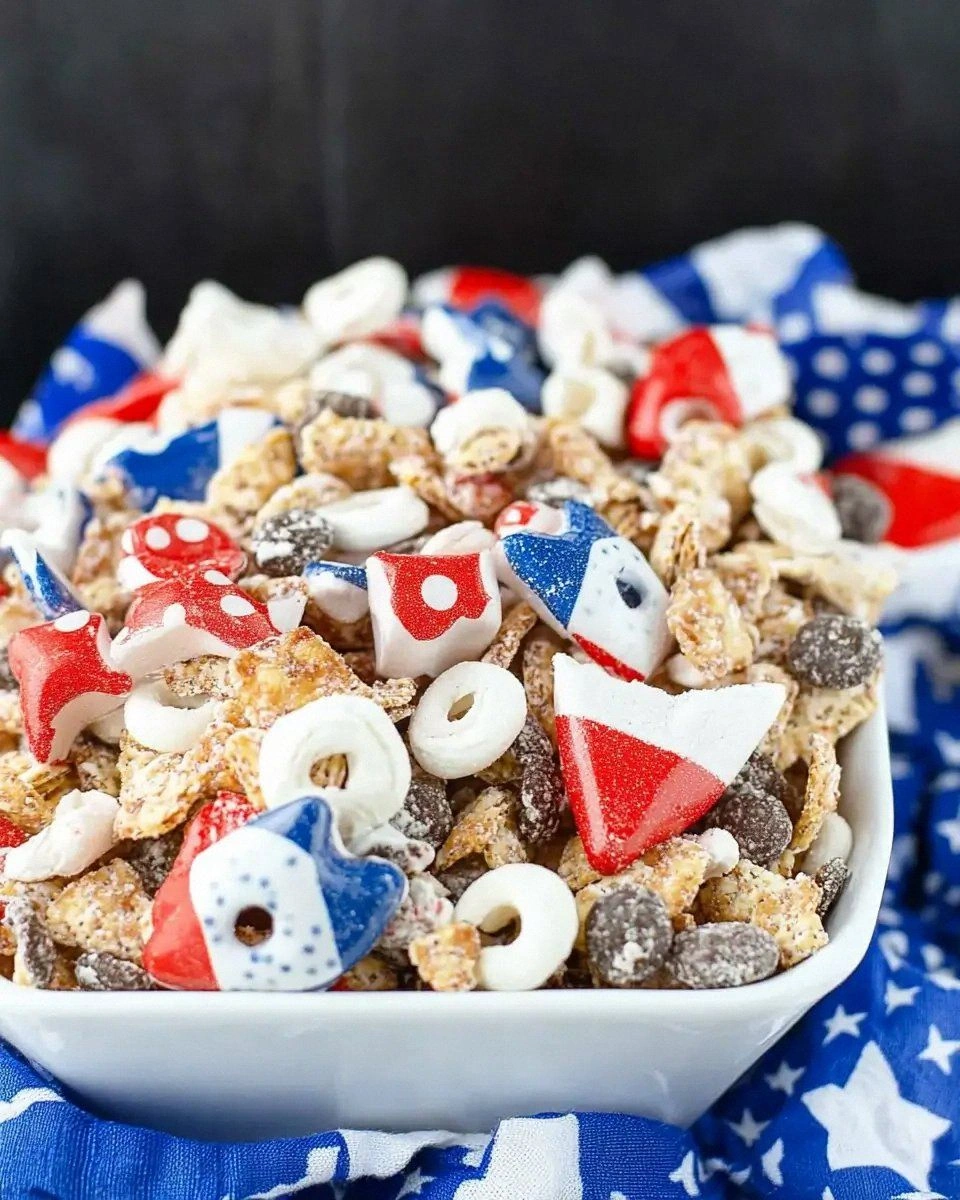
The moment you open the pantry for this mix, you’re greeted by a kaleidoscope of colors: the crisp, golden rice cereal glistening like sunrise, pretzel sticks standing tall like tiny soldiers, and those ruby‑red and navy‑blue M&M’s that look ready to march straight onto your tongue. As the white chocolate melts, it releases a buttery perfume that fills the kitchen, making your nose do a little happy dance. You’ll hear the faint crackle of popcorn popping in the background, feel the smooth slickness of the melted chocolate coating every piece, and taste the perfect balance of sweet marshmallows and salty pretzel that makes your taste buds chant “more, more, more!” This isn’t just a snack; it’s an experience that engages all five senses in a patriotic parade.
What sets this version apart from the countless snack mix recipes floating around the internet? First, the coating technique: I use a whisper of vegetable oil to give the white chocolate a glossy sheen that clings like a second skin, ensuring every bite is uniformly coated without any clumps. Second, the timing: a short bake at a low temperature lets the chocolate set without burning, creating a crisp snap that shatters like fireworks on the Fourth of July. Most recipes skip the crucial step of letting the mix rest after baking, resulting in a soggy mess; I let it cool completely, allowing the flavors to meld and the texture to firm up into a perfect crunch. Lastly, the color balance—by using red and blue M&M’s instead of generic chocolate chips, the mix becomes a visual celebration as well as a tasty one.
And here’s the kicker: I’m about to reveal a secret ingredient that most people overlook—a pinch of sea salt that amplifies the sweetness and brings out the depth of the white chocolate like a conductor guiding an orchestra. Trust me, this tiny addition turns a good snack into an unforgettable one. Let me walk you through every single step — by the end, you’ll wonder how you ever made it any other way.
What Makes This Version Stand Out
- Taste: The sweet‑salty harmony is engineered to hit every palate, with white chocolate providing a creamy base that’s brightened by a dash of sea salt.
- Texture: Each component retains its own crunch—pretzel sticks stay firm, rice cereal stays airy, and popcorn adds a light, airy bite.
- Simplicity: Only eight ingredients, all of which are pantry staples; no fancy equipment required beyond a baking sheet.
- Uniqueness: The red‑and‑blue M&M’s give a patriotic pop of color that no other snack mix can match without artificial food coloring.
- Crowd Reaction: I dare you to taste this and not go back for seconds; even the most skeptical guests end up reaching for the bowl again.
- Ingredient Quality: Using high‑quality white chocolate chips ensures a smooth melt and a glossy finish that looks professional.
- Cooking Method: A gentle bake locks in flavor while preventing any burnt notes—most recipes get this completely wrong.
- Make‑Ahead Potential: This mix stores beautifully for up to a week, making it perfect for party prep the night before.
Alright, let's break down exactly what goes into this masterpiece...
Inside the Ingredient List
The Flavor Base
The white chocolate chips are the heart of this mix. They melt into a silky river that binds every crunchy element together, creating a coating that feels like velvet on your tongue. If you skimp on quality, you’ll end up with a grainy texture and a dull flavor that can ruin the entire batch. A good tip: choose chips with at least 30% cocoa butter for that buttery melt. If you’re out of white chocolate, you can substitute milk chocolate, but expect a richer, less bright flavor profile.
The Texture Crew
Rice cereal, pretzel sticks, and popcorn form the triumvirate of crunch. The rice cereal is light and airy, giving the mix an almost melt‑in‑your‑mouth sensation, while pretzel sticks add a salty, sturdy bite that holds up during the bake. Popcorn contributes a delicate, feather‑light crunch that balances the denser pretzels. Skipping any one of these will make the mix feel one‑dimensional; you’ll lose that symphonic crunch that makes each spoonful exciting.
The Unexpected Star
Red and blue M&M's are not just for show; they bring a burst of cocoa flavor that cuts through the sweetness of the marshmallows. Their candy coating also adds a subtle crunch that’s different from the other ingredients, giving you a surprise pop in every bite. If you can’t find the dual‑color pack, mix regular M&M’s with a handful of dried cranberries for a similar visual effect, though the flavor will shift toward tart.
The Final Flourish
Mini marshmallows melt slightly during baking, creating tiny pockets of gooey sweetness that contrast beautifully with the crisp coating. The vegetable oil is the secret liaison that makes the white chocolate spread like a glossy glaze, preventing clumps and ensuring an even coat. Finally, a half‑teaspoon of sea salt amplifies every flavor, turning the sweet into a sophisticated sweet‑salty masterpiece. Forgetting the salt is a common mistake that leaves the mix tasting flat—always add it.
Everything's prepped? Good. Let's get into the real action...
The Method — Step by Step
Preheat your oven to 300°F (150°C). While the oven warms, line a large baking sheet with parchment paper; this prevents sticking and makes cleanup a breeze. I like to set a timer for 10 minutes just to keep my mind on the task, because if you’re anything like me, you’ll wander off and forget the oven.
In a large saucepan, combine the white chocolate chips, vegetable oil, and sea salt over low heat. Stir constantly; you’ll notice the chocolate softening into a glossy pool that smells like a holiday bakery. This is the moment of truth—if the chocolate starts to seize, lower the heat and add a splash more oil.
Kitchen Hack: Add the oil first, then the chocolate; this prevents the chocolate from overheating and separating.While the chocolate melts, measure out the dry ingredients: rice cereal, pretzel sticks, popcorn, mini marshmallows, and the red‑and‑blue M&M’s. Place them in a massive zip‑top bag or a clean mixing bowl. I swear by the zip‑top method because you can shake the bag vigorously, ensuring every piece gets a thin veil of chocolate without over‑mixing.
Once the chocolate is smooth, pour it directly into the bag with the dry ingredients. Seal the bag, leaving a tiny gap for air, and shake vigorously for about 30 seconds. You’ll hear the satisfying rustle of cereal and pretzels colliding, and you’ll see the chocolate coating each piece like a festive veil.
Spread the coated mixture evenly on the prepared baking sheet. Use a spatula to flatten any clumps; you want a uniform layer so everything bakes evenly. The mixture should look glossy and slightly thick—if it looks dry, drizzle a little more melted chocolate over the top.
Slide the sheet into the preheated oven and bake for 20‑25 minutes, stirring once at the 12‑minute mark. You’ll notice the edges of the pretzels turning a light golden brown, and a faint nutty aroma will fill the kitchen. That sizzle when it hits the pan? Absolute perfection.
Watch Out: Do not open the oven door before the 12‑minute stir; sudden temperature changes can cause the chocolate to harden unevenly.After the bake, remove the sheet and let the mix cool completely on the pan. As it cools, the chocolate will set into a crisp shell that snaps under your teeth. This cooling phase is crucial—if you rush it, the coating stays soft and the mix will be soggy.
Once fully cooled, break the mix into bite‑size clusters and transfer to an airtight container. Store at room temperature for up to a week, or freeze for longer storage. I like to label the container with the date so I never lose track.
Before serving, give the container a gentle shake to redistribute any settled pieces. If you notice any clumps, a quick toss with a clean spoon restores the perfect texture. And now, the fun part—serve this at your next celebration and watch the crowd dive in.
That's it — you did it. But hold on, I've got a few more tricks that'll take this to another level...
Insider Tricks for Flawless Results
The Temperature Rule Nobody Follows
Never underestimate the power of a low‑and‑slow bake. Keeping the oven at 300°F ensures the chocolate sets without scorching, while still giving the pretzels enough time to crisp. I once tried a 350°F blast and ended up with a burnt, bitter aftertaste that no amount of salt could fix. Trust the low temperature; your taste buds will thank you.
Why Your Nose Knows Best
When the chocolate is melting, the aroma is your most reliable indicator of doneness. If you smell a faint buttery scent with a hint of caramel, you’re right on target. If the smell turns overly sweet or starts to smell “cooked sugar,” you’re edging toward over‑melting. Use your nose as a kitchen thermometer.
The 5‑Minute Rest That Changes Everything
After baking, let the mix rest untouched for exactly five minutes before moving it. This pause allows the chocolate to firm up uniformly, preventing any pieces from sliding off the sheet. Skipping this rest results in a sloppy mix that loses its shape when transferred to a container.
Shake, Don’t Stir
When coating the dry ingredients, shaking in a zip‑top bag is superior to stirring with a spoon. The vigorous motion creates a thin, even coat, while a spoon can leave pockets of unmelted chocolate. I’ve tried both; the bag method always wins.
Seasonal Salt Switch
If you’re making this for a summer BBQ, try a smoked sea salt instead of regular sea salt. The subtle smoky note adds depth that pairs beautifully with the sweet marshmallows. A friend tried this once and declared it “the best BBQ snack ever.”
Creative Twists and Variations
This recipe is a playground. Here are some of my favorite ways to switch things up:
Spicy Patriot
Add a teaspoon of mild cayenne pepper to the melted chocolate for a subtle heat that contrasts the sweet. The spice awakens the palate and makes the snack perfect for adult gatherings.
Nutty Celebration
Swap half of the pretzel sticks for roasted almonds or pecans. The nutty crunch adds richness, and the green‑ish hue of toasted nuts adds a new visual layer.
Chocolate‑Lover’s Dream
Replace the white chocolate with milk chocolate and double the amount of M&M’s, using all colors for a rainbow effect. The deeper cocoa flavor makes it a hit with chocolate addicts.
Healthy Harvest
Use air‑popped popcorn, low‑fat white chocolate, and swap marshmallows for dried apricot pieces. You still get the crunch and color, but with fewer calories and added fiber.
Holiday Fusion
For a Thanksgiving twist, add dried cranberries and pumpkin seeds, and use orange‑colored M&M’s instead of red. The mix becomes a festive nod to autumn while keeping the patriotic spirit.
Gluten‑Free Version
Replace pretzel sticks with gluten‑free rice crackers and ensure the cereal is certified gluten‑free. The texture remains satisfying, and everyone can enjoy.
Storing and Bringing It Back to Life
Fridge Storage
Place the mix in an airtight container and keep it in the refrigerator for up to two weeks. The cool environment preserves the crispness of the pretzels and prevents the chocolate from blooming.
Freezer Friendly
For longer storage, spread the cooled mix on a parchment sheet, freeze for 30 minutes, then transfer to a freezer‑safe zip‑top bag. It will keep for up to three months without losing texture.
Best Reheating Method
When you’re ready to serve, preheat your oven to 250°F (120°C) and warm the mix for 5‑7 minutes. Add a tiny splash of water (about a teaspoon) to the baking sheet; the steam revives the chocolate coating, making it snap back to perfection.